 Ah, another birthday, another cake. Vegan Son #3 requested the Spiderman cake I made for Vegan Son #2 last year. I like this cake because it has a simple colour scheme and the pan comfortably fits a double cupcake recipe. The webs are a little tedious, but all in all it is a relatively easy cake to make.
Showing posts with label baking. Show all posts
Showing posts with label baking. Show all posts
Saturday, July 16, 2011
Spiderman Returns: Happy 5th Birthday Vegan Son #3
Ah, another birthday, another cake. Vegan Son #3 requested the Spiderman cake I made for Vegan Son #2 last year. I like this cake because it has a simple colour scheme and the pan comfortably fits a double cupcake recipe. The webs are a little tedious, but all in all it is a relatively easy cake to make.

Monday, July 11, 2011
Vanilla Cupcakes with Bittersweet Chocolate
 A while back we were invited to a birthday party. In preparation, the host sent me the recipe for the cake she was making for the party so I could bring a vegan version. The cake was fairly standard (an old family recipe), but the icing was a bit different because it had two eggs yolks. What caught my eye, though, was the addition of grated bittersweet chocolate to the batter. This is a fantastic way to make a cake that is somewhere in between chocolate and vanilla, but with a more sophisticated look and flavour than a marble cake. Rather than make it in a bundt pan (as the original recipe called for), I opted for cupcakes. I used Isa and Terry's vanilla cupcake recipe and folded 4 oz of grated bittersweet chocolate into the batter. The icing is a standard buttercream with a tinge of yellow colouring to match the colour of the egg yolks in the original, and the drizzle on top is a slightly thinned ganache. In the end, it looked almost identical to the original and was incredibly tasty.
Sunday, July 3, 2011
Glazed Strawberry Pie with Shortbread Crust
 My aunt made a pie like this on my recent trip to the southland (when you live in North Bay, Ohio is the southland) and I thought it would be even better with a shortbread crust. Sort of a tart meets pie meets shortcake kind of thing. Of course, you could just use a pre-baked or pre-made pie shell and be done a whole lot faster. The great thing about this recipe is that you don't cook the berries, giving that juicy fresh berry taste bursting in every bite. So, a big thanks to my aunt for the filling recipe. And be sure to savour every bite because a pie like this only comes around once a year.
INGREDIENTS
Shortbread crust
- 6¾ - 7 oz oz all purpose flour (conversion chart)
- 3 oz icing sugar
- 1/4 tsp salt
- 5½ oz cold Earth Balance margarine
METHOD
1. Sift flour, icing sugar, and salt into a bowl, then cut in margarine and work into a crumbly dough. Add more flour if too wet, or a few drops of oil if too dry.
2. Press mixture into a 9" pie pan. Cover the pie plate in plastic, and refrigerate for 30 mins.
3. Preheat oven to 375. When crust has cooled, prick the bottom and sides many times with a fork. Bake for 15- 20 mins, until a light golden brown all over. Remove and let cool. Make the filling.
INGREDIENTS
Filling
- 6 cups fresh whole strawberries
- 1 cup sugar
- 3 tablespoons cornstarch
- 1/2 cup water
METHOD
1. Mash enough of the berries to measure 1 cup. Place remaining berries in a large bowl.
2. In a medium saucepan, whisk together sugar and cornstarch, then gradually whisk in water and then crushed berries.
3. Cook over medium heat, stirring constantly until mixture thickens and boils. Boil and stir 1 minute.
4. Cool for 10 mins, then pour over berries and gently turn to coat. Transfer to cooled pie crust and chill at least 3 hours or until set.

Friday, July 1, 2011
Kaiser Rolls
Happy Canada Day/Independence Day weekend to all my Canadian/American readers! This is a video double feature recipe to help you make some delicious buns for whatever BBQ adventures you are having this weekend. Both come from Reinhart's Bread Baker's Apprentice and have been adapted and veganized as needed. The first is a pâte fermentée, a basic pre-ferment that can be used for a variety of recipes like French Bread (which I will post at a later date). The thing to keep in mind is that the pâte fermentée needs to be made the day before you want to make your rolls, but it can be kept in the fridge for 3 days. Next are the kaiser rolls. The video is a bit long (yet again) to show the technique needed to get that characteristic shape. Enjoy!
Pate Fermentee from Vegan Dad on Vimeo.
Kaiser Rolls from Vegan Dad on Vimeo.
Tuesday, June 28, 2011
Strawberry Biscuits
Strawberry Biscuits from Vegan Dad on Vimeo.
INGREDIENTS
- 1/4 cup margarine
- 1/4 cup vegetable shortening
- 1 cup chopped strawberries
- 1 cup soy milk
- 1 tbsp apple cider vinegar
- 1 3/4 cups all purpose flour
- 1/2 cup icing sugar
- 1/4 cup sugar
- 2 1/4 tsp baking powder
- 1/4 tsp baking soda
- large pinch of salt
Tuesday, June 14, 2011
Everyday Whole Wheat Bread
Everyday Whole Wheat Bread from Vegan Dad on Vimeo.
My first recipe video. I did not like the video quality via Blogger, so I created a Vimeo account and posted it here from there. I also had to drop the soundtrack because of copyright issues (Facebook deleted it right away), so I will have to work on that. I think I have learned a bit about colour schemes, lighting, shots, etc., so hopefully these get better over time (like learning how to spell "hydrated.") Here's the ingredients if that helps:INGREDIENTS
- 17 oz hard whole wheat flour
- 1 tbsp instant yeast
- 18 fl oz warm soy milk
- 11.25 oz white bread flour
- 2.25 tsp salt
- 4.5 tbsp sugar
- 3 oz oil
Tuesday, April 19, 2011
Hot Cross Buns
 A reader emailed me asking if I had a hot cross buns recipe. I didn't, but I thought that sounded like a great idea for the upcoming Easter holiday. My go-to guy is Peter Reinhart, but his recipe was basically a spiced panettone, which sounded delish but also like way too much work (what with it being leavened by wild yeast instead of commercial). But I do love the taste soughdough starter brings to bread, so I incorporated some into this recipe, veganized and adapted, and came up with this. I used citrus zest instead of candied peel (because I hate it), and it provided the perfect balance to the spiciness of the dough. The buns are chewy and moist, substantial but not dense.
INGREDIENTS
Make 12
Buns
- 1 cup warm soy milk (about 90 degrees)
- 1/2 cup sugar
- 1 tbsp instant or active dry yeast (not rapid rise)
- 1/4 cup sourdough starter (optional, see method)
- 2 tbsp ground flax seed
- 3 tbsp warm water
- 2 tbsp orange juice
- 3 1/2 to 4 cups all purpose flour
- 2 tbsp cinnamon
- 1 tsp nutmeg
- 1/4 tsp cloves
- 1/4 tsp allspice
- 1/2 tsp salt
- 1/4 cup melted margarine, or oil
- zest of 1 orange
- zest of 1 lemon
- 3/4 cup currants
- soy milk for brushing
Glaze
- 1/4 cup water
- 1/4 cup sugar
Icing
- 1 cup icing sugar
- 1/2 tsp almond extract
- 1/2 tsp light corn syrup (optional)
- 2 tsp orange juice (more as needed)
METHOD
1. Mix sugar, soy milk, and yeast together in a large bowl. Let sit until yeast is hydrated (about 1 min for instant yeast, a few mins for active dry). Mix in sourdough starter. If you don't want to use the sourdough starter, just add 2 tbsp of soy milk to the above amount and proceed forth).
2. In a separate small bowl, mix flax seed and water together. Let sit for 1 min to hydrate, then whisk until thickened. Whisk in orange juice, then add to soy milk mixture.
3. Add 3 1/2 cups of flour, spices, margarine, and zests and bring into a dough, adding more liquid or flour as needed. The dough should be firm but still tacky. Knead on a lightly floured surface (or in a stand mixer) for 5-8 mins, until smooth, kneading in the currants right at the end.
4. Place in an oiled bowl, turning dough to coat, cover, and let rise until doubled (1 to 1.5 hours).
5. Line a backing sheet with parchment paper. Divide the dough into 12 equal pieces (about 100g each), and shape into a ball. Place on prepared sheet and press down to flatten. Mist with oil, cover, and let rise until about doubled (30-45 mins). Preheat oven to 400.
6. Before baking, uncover and cut a shallow cross into the top of each bun with a razor blade or sharp knife. Brush with soy milk and bake for 15-17 mins, until a deep golden brown.
7. While buns are baking, bring glaze ingredients to bubbling over medium heat in a small saucepan. When buns come out of the oven, brush with glaze. Let sit for 1 min, then brush with glaze again. Let cool in the pan. The glaze is optional. It adds some sweetness, but also helps keep the buns fresh by sealing them off from the air.
8. When buns are cool, mix together icing ingredients (it should be stiff but not too stiff) and fill in the cross shapes with a piping bag. The corn syrup is optional, but does help the icing retain its shape.
NOTE: If you want to bake these buns up fresh on Easter day, the dough will keep in the fridge (I had my dough in the fridge for 24 hours). So, make the dough, place in a greased bowl, cover, and place in the fridge overnight to rise. On baking day, remove the dough from the fridge, cut into 12 pieces, and shape into buns while still cold (it's a bit harder to do cold). Mist with oil, cover, and let rise in a warm place until almost doubled (this will take about 1.5 hours). Score and bake as per the recipe above. The end result is more tender and a little more complex in flavour.
Sunday, April 10, 2011
New York Deli Rye: Baking Through the Bread Baker's Apprentice
 I know its been four months since my last post on this book, but I still intend to get through it. I've just started refreshing my sourdough starter again (after some neglect) so I can finish off the final recipes. I've made this bread before, and this time around made rolls for lunches during the week. It is wonderfully tasty for all kinds of sandwiches, especially reubens.
GENERAL NOTES:
1. I have no idea what "white rye" flour is, and in any event the bulk food store where I get my flour only sells one kind of rye flour.
2. I always find this dough to be rather wet and end up adding in plenty of bread flour so it can actually be kneaded. I'm not sure if this is because of the onions, or what. It still tastes great in the end, though.
3. I left out the caraway seeds because I don't really like them.
4. I made 4 oz rolls instead of loaves, and baked them at 400 degrees for 15 mins.
VEGAN NOTES
1. Replace buttermilk with soy milk.
2. Make vegan buttermilk by replacing 1 tbsp of the soy milk with apple cider vinegar and whisking.
3. Brush with soy milk instead of an egg wash.
Wednesday, March 9, 2011
Apple Brandy Croissants
 This recipe came to me one night while I was preparing a special meal for Vegan Mom and myself. The original idea was to make Apple Brandy Crepes, but then the croissants were sitting there just begging to be used. The result is absolutely divine. The sweet, syrupy filling runs into the nooks and crannies of the pastry which still imparts a delicate crispiness to contrast the soft apples.
 INGREDIENTS
Serves 2
- 2 croissants, halved lengthwise
- 1 large cooking apple, small dice
- 3 tbsp margarine
- 3 tbsp brandy, divided
- 1/4 cup brown sugar, packed
- 1/8 tsp nutmeg
- 1 tsp cinnamon
- icing sugar for dusting
METHOD
1. Melt margarine in a small saucepan over med-hi heat. Add apples and cook for 4-5 mins, until soft but not mushy. After 2 mins, add in two tbsp of brandy, mix well, and let cook down a bit.
2. Add brown sugar and mix well. Then add the remaining brandy and mix well. Let bubble for a min or so, until nice and syrupy. Mix in spices and remove from heat.
3. Spoon 1/2 of the apple mixture over each bottom slice of croissant. Top with the top slice, then dust with icing sugar.
A Final Word on Lamination
 I know I said I would not post about laminated doughs again, but I lied. Son #2 is going to a birthday party this weekend where they are having croissants (geez, why wasn't I invited to a party like that when I was a kid?) so I need to provide him with a vegan substitute. No problem. So, I added croissants to my baking list on the weekend. I then remembered that the very first recipe I used to make puff pastry used a double turn to laminate the dough. This sounded perfect to me since my weekend baking schedule is busy enough getting ready for lunches for the week. I tried the double turn and it worked perfectly, and meant I got the dough ready in about half the time (considering you need to let the dough rest for about 40 mins between turns, this was significant time savings). Check out the link and try it yourself. As you can see from the pic above, the croissants came out flaky and crispy and delicate, but this could be because I let them rise longer than usual.
Thursday, March 3, 2011
Pain Au Chocolat
 Alas, this is the last of the laminated pastry posts. I had a lot of fun (and possibly gained a few pounds) but I realize that not everyone is game to spend the entire day laminating and baking dough and pastries. Still, if you ever decide to give it a whirl know that it can be done and can be tasty. Pain au Chocolat is a snap to make (provided you have some croissant dough already made). You can also use the same method to make chocolate croissants.
Makes 6
INGREDIENTS
- 1/2 recipe croissant dough
- grated or finely chopped semi-sweet chocolate
- soy milk for brushing
METHOD 1
With the oven at 425 degrees, the pastries spring up quickly and bake to a lovely golden brown. The quick oven rise means that the pastry comes out fairly soft but with a few air pockets.
1. Roll dough on a into 8 x 12 inch rectangle, then cut into six 4 inch squares. Place about a tbsp of the chocolate down the middle the each square, then fold the top 1/3 down and bottom 1/3 up. Gently seal the seam and place seam down on a baking sheet lined with parchment paper.
2. Cover the pastries and let rise for about 1.5 hours, or until nicely swelled.
3. Heat oven to 425 degrees. Brush pastries with soy milk and bake on the middle rack for 15-17 mins. Let fully cool in the pans and serve.
METHOD 2
With the lower oven temp and longer cook time, the pastries rise more evenly in the oven but are a bit drier than the above method.
1. Do Steps 1 and 2 as above.
2. Bake as per the instructions in the croissant recipe.

Sunday, February 27, 2011
Croissants
 Vegan croissants! This is not the first recipe of its kind (Vegan LunchBox had one years ago), but I find these ingredients and method produce a wonderfully light and flaky pastry.
Makes 14
INGREDIENTS
Dough
- 2 tsp instant yeast
- 3 tbsp sugar
- 3 tbsp warm water
- 1 cup cold plain soy milk
- 1 tsp salt
- 2 tbsp melted margarine
- 13 to 14 oz all purpose flour
Margarine Block
- 1 cup Earth Balance margarine (not the whipped kind)
- 2 tbsp flour
METHOD
1. Whisk the yeast and sugar into the water. When yeast is hydrated, whisk in soy milk and salt. Add in melted margarine and flour and bring into a very soft dough. Do not overknead.
2. Transfer dough to a lightly floured surface and roll/shape into a 9 x 13 inch rectangle. Cover with plastic wrap and refrigerate for 30 mins, or until well-chilled.
 3. While dough is chilling, make the margarine block. Use the method described here, but shape it into a 6 x 8 inch rectangle.
4. Laminate the dough: place the margarine block in the bottom half of the dough, making sure there is a about a 1/2 inch border.
 Fold the top half down and seal the edges. Take your time to make sure everything is sealed properly.
5. Making sure your surface is properly floured, place the folded side on our left and roll the dough into a 10 x 24 inch rectangle. Take your time, rolling from the centre to the edges first. Try to square everything up as best you can. With the short side towards you, fold the bottom third up, then the top third down, like a letter. Cover with plastic wrap and refrigerate for 30 mins.
 6. Repeat step five 3 more times, always placing the folded side on your left. After the final turn, refrigerate for a few hours to chill all the way through.
7. To make the croissants, roll the dough into a 9 x 32 inch rectangle. Starting in the bottom left corner, make a notch every four inches along the length of the dough. Then, from the top left corner, make a notch 2 inches in, then every four inches thereafter. With a pizza cutter, cut from the bottom notches to the top to make triangles. (You can make mini pastries with the leftover edges)
8. Gently pull the bottom of the triangle wider then, with the point pointing at you, begin to roll up the pastry. Hold the tip/point with your finger so you can pull the pastry as you roll it up. Place on a baking sheet lined with parchment paper, making sure the tip is on the bottom. You can curve the ends inwards to get the crescent shape if you like. (You can freeze them at this point, then thaw, let rise, and bake later)
9. Cover with plastic wrap and let rise for about 1.5 to 2 hours, until nicely swelled. Preheat oven to 450 degrees. Brush the croissants with soy milk, if you want.
10. Place the croissants in the oven and reduce the heat to 375 degrees. Bake for 15 mins, then rotate the pan and reduce the heat to 350 degrees. Bake for another 15 mins, until a golden brown. Let completely cool in the pan before serving.
Saturday, February 19, 2011
Schnecken and Pinwheels
 Now that you have made your Danish pastry dough, it's time to make some delicious treats! The first method gives you the classic shape people think of when they are offered a danish, the second is a pinwheel sure to impress your friends. The glazes and baking method come from Peter Reinhart, but are fairly standard fare.
SCHNECKEN (makes 12 reasonably-sized pastries)
Line a baking sheet (or two) with parchment paper)
1. On a lightly floured surface, roll 1/2 of the pastry block into a 12 x 9 rectangle. Cut into 12 one inch strips (i.e. they will measure 1 x 9 inches).
2. The dough will shrink back a bit from the cutting, so gently pull each end then twist each end several times to make a spring. Coil the dough and tuck the end under the coil. Place on the prepared sheet, cover with plastic, and let rise for 1.5 to 2 hours, or until nicely swelled and risen.
3. OPTION: Instead of letting the dough rise, you can freeze the formed dough. Place the sheet in the freezer, and when pastries are frozen transfer to a plastic bag.
 PINWHEELS (makes 8)
Line a baking sheet with parchment paper)
1. On a lightly floured surface, roll 1/2 of the pastry block into an 8 x 16 inch rectangle. Cut into 8 equal squares (4 x 4 inches).
2. Cut a notch at a diagonal from each corner to the center, leaving enough space in the middle for the filling. Take the same side of each corner and fold it into the middle, pressing the dough into the middle to hold its shape. Place in the prepared sheets, cover with plastic, and let rise for 1.5 to 2 hours, or until nicely swelled and risen.
3. OPTION: Instead of letting the dough rise, you can freeze the formed dough. Place the sheet in the freezer, and when pastries are frozen transfer to a plastic bag.
 TO BAKE
If you are using frozen pastries, place on a prepared baking sheet, cover with plastic, and let thaw/rise until nicely swelled. This will take a few hours. Then proceed as follows:
1. Preheat oven to 450 degrees
2. Once pastries have risen, use you thumb to depress a section in the middle for the filling. Fill depression with fruit filling (I find it easiest to put the filling in a piping bag).
3. Place pastries in the oven and reduce heat to 400 degrees. Bake for 6 mins, then rotate pan and bake for another 6 mins. Pastries should be golden but not too dark.
4. Brush each pastry with hot glaze (see below), then let cool in the pan for 5 mins. Drizzle with a bit of icing and enjoy while still warm.
FRUIT FILLING
- 1 cup frozen blueberries (or other fruit, chopped if too big)
- scant 3/4 cup water
- 2 tbsp sugar
- 1 tbsp cornstarch
- splash of lemon juice
Whisk water, sugar, cornstarch, and lemon juice together, then bring to a boil in a saucepan over medium heat, whisking constantly. Remove from heat and stir in fruit until well mixed. Let cool.
HOT GLAZE
This recipe will do 12 pastries, so double if you are making more
- 1/4 cup water
- 1/4 cup sugar
Bring ingredients to boiling, then simmer while the pastries finish baking.
ICING
Double if you like a lot of icing
- 1 cup icing sugar
- 1 1/2 tsp light corn syrup
- 2 tbsp soy milk
Mix all ingredient together, adding more icing sugar or soy milk to make a thickish glaze that can be drizzled with a fork.

Friday, February 18, 2011
Danish Pastry Dough
 Here is installment two of my laminated dough series: danish pastry dough. The recipe is adapted and veganized from Williams Sonoma's Essentials of Baking. It is basically an enriched and yeasted laminated dough--I used Tofutti cream cheese to enrich the dough, but you could use a flax egg or just forget about it altogether. Since the dough has yeast it is a little less forgiving than puff pastry in that it can't hang around in the fridge for days. The great thing is that you can form the pastries and freeze them, unbaked, then thaw and bake them later. More on that in my next post!
INGREDIENTS
Dough
- 19 to 21 oz all purpose flour
- 4 1/2 tsp instant yeast
- 1 tsp salt
- 1/3 cup sugar
- 1/3 cup warm water
- 1 cup warm plain soy milk
- 3 tbsp Tofutti cream cheese
- 1/2 tsp vanilla
Margarine Block
- 1 cup Earth Balance margarine (not the whipped kind)
- 1/4 cup all purpose flour
METHOD
1. Whisk 19oz of flour with the yeast and salt. Heat water, soy milk, and cream cheese together until warm and whisk until smooth. Add to the flour with the vanilla and bring together into a dough. Add as much flour as is needed to make a smooth and soft dough. It should not be sticky, but can be slightly tacky.
2. On a lightly floured surface, roll the dough into a 10 x 16 inch rectangle (I like to do this on a pastry mat). Square everything up as best you can. Cover with plastic and refrigerate for 30-40 mins, or until well chilled.
3. While the dough is chilling, make the margarine block. Use the method described here, but make the block 8 x 7 inches. Keep cool until ready to use.
4. Laminate the dough: with the short side of the dough towards you, place the margarine block on the lower half of the rectangle, leaving a 1 inch border. Fold down the upper half, then seal the dough. Take our time to seal everything properly. Place the folded side to your left, then roll into a 12 x 20 inch rectangle. With the short side towards you, fold the bottom third up, then the top half down. Refrigerate for 15 mins.
5. Repeat step 4 three more times, then refrigerate for at least one hour, or until very well chilled, before making pastries.
NEXT TIME: Danishes and Pinwheels!

Saturday, February 12, 2011
Happy Valentine's Day
 Yes, I am a little early with my valentine salutations, but today my three sons and I entered some pieces in a food art competition held at our local public art gallery. If you follow me on Facebook you already know that my concept was to make Sweetheart candies out of cake and emblazon them with vegan slogans. The idea was to juxtapose the familiar colours and shapes of the candies with the more shocking realities of eating animals, and I figured since it was being displayed at an art gallery I could get away with it. I guess the concept worked because I took home first prize! I tried out this recipe for the cake: it was durable (and therefore perfect for this project) but chewy. A little more oil needed, perhaps, or just more liquid in general. I used this buttercream fondant recipe for the icing: it worked perfectly but did not taste very good. Perhaps a 50:50 margarine to vegetable shortening mix is needed.
Son #1 made these mini cupcakes (chocolate from VCTOTW), decorated to look like a box of chocolates.

Son #2 made this "cup"cake. I baked the batter right in the cup with the spoon and all, and he added the topping and chocolate shavings.

Son #3 decorated this little heart cake. Too cute!
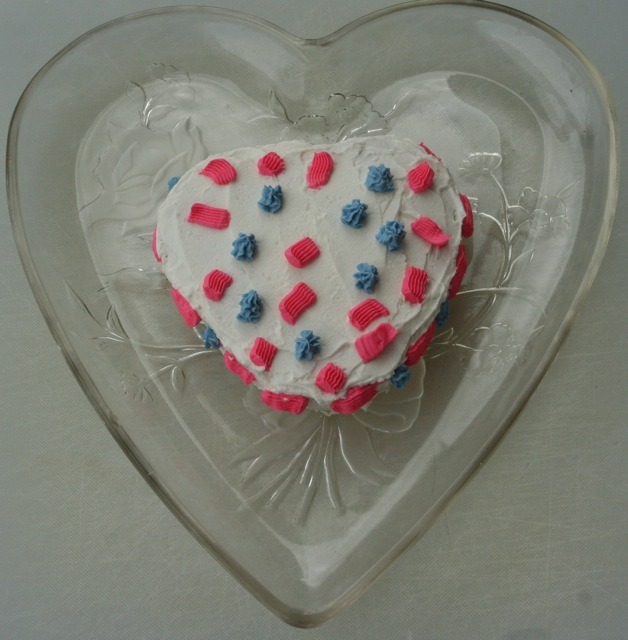 So have some fun with your food this Valentine's Day. I don't suggest giving your sweetie a cake with E. coli stamped into it . . . unless that is his or her thing.
Sunday, February 6, 2011
Chocolate and Strawberry Napoleons
 So this is a take on the classic French dessert and is perfect for when you are throwing a dinner party and want to impress your guests with the amazing world of vegan pastry. It also helps if your guests are not worried about their daily caloric intake. In this version I make a strawberry gel with agar, but you could use some quality jam instead. Fresh berries would also be awesome, too, but since it is the dead of winter I don't have access to any (save the ones from California in the un-recycleable plastic clamshell). On the other hand, the gel helps give it a nice layered look and keeps the final dessert from getting too messy. The trick here is not to go overboard on the creme, and to make sure that all the components have cooled so the creme does not melt. You will have some left over (and some gel) but there are worse things that could happen to you.
INGREDIENTS
Makes 9
-1/4 block of puff pastry (i.e. make this recipe and cut it into 4 blocks)
Ganache
- scant 3 tbsp soy milk
- 2 oz semi-sweet chocolate chips
- 1 tbsp maple syrup
Creme Filling
- 1/2 can coconut milk, refrigerated (not low fat)
- 1.5 tsp brandy
- 2 tbsp icing sugar
Strawberry Gel
- 2 cup frozen strawberries
- 1/2 cup sugar
- 4 tbsp water, divided
- 1 tbsp agar flakes
- icing sugar for dusting
METHOD
Line a baking sheet with parchment paper
1. Roll out the well-chilled dough on a lightly floured surface into a 6x6 inch square. Roll the sides with the folds in them slightly longer, then trim to 6" with a sharp knife (this will help the pastry bake up straight). With a sharp knife, cut the dough into nine 2" squares (i.e. make a # pattern). Transfer to the baking sheet, leaving some space in between them, cover the another piece of parchment, and refrigerate for 30 mins.
2. While the pastry is cooling, make the creme filling. It is essential that the coconut milk be very cold, so make sure it has been in the fridge at least overnight. Drain off the water and place 1/2 the remaining fat in a bowl. Whisk until smooth (this will take a little elbow grease). Add the brandy and icing sugar and whisk well. Place back in the fridge to keep cold.
3. Meanwhile, heat oven to 400 degrees. When dough is done chilling, gently poke through the layers with a fork 2 times, then bake for 22-25 mins, or until nicely golden.
4. Transfer to a cooling rack. As soon as the pastry can be handled, separate each square into three (it should easily divide along the fold lines). Let completely cool.
5. While the pastry is baking, make the strawberry gel. Combine frozen berries with sugar and 1 tbsp of water. In a separate bowl, sprinkle agar over the remaining 3 tbsp of water. Place berries over med-hi heat and bring to bubbling. When berries have softened, mash them with a fork or potato masher. You don't want to completely pulverize them: small chunks is the way to go. Add agar and water and let bubble away for 5 mins over medium heat. The mixture will get a bit thicker. Pour into a 9x13" pan and place into the fridge to cool down.
6. Make the ganache. Heat the soy milk to bubbling, then take off the heat and mix in the chocolate chips. When melted and smooth, mix in syrup until smooth.
7. To assemble:
- dip the top of the bottom layer of pastry in the ganache, as well as the bottom of the top layer. Place in the fridge for a few minutes to firm up.
- Cut the strawberry gel into 2" squares
- Start with your dipped bottom piece, then place a square of strawberry gel on top, then a dollop of creme filling. Top that with your middle piece, then another dollop of creme. Top that with another square of strawberry gel, then your top piece.
- Dust with icing sugar and serve immediately (with a fork).

Monday, January 31, 2011
Quick and Easy Peach-Blueberry Turnovers

OK, so you spent all that time making the puff pastry, but now what? I like wrapping veggies and the like in the pastry for some kind of en croute creation like this, but I always save some dough to make some turnovers. I posted this recipe a while back, but since doing so I got my hands on a copy of Williams-Sonoma's Essentials of Baking and I think this method makes for a nice golden and well-baked turnover. Also, after making puff pastry I am in no mood to mess around with complicated filling.
INGREDIENTS
- puff pastry
- peach jam
- frozen blueberries
- soy milk for brushing
METHOD
Line a baking sheet with parchment paper.
1. How much puff pastry you need depends on how many turnovers you want to make. 1/2 recipe of the puff pastry will make 8 turnovers. If you are making 8, roll the chilled dough into a 9x18 inch rectangle. If you are making 4, make a 9x9 inch square. Cut in half lengthwise, then crosswise to make 8 squares (or four).
2. Spoon a generous tablespoon of peach jam slightly off centre in each square. Top with a few blueberries. Fold over to make a triangle, then seal edges with a fork. Place on the prepared sheet, cover, and refrigerate for 30 mins.
3. Preheat oven to 400 degrees. When the turnovers are chilled, brush them with soy milk and sprinkle sugar over top (regular or large grain). Poke the tops with a fork a few times then bake for 20 mins. Reduce heat to 350 degrees, rotate the pan, and bake for an additional 15 mins, or until golden and nicely puffed up.
4. Let cool for 15 mins in the pan, then serve.
Thursday, January 27, 2011
Puff Pastry
 This is the first of a series of posts on laminated doughs. The basic idea behind a laminated dough is to have alternating hydrophylic and hydrophobic layers that help create rise (or puff, in this case) when baked. Basically, the moisture trapped between the layers of fat cannot easily escape and so up goes the pastry. These posts are the result of me trying to improve my pastry skills and are experiments in the boundaries of vegan baking. I really just wanted to see if I could make these doughs with any success, so you are under no obligation to actually make them since they are rather high in fat. But, if you like a good challenge, then laminated dough will surely test your patience and skill. I have looked through a variety of puff pastry recipes and they are all basically the same, but I have pieced together some techniques that worked well for me. Here is what I did:
INGREDIENTS
For the Dough
- 16 oz all purpose flour
- 4 oz cake and pastry flour
- 1/2 - 3/4 tsp salt (use less salt the more margarine you use for the block)
- 2 tbsp very cold Earth Balance margarine (not the whipped kind) or vegetable shortening
- 6 to 8 oz ice cold water
For the Margarine Block
- 16 oz very cold Earth Balance margarine (not the whipped kind), or up to a 50:50 mix of margarine and vegetable shortening
- 2 tbsp all purpose flour
METHOD
1. First, make the dough. Mix the flour and salt together. Cut the butter into the flour, then add enough of the water to make a soft and smooth dough. It should not be sticky, but it should not be tough, so adjust accordingly. Knead until smooth (about 5 mins with a stand mixer fitted with a dough hook).
2. Place the dough on a lightly floured pastry mat and stretch/pat it into roughly a 12 inch square. Cover with plastic and refrigerate (I do the mat and all to make it easier) for an hour.
3. While the dough is cooling, make the margarine block. Place the margarine (or margarine/shortening mix) on a silicone mat or piece or parchment paper. Starting with your hands, but moving to a pastry scraper when the margarine gets sticky, work the margarine to make it pliable. If you are using a margarine/shortening mix, make sure it is well blended. Sprinkle the flour over top, then use the flat side of the pastry scraper to work it into the margarine. If the mixture gets too warm, stick it back in the fridge for a while and try again later. It is essential to keep everything cool or cold.
4. Lightly spray a piece of parchment paper with oil, then transfer the margarine flour mixture to it. Lightly spray the margarine with oil, then place a piece of cling wrap over top. Using your fingers, press the mixture into a 6 inch square, using the pasty scraper to square everything up perfectly. Place in the fridge until ready to use.
5. Now to laminate. The key here is to make as perfect a rectangle (or square) as possible, and to have your dough an even depth. The trick is to roll from the centre to the corners first, then along the length and width of the dough to even things up. So, remove the dough from the fridge, make sure the pastry mat is still lightly floured, and roll it into a perfect 12 inch square. Remove the cling wrap from the margarine and place margarine side down on a diagonal in the centre of the dough (i.e. it will look like a diamond in the centre of a square. Carefully peel off the parchment paper. Fold the corners into the centre to make an 8" square, make sure no air is trapper inside, and seal the seams. Take your time here, making sure each seam is carefully but firmly pinched together and completely sealed. If your margarine starts squirting out when you begin rolling the dough, all will be lost.
6. Turn the dough over so that the seams are on the bottom, and make sure your pastry mat is still lightly floured (the dough needs to slide on something so it does not stick and tear). Carefully roll the dough into a 24" x 8" rectangle. Do not press too hard or work the dough too fast. If it keeps shrinking back, let it relax for 5 mins and try again. Square everything up as perfectly as possible. Now, with the 8" side facing you, fold the bottom 1/3 up, then to top 1/3 down, like you are folding a letter. Cover in plastic and put back in the fridge for 30 mins. I like to do all this on the pastry mat so I have a rolling surface and a way to measure the dough.
 7. After 30 mins, remove the dough from the fridge. Making sure the seam from the first fold is on your left, carefully roll the dough into another 24" by 8" rectangle. Fold exactly like you did before, and refrigerate for 30 mins. You want to repeat this so that you end up doing six folds in all (yes, this is going to take a while). You could stop at five and no one would notice. With every fold the dough will get more delicate so please be very careful! One errant poke of a thumbnail can tear the dough and ruin your lamination.
8. When all the folding is done, refrigerate the dough for a few hours, or up to overnight. You can also divide the dough in half or quarters, wrap tightly, and freeze for one month.
A NOTE ON MARGARINE: I had the best luck with Earth Balance baking sticks since they best approximate butter in firmness and performance. Softer spreadable margarine led to disaster because it squirted out from between the layers of dough. But, I also find that Earth Balance has a bit of a taste and so mixing it with a more neutral non hydrogenated vegetable shortening can help with that whilst making for a very flaky pastry.
Monday, January 3, 2011
Treacle Tart
 Behold, part two the Harry Potter party recipes! I have never had treacle tart in my life and so I had no idea what I was getting into when the boys requested this English favourite for their party. It took me two tries to get the recipe right. I started with this recipe. My first mistake was glossing over the part of the recipe that called for fresh bread crumbs. I thought it was a little weird that the tart filling would use bread crumbs but, after cracking a few jokes about English cuisine, I charged ahead with regular ol' dried bread crumbs. Quelle disaster. The tarts baked up so hard you could sand the floor with them. My second mistake was using water in the shortbread crust--that makes it bake up like concrete. I then checked out this recipe. I thought the proportion of syrup to bread crumbs looked better in this recipe, but was dubious that it would make enough filling to fill a 9" crust. So, after much trial and error, here is my recipe (and it was really tasty).
Shortcrust Pastry
INGREDIENTS
- 6¾ oz all purpose flour
- 3 oz icing sugar
- 1/4 tsp salt
- 5½ oz cold Earth Balance margarine
METHOD
1. Sift flour, icing sugar, and salt into a bowl, then cut in margarine until mixture resembles coarse bread crumbs.
2. Press 2/3rds of the mixture into a 9" pie pan, making about a 1" lip. Drizzle a few drops of oil over the remaining dough and press it into a ball. Wrap the dough ball in plastic, cover the pie plate in plastic, and refrigerate for 30 mins.
3. Preheat oven to 375. When crust has cooled, prick the bottom with a fork, line with aluminum foil, and fill with dried beans (or pie weights). Bake for 15- 17 mins, until just lightly golden. Remove beans (or weights) and parchment. If the bottom of the crust seems moist, return to the oven for 1-2 mins to dry out. Remove and let cool. Make the filling.
Filling
INGREDIENTS
- 270g golden syrup (I used Lyle's)
- 150 g fresh bread white bread crumbs (I pulsed bread slices in the food processor)
- grated rind and juice of one lemon
METHOD
1. Heat syrup in a saucepan over med-lo heat, until runny. Add breadcrumbs, lemon rind and juice, and mix well. Pour into cooled crust.
2. Roll out remaining crust in a lightly floured surface and make a lattice top. Protect pre-baked crust with foil, and bake for about 24 mins, until pastry is golden and filling is set. Serve warm.
I noticed that clotted cream is a popular addition to a slice of treacle tart. You could try this recipe. I did not have the required ingredients, so I whisked 1 tbsp of sugar into the cream scraped off the top of a can of coconut milk left in the fridge.

Saturday, January 1, 2011
Butterbeer
 Vegan Mom came up with the great idea to make New Year's Eve a Harry Potter Day for the kids. We played Potter-related games, watched The Goblet of Fire, and ate Potter-inspired food. The kids had a blast and so did I, though I have a lot more sympathy for the house elves now. When we solicited the kids for food ideas, butterbeer was at the top of the list. The Googles pointed me to a variety of recipes, all similar in that they mixed some kind of butterscotch flavour or syrup with soda (usually cream soda). The recipe posted on this blog looked the best to me, though perhaps is the most complicated. Of course, it needed the appropriate veganizations. Here is what I did:
INGREDIENTS
- 1 cup brown sugar
- 2 tablespoons water
- 6 tablespoons Earth Balance margarine, cubed
- ½ teaspoon cider vinegar
- 1 can light coconut milk
- ½ teaspoon rum extract
- large bottle plain (i.e. not pink) cream soda (I used a 1.5 L of Fanta)
METHOD
1. Place brown sugar and water in a small saucepan over medium heat, stirring constantly until mixture reads 240F on candy thermometer.
2. Remove from heat and stir in the butter, salt, vinegar and 1/4 cup of coconut milk. Set aside to cool to room temperature. When cool, mix in rum extract.
3. To serve: pour 2-3tbsp of the butterscotch mixture into the bottom of a small glass. Add in some cream soda and mix well. Top up with more cream soda. Then, pour about 2 tbsp of coconut milk down the back of a spoon on top.
VERDICT: This stuff will put you in a sugar coma in 2 seconds flat. The link above suggested using club soda, so you could try that. It's not exactly the warming beverage the books describe, but it's not bad. I did not use all the butterscotch syrup, but that's OK--it will be awesome over ice cream.
I also made pretzels that are supposed the be shaped like the deathly hallows symbol. Each pretzel is 3oz, brushed with some margarine after baking (450 for 15 mins), and sprinkled with a little kosher salt.

Subscribe to:
Posts (Atom)


