Saturday, October 17, 2009

Pumpkin Rolls (and Bread)

Tonight's post is kind of two ideas in one. First, adding pumpkin to just about any kind of bread is a good idea. I peel and seed the pumpkin, chop it, and boil it in water for about 30 mins until it is soft. I then drain it and blend it in a food processor until very smooth. I have found that this puree can be subbed in for water in bread recipes, almost cup for cup. Start by simply replacing the water with the puree, then add in more as needed. It gives the bread a wonderful light orange/yellow colour and makes it tender and moist.

Second, I give you mini buns. Not really a ground-breaking idea, I know, but hear me out. This year the boys' school changed to something called the equal day. Instead of two recesses and a lunch break, the kids get two 40 min "nutritional breaks," one in the morning and one in the afternoon. This makes packing food a little more interesting, but I have had great luck with these mini buns. The recipe is Peter Reinhart's Italian bread recipe from The Bread Baker's Apprentice: the starter is made as per the book, but the final dough is made with whole wheat flour, and the water is replaced with pumpkin puree. Each bun weighs 50 grams, is brushed with soy milk after rising, and is baked at 400 degrees for 14 mins. The great thing about these is that there is no crust to leave behind, so the kids gobble them all up, one in the morning and one in the afternoon. I make 40 of them at a time (double batch of dough), freeze them, and pull them out as I need them throughout the week.

Wednesday, October 14, 2009

Apple Juice

We have apples coming out of the wazoo! I guess it is too cold to grow apples up here (there are no local orchards that I know of), so my in-laws bring us a whole whack of apples from down south every fall. So, after making apple pie, apple crisp, and huge batch of apple sauce, we still had tons left. The obvious thing to do next was to try my hand at apple juice. OK, first just let me say that apple juice is A LOT of work. I don't know how they can sell huge cans of it for 99 cents. I started with a recipe in my canning cookbook that called for 24 lbs of apples to be chopped, cooked in 8 cups of water, then hung in a cheesecloth and left to drip for 2 hrs. That sounded like too much work, plus I doubted any cheesecloth could hold 24 lbs of cooked apples. Enter my Jack LaLanne power juicer! I figured the juicer would eliminate the initial cooking step and perhaps filter the juice a bit. Well, it didn't work exactly as planned since the juice still needed considerable straining to filter out all the sediment. Here is what I did to get a delicious juice with an amber colour and cidery taste. Son #1 set up the photo for tonight's post.

EQUIPMENT/INGREDIENTS
Makes about 6L of juice
- 24 lbs apples
- 1 juicer
- 2 clean tea towels, damp (they will get stained)
- two large pots/bowls
- kitchen thermometer
- 6 1L canning jars and lids

METHOD
Sterilize your jars. Get a large pot of water boiling to process the jars of juice.
1. Use large rubber bands to affix the tea towels over the top of the pots/bowls. Don't make the towel tight over the bowl; rather, make sure it dips into the bowl so it can hold the juice.
2. Working in batches, chop the apples and process them through the juicer. Pour into the towel over one of the bowls and let drip through. You will find that the towel quickly gets gummed up with a pectiny residue, so I made this a pretty rough filtering. Once most of the juice passed through, I detached the towel and squeezed the remaining juice through. Then, I poured it through the other towel while I cleaned the first towel. I then passed it through the first towel once again.
3. Once all the juice has been filtered, heat to 190 degrees F and keep at that temperature for 5 mins. Pour into jars, top with lids, then screw the ring on finger tight. Place in pot of boiling water (making sure water covers lids), return to boiling, then boil for 10 mins with lid on. Remove from heat, remove lid, and let sit for 5 mins. Remove jars from water and let cool.

Monday, October 12, 2009

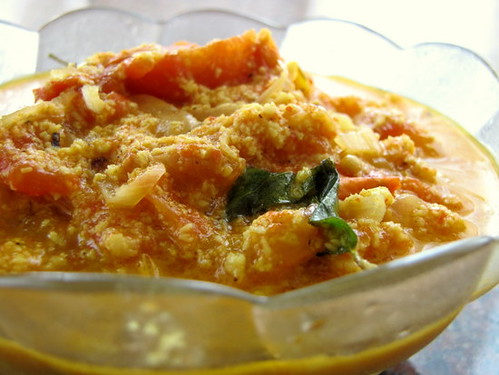
Thakkali Muringakka Aviyal Recipe / Tomato and Drumsticks in Coconut

I don't know if this a common Kerala recipe but ever since I can remember amma has been making this a quick side dish for Chicken Biryani. Her rationale is, biryani is intense and doesn't have coconut and any Malayali should know that we always pair curries with coconut and without coconut together, to balance the flavours.

Amma sent me the recipe through my uncle who typed it out while she listed the things to be done. The picture was taken in Kottayam when I was there this August and amma made it, not me :)

thakkali muringakka aviyal

Thakkali Muringakka Aviyal Recipe
Source: My mom
Preparation time: 30 mins

What Is Needed:

4 tomatoes, sliced into six long pieces
1 drumstick / muringakka, cut into 3" pieces
1/2 cup grated coconut
12 peeled shallots / chinna vengaayam / cheriya ulli
2 flakes garlic
1/4 tsp jeera / cumin seeds / jeerakam
1 tsp red chilly powder
A few curry leaves
1/4 tsp mustard seeds / kaduku
1 tbsp oil (preferably coconut oil)

How Its Made:

1. Add the chopped drumstick to about 1 cup water with with some salt and the chilly powder. Keep on a medium flame and cook until soft. The mixture shouldn't be too watery, so if it is, boil some more on a low flame.

2. To this, add the cut tomatoes and cook some more until the tomatoes begin to soften.

3. Grind together - coconut + jeera + garlic to a coarse paste.

4. Heat oil in a pan and add the mustard seeds. When they pop, add the shallots and curry leaves. Fry for about 2 mins, until the shallots soften.

5. Next, add the ground coconut paste and fry for another 1 min. To this, add the drumstick and tomatoes. Mix well. Simmer for 2-3 mins until well combined. Adjust salt.

Serve hot with steamed white rice or chicken biryani.