Showing posts with label Cheese. Show all posts

Wednesday, March 16, 2011

Green Mint Chutney & Cheese Sandwiches

Picnic food is fun to make, especially if you are not really going on a picnic but just pretending to on a rainy, weary weeknight.

About once a month, TH and I have sandwiches for dinner. Its just one of those inexplicable things we do.

DSC_2430

Since I got my mint plant, there's no dearth of fresh mint and I love using fresh herbs in my cooking. Well, don't we all?

This is a quick sandwich recipe that works great for a picnic, tiffin box or even brunch or tea party. It tastes great and is filling too!

Mint Chutney and Cheese Sandwiches
Makes 4 - Serves 2

Ingredients:
8 slices of bread of your choice
4 slices of cheese

For the Mint Chutney:
A bunch of fresh mint leaves
1/2 cup freshly grated coconut
1 green chilly
1/2 tsp minced garlic (optional)
A pinch of dry ginger powder or 1/2" piece of fresh ginger
Salt to taste

Grind all ingredients together with very little water to a smooth paste.

To assemble and toast the sandwiches: Spread a generous amount of the mint chutney on one side of the bread slice. Top with a slice of cheese and toast in a sandwich maker until done. You can also toast in a pan on the stovetop with a pat of butter until both sides are golden brown and the cheese has melted.

DSC_2440

Serve hot with ketchup.

Monday, September 6, 2010

Golden Onion Mushroom Quiche Recipe

This month's 'A Sweet Punch', although not sweet, came out fantastic! This is another one of those why-on-earth-did-I-ever-think-of-making-these kinda recipes.

I would highly recommend this golden onion mushroom quiche recipe to beginner bakers. You know why? Its going to make you feel awesome and so much more confident because its practically no-fail.

Golden Onion Mushroom Quiche Recipe

Golden Onion Mushroom Quiche Recipe
Makes 8 generous wedges and 4 mini quiches

Ingredients

For the pastry:
1 cup + 2tbsp flour (200gm)
100gm unsalted butter, frozen
1/4 tsp baking powder
1 beaten egg
A generous pinch of salt

For the filling:
2 cups chopped mushrooms (I used button mushrooms)
1 large onion, chopped
1/2 cup milk
3/4 cup shredded cheddar cheese
2 beaten eggs
Freshly ground pepper
Salt to taste
1 tbsp oil


How I Made It:

For the pastry:

Golden Onion Mushroom Quiche Recipe

Mix flour, salt and baking powder together. Ideally, you should sieve this. Ideally. Grate the frozen butter and mix it well with fingertips until the mixture resembles coarse sand.

Sidenote: I would recommend grating the butter only if you have someone to outsource the washing of the said grater. If not, just cut the butter into cubes and follow this process.

Golden Onion Mushroom Quiche Recipe

Add the egg and bring the dough together. You can add a few drops of ice cold water if needed at this stage, but I didn't have to. Transfer the dough to a floured surface.

Golden Onion Mushroom Quiche Recipe

Roll it out about 1/2" thick. Its fine even if its not an even circle or whatever. Just make sure the thickness is more or less even all around.

Golden Onion Mushroom Quiche Recipe

Next step is to gently transfer this to a greased pie dish. Here's what I used. I bought this pie dish ages ago anticipating this exact moment! Well, not really, but atleast it was put to good use after 7 months of buying it.

Golden Onion Mushroom Quiche Recipe

Gently lift the rolled out dough and lay it over the dish. Press it down lightly at the bottom and along the sides. If there's a gap somewhere, just take the overhanging dough fromt he sides and patch it up. Go on, nobody needs to know. I did it along the top and left hand side, can you tell? Of course you can, but, it doesn't matter. That's the beauty of a quiche.

Refrigerate this crust while you put together the filling.

Pre-heat the oven to 350F / 180C.

To prepare the filling:


Heat the oil in a pan and fry the onions until golden brown. Add the mushrooms and saute until soft and all the water has evaporated from the pan. Top off with ground pepper and salt and mix well. Cool completely.

Golden Onion Mushroom Quiche Recipe

Break 2 eggs into a bowl and beat lightly. I know there are three in there but I ended up with a lot of extra filling and I really don't want you to waste good ingredients. So stay with me here, ok? Only 2 eggs needed.

Golden Onion Mushroom Quiche Recipe

Add 1/2 a cup milk to the eggs.

Golden Onion Mushroom Quiche Recipe

And top off with about 3/4 cup of shredded cheddar cheese. Mix well.

To assemble and bake:

Golden Onion Mushroom Quiche Recipe

Bring out the prepared crust from the fridge.

Golden Onion Mushroom Quiche Recipe

Lay the onion mushroom mixture evenly on it.

Golden Onion Mushroom Quiche Recipe

And top off with the milk-egg-cheese mixture until it reaches almost up to the top of the crust.

Golden Onion Mushroom Quiche Recipe

Bake until the top turns golden brown and patchy in parts and the crust turns golden - about 25 to 30 mins.

Golden Onion Mushroom Quiche Recipe

Cut into wedges and serve warm.

Golden Onion Mushroom Quiche Recipe

I had some leftover dough and filling so I made 4 of these adorable mini quiches with it in these tart moulds that came with my old oven. These only need to be baked for about 20 mins and are fantastic single-serving portions for parties or potlucks.

This was a great "Sweet Punch" for September. Will link to the roundup as soon as its done. Thanks ladies!

Tuesday, August 3, 2010

Cheesecake Truffles Recipe

I love cheesecake but the slightly tedious process of making cheesecake, the water bath, the baking of the crumb, etc etc makes me want to just walk over to Secret Recipe and eat their perfectly baked cheese cake. And, I can choose what flavour I want!

So as you can see, I am a quick and easy bakes kinda person. I love my baked goodies but I want them quick and I want them good. That also explains why I made these delicious truffles.

Cheesecake Truffles Recipe

These is not a cheesecake in the conventional sense. Its a crust-less cheesecake, more like truffles, that's dipped in chocolate. Yumville!

Cheesecake Truffles Recipe

The recipe is from my absolute favourite baking book - A Passion for Baking by Marcy Goldman!

Cheesecake Truffles
Makes 20 small truffles

Ingredients:

For Cheesecake Batter:
250gm cream cheese (about half a pound), softened at room temp
1/2 cup sugar (or a little less)
2 eggs
1 tsp vanilla extract
1/3 cup whipping cream (or normal cream)
Small pinch of salt

For Dipping Chocolate:
8 ounces of semi sweet or milk chocolate, melted (I used Hershey's semi sweet chocolate bar)


Cheesecake Truffles Recipe

How I Made It:


1. Pre-heat oven to 350F. Line a brownie pan with parchment paper and set aside.

IMG_2938

2. Whisk together all the ingredients for the cheesecake. Isn't that gorgeously simple?!

Cheesecake Truffles Recipe

3.  Bake for about 35-40 mins until the cake is spongy but doesn't dry and curl in from the sides.

IMG_2956

4. Cool completely and don't poke it with your fingers like I did.

Cheesecake Truffles Recipe

5. Using small cookie cutters or ice cream scoop, make small pieces of the cheesecake.

Cheesecake Truffles Recipe

6. Oh by the way, don't forget to melt the chocolate and set aside to cool.

Cheesecake Truffles Recipe

7. Dip the cheesecake pieces into the melted and cooled chocolate and transfer to a plate lined with parchment paper or a baking sheet (so that it doesn't stick to the plate). You can also try using a greased plate for this in case you don't have parchment paper.

Cheesecake Truffles Recipe

8. Don't worry if it doesn't look that glam because the chocolate is dripping around the cheesecake pieces. Trust me and stick the plate into your freezer for about 2 hours.

Cheesecake Truffles Recipe
Serve the cheesecake truffles frozen or chilled. 

Need I say again that this is the most easy and quick cheesecake recipe I have seen? Once the cheesecake was done, it tasted so good as is (yes of course I tried it) so I am thinking of using a crush and the same cheesecake recipe to bake up a good 'ol proper cheesecake. Will let you know how that comes out, ok? Meanwhile, do yourself a favour and go bake this! Your family and guests will be wow'ed, guaranteed ;)

PS: you can dress these up by drizzling some melted white chocolate over the truffles, like you see in the book. I didn't have any white chocolate handy.

PPS: Marcy says chocolate chips won't work in this recipe. So to make the dipping chocolate for the cheesecake truffles, use chocolate bars.

PPPS: Check out my review of A Passion for Baking by Marcy Goldman.

Sunday, December 13, 2009

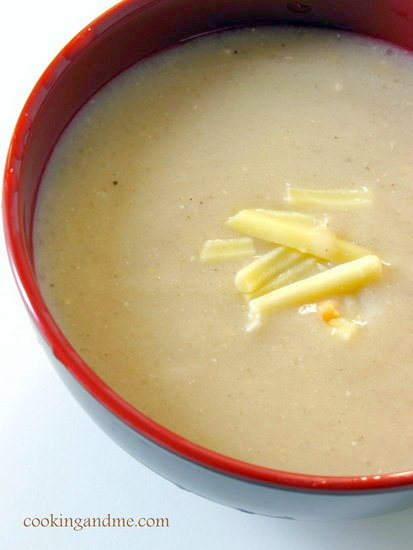
Cheddar Cheese Soup Recipe

This is from Nita Mehta's Soups, Salads and Starters. I was slightly skeptical when I read the name of the soup but since I had some cheddar cheese lying around and really wanted to use it up. The soup was a pleasant surprise, not as heavy as I expected but quite filling and creamy.

Cheddar Cheese Soup
Source : Nita Mehta's Soups, Salads and Starters
Serves : 5-6

What I Used:

2 onions, chopped
3 medium potatoes, peeled and chopped
25gm (1 cube Amul cheese) cheddar cheese, grated
2 tbsp butter
1 cup milk (I used low fat 'cuz that's all I had)
5 cups water
1/2 cup sour cream (I didn't use this)
1/2 tsp freshly ground black pepper
1 tsp salt

To Garnish:

Croutons
25gm (1 cube Amul cheese) cheddar cheese, grated
Fresh coriander leaves (optional)

How I Made It:

1. In a pressure cooker pan, add the butter and brown the onions lightly.

2. Add potatoes and saute for 1-2 mins. Then add the water and pressure cook for 3-4 whistles. Remove from fire.

3. When cooled, blend the pressure cooked onions and potatoes in a mixer to a puree, along with the water used for cooking them.

4. Strain the puree (I didn't do this) and set aside.

5. Boil the milk separately. Bring the strained pureed soup separately to boil and add the milk, stirring continuously. Simmer for 2-3 mins on low flame.

6. Add grated cheese, salt and pepper.

7. Finally add the sour cream, if using, keeping the soup on very low flame and stirring continuously. Remove from fire.

8. To serve, grate top off with some grated cheese and toasted croutons with coriander leaves if using. Serve hot.
This goes to Monthly Mingle - Soups, conceptualized by Meeta and hosted this month by Sunshinemon. Thanks for reminding me, Sonia :)

Tuesday, May 5, 2009

Cheddar Cheese Muffins Step By Step Recipe

A while back, I bought a packet of cheddar cheese because it was on sale. In Singapore, practically any kind of cheese is expensive. The usual price for a 200gm packet starts at $5 so I normally don't buy and keep it. Even cheese singles are a rare item in our grocery list. So anyway, when this particular packet of cheddar cheese was on sale, I had to buy it. So I did.

I waited a week before hitting the 'urgent' button and looking around for easy muffin recipes. I found a bunch of interesting recipes, some were eggless, some were butter-less, some required vegetable oil, etc etc etc. I went through about a dozen muffin recipes before I felt I can do this on my own. So I did.

Here are my cheddar cheese muffins. Pretty no? They are really simple to bake. Really!

Let's get started with flour. I decided to use half all-purpose flour and half wheat flour (atta). You can go with just ap flour but if you decide to use only atta,then try at your own risk.

You'll need 1.5 cups of flour in total. I used 3/4 cup all-purpose flour and 3/4 cup atta.

Measure them and add to a dry bowl.

Now add about 1/4 cup sugar. I wanted the muffins to be equally salty as sweet so I went a bit easy on the sugar. Feel free to add a bit more if you want them on the sweeter side. Oh, and I used brown sugar but white sugar should work perfectly fine too.

Now comes the salt. Add slightly more than 1/4 tsp. Remember to adjust this depending on how salted your cheese is.

The same amount of baking soda - about 1/4 tsp.

Baking powder is an important ingredient while baking so add in 1/2 tsp. Trust me on this, ok?

Now that we have all our dry ingredients in the same bowl, mix them well. Make sure that you cannot make out one ingredient from another once you are done mixing.

Time to bring out the cheddar cheese. I bought them grated. You can buy chunks if you want or if you are in India, you can get Amul cheese cubes but make sure you reduce the salt you add because those cubes are heavily salted.

Dunk in about 1/2 cup grated cheddar cheese.

Mix mix mix.

Add one small egg about 2 tbsp butter. Again, if using salted butter, go easy on the salt in the beginning. I used unsalted butter at room temperature to make the mixing process easier.

Add a little less than 1 cup milk to the above mixture. I am sorry for the weird measurements but if you add the whole cup, the batter may get too watery. Add 3/4 cup and then add little by little from there.

Here's how the batter should look in the end. Its more watery than cake batter, something like the consistency of pancake or dosa batter.

Line a muffin tray. If you don't have muffin cups, just grease the tray with some butter. I'd recommend rubbing the muffin cups with some buter too because my muffins stuck to their cups like they didn't want to ever let go. It was slightly hard to pry them out.

Pour batter upto 3/4 of the way. These muffins don't rise all that much so you can pour slightly more if you want.

Bake for about 25-30 mins in a 200 C preheated oven.

I had enough batter for 6 muffins and then 2 ramekin-sized muffins. So this amount of batter should make about 10 muffins, regular sized.

Baking in ramekin made it softer though the baking time was another 5-8 mins extra.

The consisteny of the muffin is more spongy and chewy than soft like normal muffins. I loved it with tea and it stored well for a day, though it got slightly more dense than when it was freshly baked.

Here's the recipe again, all in one place.
Cheddar Cheese Muffins Recipe
Makes 10 muffins

What I Used:

Flour - 1.5 cups (I used 3/4 cup all-purpose flour and 3/4 cup wheat flour)
Sugar - 1/4 cup
Salt - 1/4 tsp
Baking soda - 1/4 tsp
Baking powder - 1/2 tsp
Grated cheddar cheese - 1/2 cup (you can use Amul cheese cubes available in India)
Egg - 1 small
Butter - 1.5 tsp (use unsalted or if not, regulate salt amount above)
Milk - 3/4 cup and a little more

How I Made It:

1. Mix all the dry ingredients well together (upto baking powder in the ingredients list)

2. Add the cheese next and combine well.

3. Then add the agg and butter and mix well to get a sticky mixture.

4. Finally, add the milk and mix well to get a loose batter.

5. Preheat oven. Pour the batter into greased muffins pan and bake in a 200 C oven for about 30 mins. The top will turn a golden brown.

Serve warm with coffee. Stores well for upto a day.

This recipe goes to Poornima's My Favourite Things - Cheese event, originally started by Bindiya.

I would also love to be part of the group celebrating Mother's Day with Ivy of Kopiaste.

Its been a while since I posted an original recipe so these muffins also make their way to Culinary's Original Recipe round-up.

Sunday, December 21, 2008

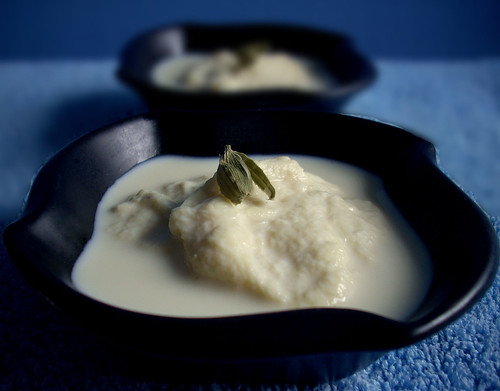
Quick and Easy Rasmalai Recipe

Here is a recipe I have been dying to post. Its from my mother-in-law and its the most easy and quick rasmalai recipe ever! Promise!

But wait, what is rasmalai? Its sweetened, flattened or round balls of paneer (Indian cottage cheese) soaked in milk cream. Sounds yummy? That's 'cuz it is!

So in case you want to celebrate the holidays with some Indian dessert, whose sweetness level you can control, then this one is for you. Did I mention its super easy?

The recipe does use eggs, which would probably make the inventors of rasmalai turn in their graves, but the taste is not compromised one bit and there is no 'eggy' smell at all.

What I Used:

For the pieces

Milk Powder - 1.5 cups
Egg - 1

For the liquid base

Whole cream milk - 4 cups
Sweetened condensed milk - 1/2 tin (adjusting according to the size of your sweet tooth)
Crushed cardamom - 3
You can use other flavoring of choice like rosewater, pistachios, almonds, saffron, etc.

How I Made It:

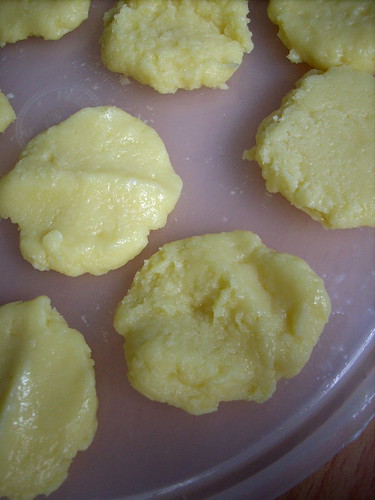
1. Mix the egg and the milk powder together to form a thick, sticky dough-like mass. Divide into lemon sized balls and flatten gently on palms. If too sticky, dampen palms. Lay these flattened pieces without overlapping, on a tray.


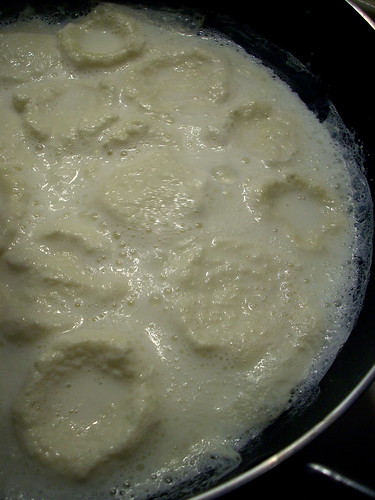
2. Heat a wide bottomed pan and bring the milk to boil. Once it starts boiling, bring the heat to sim and gently, very gently, add the milk powder-egg discs to this.

3. You don't need to mix or stir much, but be careful to give the discs enough space from each other in the liquid. They will expand a bit when they start cooking.


4. After about 10 mins, add the crushed cardamom and. Let it cook for another 10 mins.

5. When the pieces have expanded considerably and seem soft and cooked through (take out once piece, break and check inside if the dough is still sticky), remove from fire.

6. Add the condensed milk when still hot and mix gently. Adjust amount according to sweetness required.

Chill before serving.

Now you can tell me you love me for this quick and easy rasmalai recipe :)

I am sending this to FIC - White over at Kitchen Flavours.