Showing posts with label Chutneys Dips and Spreads. Show all posts

Sunday, February 13, 2011

Mint / Pudina Coconut Chutney Recipe

I bought a mint plant the other day and its growing like a wild bush in its small pot. To use up some of the fresh and insanely flavourful leaves, I made a mint coconut chutney to go with wheat dosas

DSC_1023
Yes, they are over-exposed, but too lazy to edit much :D
Its incredibly simple and takes all of 10 mins to whip up. That's my kind of dinner, any day night!

mint chutney 3

Mint / Pudina Coconut Chutney
Serves 2

Ingredients:
1 cup fresh grated coconut (not desiccated)
1/2 cup loosely packed fresh mint leaves
2 shallots
A tiny piece of ginger
A tiny piece of tamarind
2 green chillies (adjust to taste)
Salt to taste

To make chutney - grind all ingredients with very little water. Serve immediately with dosa, or even rice. This goes really well with the slightly dense and bland wheat dosa.

mint chutney 2

All pictures in this post taken in the home made light box for food photography.

Tuesday, January 25, 2011

Fresh Basil Pesto Recipe

Its not super easy to get fresh basil in Singapore. Its not impossible either but somehow, when I do come across them in the supermarket, I feel they are wilted and cost too much. Why bother when there are a gazillion different types of other greens around, that are more local.

Fresh basil pesto recipe

I did, however, manage to score an entire bag of super fresh basil in Giant supermarket a couple of weeks back. Ooh the flavour was mindblowing. Although I have tried pesto pasta and pesto chicken before in restaurants, making your pesto is way way better! I was a bit skeptical if TH would like it but he actually loved the pesto pasta I made with (recipe coming up next!)

fresh basil pesto recipe

Fresh Basil Pesto 
Makes about 3/4 cup

Ingredients:
4 cups fresh basil leaves
1/2 cup extra virgin olive oil
3/4 cup grated parmesan cheese
1 tsp minced fresh garlic
1/3 cup pine nuts
1/2 to 1 tsp freshly ground black pepper
Salt to taste

How I Made It:

Dunk all ingredients into a mixer or food processor and grind to an almost smooth paste. Can be served in various ways, most popular being pesto pasta, over toasted bread, in pizza, etc. Can keep refrigerated in an air tight container for up to 3 days.

You can also substitue the pine nuts for walnuts, sunflower seeds (I tried these once and loved it!), or any other nuts you have in hand.

fresh basil pesto recipe

First two pictures in this post taken in the home made light box for food photography.

Thursday, December 9, 2010

Guacamole Recipe + Winners

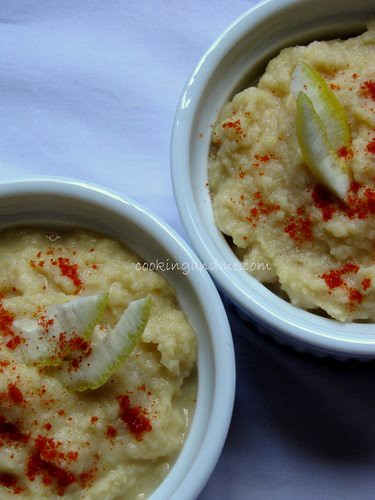
I love avocados. Guacamole is something that regularly gets made as a sandwich spread for TH to take to work. In fact, I don't even think I have tried an avocado smoothie at home before, although I have tried some delicious ones all over Singapore. 

DSC_0954-1

Last weekend, uncharacteristically, I made these for brunch on Saturday and the lighting was just perfect for some shots for the blog. I Indianize the recipe quite a bit by using Indian green chillies and shallots in my guacamole. The flavour is amazing and we love it with some toasted bread!

DSC_0943

Guacamole Recipe
Serves 2 / Fills 4 Sandwiches

Ingredients:
1 ripe* avocado
2 shallots
1 Indian green chilli (or a chopped jalapeno)
Half a tomato, deseeded and chopped fine
Juice of half a lemon or 1/4 of a lime
Chopped fresh coriander leaves (optional)
Salt and pepper to taste

How I Made It:

1. Draw a knife deep into the avocado all around it, length-wise. Gently twist it around until the two halves fall apart and the seed is exposed. Remove seed, scoop out the green flesh with a spoon and place in a bowl. Mash well with a fork.

2. Grind the shallots and green chillies in a pestle and mortar (for best taste) or in a small grinder until roughly mixed.

3. Mix with the shallot-chilli paste along with all other ingredients with the avocado. Taste-test to adjust the sourness, saltiness and spice level. I usually adjust the amount of lime and salt to make it just right. It largely depends on personal taste.

4. Serve with tortilla chips, toasted bread wedges, rolled into a chapati, as you wish!

DSC_0980

Notes

- to check if an avocado is right, press lightly near where the shoot end is see if its soft. If its hard there, its definitely not ready for use yet. Another trick is to hold it in your palm and see if it yields to squeezing.

- to make the avocados ripen faster, leave in a brown paper bag and don't refrigerate.

- to prevent browning, the lime juice will help. Some swear by leaving the seed in with the chopped avocados but I haven't tried this yet.

Enjoy this buttery, yummy fruit. Its high in Mono-Unsaturated Fats and apparently helps you lose weight if taken in moderation :)

-----------------------------------------------------------------------------------------------

There were 104 comments on the $25 cooking.com giveaway post. The 2 lucky winners of the coupons are Kalyani and Sadhana Ginde. Ladies, I have contacted you already with the coupon codes so happy shopping and hopefully you share with us what you bought with them.

Disappointed that you didn't win? Please don't be! More giveaways and fun coming your way very soon!!

Sunday, October 24, 2010

Andhra Peanut Chutney Recipe

A friend, Indy, has been asking for a Peanut Chutney recipe for ages now. I do make it now and then but its mostly my own version, peanuts often added to give it some texture or when I don't have enough coconut to make a plain coconut chutney. 

Peanut Chutney Recipe

 I wanted to give her the Andhra peanut chutney recipe and I wanted to make it first to see it tasted good enough to share. I took inspiration from both Sailu and Indira but preferred to keep my chutney more dry than watery. The consistency its totally up to you but onto the recipe now. 

Andhra Peanut Chutney Recipe
Serves 2

Ingredients:
1 cup raw, unsalted peanuts
5-6 dry red chillies (adjust to taste)
3 flakes of garlic (or 1/2 tsp garlic paste)
3 shallots, sliced (or use 1 small onion)
A marble-sized piece of tamarind (or 3/4 tsp tamarind paste)
1 tsp oil

For tempering:
1 tsp oil
1/4 tsp mustard seeds
1/4 tsp urad dal / split black gram
1/4 tsp channa dal / Bengal gram
1/4 tsp cumin seeds / jeera
A pinch of hing / asafoetida
A few curry leaves (optional)

How I Made It:

1. Roast the peanuts in a dry skillet until brown and the skin starts to peel off - about 10 mins or so. Once cool, you can rub them between your palms and remove the skin but I kept them on. 

2. Heat 1 tsp oil and roast the shallots/onions, red chillies and garlic. Once they are browned, remove and set aside to cool. 

3. Once the peanuts and the shallot mixture cool completely, grind to a smooth paste with the tamarind (fresh or paste) with about 1 tbsp of water. If you want a watery chutney, soak the tamarind in 1/4 cup water (extract juice, discard pulp) and use this for grinding. Add salt. Remove and set aside in a bowl. 

4. Heat oil for tempering. Add all ingredients under the list and when the mustard seeds pop and the dals turn golden brown, remove from fire and dunk into the ground chutney. Mix well. 

Peanut Chutney Recipe

I served this with rice and vatha kozhambu. If you make the watery version, it goes well with dosa and idli too. 

Monday, February 9, 2009

Ridge Gourd Coriander Chutney

Ridge Gourd is a vegetable I haven't seen much in Kottayam. Or maybe it was available but I never noticed it. I do remember the dried ridge gourd (peechanga in malayalam) that we used to scrub ourselves in the shower. This was before the entry of a free loofah with every bottle of body wash (God! I feel old now!).


Anyway, ridge gourd is very commonly seen in all supermarkets and wet markets in Singapore. I used to pass by without a second glance because I had never cooked with it before and had no clue where I can fit it in. I vaguely remember amma making a bajji (not the deep fried kind, we also refer to pachadi-like curries as bajji at home) with the vegetable but I wasn't even sure if this was the same vegetable.


I would always resolve to go home and search for ridge gourd recipes online so that next time I can buy it. Of course the search never happened and I invariably forgot about it until I came to the supermarket next.


One day, I have no idea what came over me but I walked straight to the ridge gourd tray and picked up one. TH panicked. I could read his thoughts which went 'now what experimental dish is she going to cook up with this weird looking thing?' He asked me a few times if I knew how to cook it and I very confidently said 'I will figure something out'. The challenge was not to cook something with it but to cook something that he would like.


Long story short, I came home and searched online for ridge gourd recipes and, of course, Sailu's blog was among the top ten. I saw the recipe, realized it was quite easy and made it over a weeknight. It tasted so good that I had to take a picture even in sucky light just so that I can share it.


And yes, TH liked it too :)


Ridge gourd is known as beerakai in Telugu, peerkangai in Tamil, peechanga in Malayalam and torai/dodka in Hindi/Marathi.


Sailu's recipe involves tempering the chutney but I avoided that because I was lazy it’s healthier that way and still tastes great! I also avoided roasting the coriander leaves since I prefer the fresh flavour. So basically mine is a much lazier.. err.. simpler version :D

Recipe for Peechanga Chammanthi

What I Used:


Ridge gourd - 2 cups (1 medium sized vegetable), peeled and chopped

Fresh coriander leaves - 1/2 cup, chopped

Green chillies - 2, or to taste

Chana dal / bengal gram / kadala paruppu - 2 tsp

Urad dal / uzhunnu parippu / ulatham paruppu - 1 tsp

Cumin seeds / jeera / jeerakam - 1/4 tsp

Hing / asafoetida / kaayam / perungayam - a generous pinch (optional)

Sesame seeds / til - 1 tbsp (I used white sesame seeds, do not avoid this ingredients as its vital for the flavour)

Tamarind paste - 1 tsp (or use 1 tbsp lemon juice)

Salt - to taste

How I Made It:


1. Peel and chop the ridge gourd into chunks. Cook this with 1/2 cup water until soft and mushy. Set aside to cool.


2. Dry roast the chana and urad dal in a pan. When they are about to turn golden brown, add the sesame seeds and keep roasting until all are nicely browned and smell good. Throw in the jeera and the hing when the pan is still hot and set aside to cool.


3. Once the ridge gourd and the roasted ingredients have cooled completely, grind to a smooth paste with the coriander leaves, tamarind, green chillies and salt.

Tastes good with dosa and steamed rice. Actually not just good, but really really good! The sesame seeds are the winners in this recipe so do not avoid those. Oh I said that already? Ok then!


This is my entry to this week's Weekend Herb Blogging hosted by Cheryl of Gluten Free Goodness


Thursday, January 29, 2009

Hummus Recipe - Quick & Healthy Spread

I discovered pita bread and hummus when I was in Google Hyderabad. We had a salad bar with all these crunchy, fresh vegetables and a bowl of creamy hummus with warm, oven-fresh pita bread right next to it. It wasn't really a popular choice since our lunch buffet had much more appealing dishes but practically every other day, I used to make a pita sandwich with some lettuce, tomato slices, cucumber and a generous spread of hummus.


Those were the days that I could get hummus without going through the trouble of making it myself but now things are different. So last weekend, I set out to the task myself. I started with a Google Search for 'hummus recipe' and was quite surprised to see a site dedicated only to hummus! It was mentioned there that making hummus takes practise even if you are following recipes religiously. I beg to differ. My hummus came out really well and though next time I may blend it until creamy, I still didn't mind the coarse texture of it this time.

One ingredient you will surely need is good-quality Tahini. I got mine from NTUC FairPrice in Singapore. I don't remember the brand name now but tahini is definitely available here in Singapore.

If you want to prepare the hummus without tahini then you can avoid it, which will of course affect the flavour but the end product is still creamy and delicious. Sometimes, kids are allergic to tahini so follow the hummus recipe without tahini.

What I Used:

Chickpeas - 1 cup, washed and soaked in water overnight or atleast 8 hours
Tahini - 1/2 cup
Lemon juice - 1 tbsp
Garlic - 1/2 tsp, minced
Cumin / jeera / jeerakam - 1/2 tsp, crushed (I used cumin powder)
Salt - to taste
Olive oil / sesame oil - 1 tbsp

How I Made It:

1. Wash the soaked chickpeas well and drain water completely.

2. Pressure cook until soft (3 whistles) in sufficient water. If you don't have a pressure cooker, transfer the chickpeas to a pot and add water until it is well covered. Cook until the chickpeas are soft and mash easily. This should take about 30-40 mins. Do not add salt while cooking the chickpeas as this will harden them.

3. Drain the water used for chickpeas and keep aside. Blend the chickpeas until smooth, adding little water if too thick.

4. Add the rest of the ingredients (except oil) and continue to blend until you get a smooth, thick paste that is of spreading consistency. If too thick, add very little water at a time from the water used to cook the chickpeas.

5. Make sure you mix the oil in before serving!

I didn't buy pita bread so I served it with some home made white bread (recipe coming soon!)

I am sending this hummus recipe to Ramya's Chutney/Dip Mania and MS's JFI - Chickpeas.

Monday, December 15, 2008

Curry Leaves Chutney / Kariveppilai Chutney

Curry leaves are one of the staples of Indian cooking. Its the one herb that we cannot do without and you will find this in practically every Indian kitchen, or shall I say refrigerator :) However limited space people have around their houses and apartments, its not uncommon to see at least one curry leaves plant that is carefully watered and tended to. My mom has about three plants around the house and my sis has practically a tree growing out of her backyard.

The house we moved into first in Singapore had 3 plants outside the front door. A neem plant, a money plant and curry leaves! The other 2 died when I went to India for 3 weeks but the curry leaves plant harbored on and was still standing strong and healthy when we moved out 2 weeks back. I miss breaking out fresh sprigs of curry leaves while cooking but some good things must come to an end.


However, I didn't leave before I made this super-quick chutney one day. As we know, curry leaves are just added for flavor to dishes and most of us remove them from our servings before we eat, but they are said to have high iron content. No wonder my grandma used to force me to eat them and promised a head full of lustrous hair if I did! Our maid of so many years, Mary, loves the flavor of curry leaves and any dish made by her is sure to have a generous amount of these lovely-smelling leaves.

I have gone on and on, quite uncharacteristically (cuz I do all the ranting here) but I guess that shows my love for curry leaves.


Curry Leaves Chutney Recipe
What I Used:

Curry leaves - 2 cups (just throw them in loose)
Grated coconut (fresh or frozen) - 3/4 cup
Tamarind paste - 1 tsp (mix in 1 tbsp warm water to a marble-sized amount and squueze well)
Dried red chillies - 2 to 3, depending on taste
Hing / asafoetida / kaayam / perungayam - a pinch
Garlic - 2 pods (optional)
Oil - 1 tbsp
Salt - to taste
How I Made It:

1. Heat oil and add the red chillies and garlic (if using), making sure they don't burn by lowering the heat.

2. Now add all the other ingredients and fry for about 5 minutes, until the curry leaves turn slightly brittle and the coconut turns a light brown.

3. Remove from fire, cool and grind well.

I am sending this to Andrea's Grow Your Own.

Wednesday, November 5, 2008

Thakkali Chutney / Tomato Chutney

This is one dish that has many many memories associated with it. My grandma used to make it quite often since me and my bro love it. And we call it 'thakkali oorindi' where the word 'oorindi' comes from saying 'noorindi' very often. 'Noorindi' in "our" telugu means ground (past tenst of grind!). Ok this explanation is getting way too confusing so I will fill you in on why I call the word "our" telugu and where in India I am actually from. 'Cuz that's a long (long) story.


My sis took the recipe from amma last summer and I took the picture. Because of that, I get to post it first, I guess. Thanks sis, for sending the recipe over email 'cuz god knows I wouldn't have been able to remember it otherwise. Don't get put off by the roast-remove steps in the directions of the recipe, really. Its worth it!

What I Used:

Ripe red tomatoes, slightly sour - 500gm, diced
Big onions-3, chopped
Garlic - 2 cloves
Coriander seeds - 1 tbsp
Grated coconut - 1 tbsp (optional)
Red chillies - about 12, depending on taste
Mustard seed - 1/8 tsp
Hing/Asafoetida/Kaayam -1/4 tsp
Curry leaves - a few
Oil (preferably gingelly/sesame) - 3 tbsp + 2 tsp + 2 tsp
Salt - to taste
How I Made It:

1. There are four ingredients that need to be fried separately and kept aside. So follow this order.

- In a broad frying pan and 2 tsp oil and the coriander seeds. Fry for 30 seconds and remove.

- Red chillies - roast for a minute - remove.

- Coconut - roast for a minute - remove.

- Now add another 2 tsp oil and fry the onions till golden brown and soft. Remove.

- Finally add the tomatoes and saute them for about 10 minutes on a medium fire, until they are half cooked.

2. Transfer all the roasted ingredients in a blender and add the garlic raw. Blend till smooth, adding not more than half a cup water. The mixture should be thick than watery.

3. Add the 3tbsp oil into the same pan, temper mustard seeds and add curry leaves and hing. Transfer the blended mixture into the pan, add salt and stir occasionally until the oil separates and you left with a thick, red chutney that smells mouthwatering.
This tomato-onion-garlic chutney has a good shelf life and goes well with rice, dosa, idly etc. I have posted a similar yet simpler tomato chutney here before. You can try it in case you are pressed for time.

I am sending this family favourite to Suganya for her Vegan Ventures Round 2.

Sunday, June 22, 2008

Coriander Chutney With a Twist

Well honestly, I don't know if this chutney has a twist or not, but to a person who has only tried the raw coriander chutney, I found this quite different when amma made it during my vacation at home.


The preparation method is considerably more time-consuming but this one goes well with rice, dosa, idly and even bread - plain and toasted. Adjust the tangy-ness by increasing or decreasing the amount of tamarind paste. We like it moderately sour.


What I Used:

Fresh coriander leaves/kothamalli/malliyila/kotamiri - a bunch, chopped
Grated coconut - 1/2 cup
Red chillies - 2
Green chillies - 2
Tamarind paste - 2 tsp (readymade paste may not taste great)
Urad dal - 1/2 tsp

How I Made It:

1. Heat very little oil in a non stick kadai and fry the dal for 2 minutes. Add the red chillies, green chillies and chopped coriander leaves and fry well for about 2-3 minutes.

2. Next, add the coconut and mix well on sim. Remove from fire and cool well.

3. Grind the above with the tamarind paste and necessary salt, adding as little water as possible.

This chutney is making its way to Suganya's AFAM-Coconut as my second entry. I can't wait for the round up of that event, what with being a mallu and all that :D

Thursday, January 3, 2008

Chuttaracha Chammanthi - Authentic Kerala Roasted Chillies & Coconut Chutney

Chuttaracha Chammanthi, also known as Chutta Mulaku Chammanthi literally means roasted (chutta) chillies (mulaku) chutney (chammanthi). It is an authentic kerala accompaniment to kanji (rice gruel) and is mostly seen as the common man's food. I especially love the flavour the roasted chillies give the chutney. And what's more, its oil free!


What I Used:

Grated Coconut - 1 cup
Dried red chillies - 4
Shallots - 4
Garlic - 2 cloves (optional)
Coriander powder - 1 tsp
Tamarind - half a lemon size
Salt - to taste

How I Made It:

1. Heat a non-stick pan and roast the red chillies dry (without oil) till it reaches the stage just before burning.

2. Add the coconut, chopped shallots, garlic and coriander powder and roast for another 2 mins. The coconut will start getting brittle. At this stage, remove from fire.

3. Grind this mixture in very little water with salt and tamarind.

Enjoy!

This is my first entry to RCI - Kerala Cuisine hosted by

Sunday, September 23, 2007

Egg Dosa with Onion-Tomato Chutney/Mutta Doshayum Ulli-Thakkali Chammanthiyum

I love egg, be it omelette, or curried, or hard boiled, or even on a dosa! (Only exception being bull's eye). Egg dosa is a favourite at home and normally we have it for dinner. Last week, we had this for breakfast though, with spicy onion-tomato chutney. Mom either makes tomato chutney or onion chutney but both are a little time consuming, especially the tomato chutney which requires a lot of time on the stove and when it boils, it falls all over the stove, dirtying it. Needless to say, I am too lazy to follow that so went for an equal amount of tomatoes and onions for this chutney.

Egg Dosa

I used readymade batter for the dosa. To make the batter at home, take rice : urad dhal in 3 : 1 ratio, soak overnight (or atleast 5-6 hours) in water separately, grind separately and then mix together, adding salt. This batter should be kept covered for another 5 hours or so before you can start making the dosa.


Using this batter, pour a dosa on the griddle, break an egg and lay on top of dosa. Lightly sprinkle with gingelly oil, carefully turn and cook till the egg is cooked.

Onion - Tomato Chutney


What I Used:

Onions - 2 medium
Tomatoes - 2 large
Hing - 1 pinch
Red Chillies - 4-5
Garlic - 8 cloves

How I Made It:

1. Fry onions in very little oil till it they turn golden brown.

2. Add the red chillies, hing and chopped garlic.

3. When the masala is done, add the chopped tomatoes, mix well and cook till the tomatoes are soft.

4. Cool this mixture and grind well in mixie.

Serve with hot egg dosa.

Sunday, April 22, 2007

Malliyila Chammandi/Kothamalli Chutney/Coriander Chutney

Coriander, also known as cilantro, is a welcome addition into any kitchen. Technically, the leaves are the cilantro and the seeds are the coriander, but this seems to mean one and the same these days. Moderately priced, this delightful herb can easily be found in tiny markets as well as monolithic superchains. When I saw that this month's Jihva for Ingredients (JFI) hosted by Mahanandi is on fresh leafy green vegetables, I had no second thoughts about which one to use. Also, my recipes here are meant to be simple (suitable for bachelors) and remind me of mom. This was a usual snack packed for school :)


My entry for this month's JFI (Also trying to get better at photography!)

Coriander Chutney

What I used:

Freshly grated coconut : 1 cup
Chopped coriander leaves : 1 cup
Green chillies : 3
Lemon juice : 1 teaspoon
Sugar : 1 teaspoon
Cumin seeds or powder : 1/2 teaspoon
Salt : to taste

How I made it:

Put all ingredients in a small blender. Blend till smooth adding very little water as required. Use on buttered or non-buttered bread for sandwiches. It also goes with rice and curd though bread is definitely the more popular and favourite accompaniment.