Thursday, July 31, 2008
Recipe Index - Breakfast Recipes
Please click on recipe name to visit recipe page.
Wheat Flakes With Fresh Fruits
An Even More Perfect Burger?
 We needed a quick meal tonight, and since it felt nice and summery I thought burgers and fries out on the back porch sounded like a good idea. But there were a few snags. First, I only had half a block of tempeh. And no bread crumbs. And no soy sauce. So I made a few substitutions and created a similar but different tempeh burger. One that may even be better than the original in that it has a more meaty texture. Try it and see what you think.
INGREDIENTS
Makes 6 burgers
- 1/2 pkg tempeh, grated (boil for 10 mins first, then cool, if you don't like tempeh's taste)
- 2 vegan sausages, grated (or pulsed in a blender)
- 1/2 cup vital wheat gluten
- 1 tsp each garlic and onion powder
- 1 tsp coriander
- other spices of your choice (oregano, sage, parsley, fennel, etc.)
- salt and pepper
- 2-4 tbsp water
METHOD
1. Mix together tempeh, sausage, wheat gluten, and spices in a bowl. Add in sauces and enough water to make a firm dough. Squish dough between your fingers for a min or so to thoroughly mix. Divide in 6 portions and shape in patties (I find thin patties work best, but you could make 4 thicker ones if you want).
2. Heat a think layer of oil in a frying pan over med-lo heat. Cook burgers for about 5 mins per side, until firm to the touch.
Wednesday, July 30, 2008
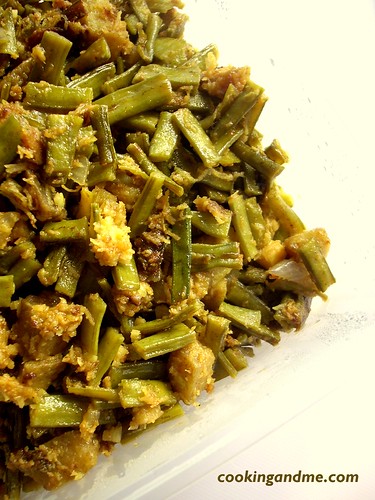
Cluster Beans With Yam
Cluster Beans, a very interesting vegetable when I did some research on them. They are known by various names in different states in India and surprisingly in many of them, they are an integral part of their meals. In Kerala, this is not the case and I see it on our table only when we have visitors like my aunt or sis from Tamil Nadu.

Cluster beans, known as Mattikaya in Telugu and Kothavarakkai in Tamil is popular in the north as Guar. In Malayalam, we just call it Kothavarakka, a slight variation in pronunciation from what its called in Tamil. I am a little confused about what Chitkaya/Chikkadikaya is? Is it another name for the vegetable in Telugu?
Anyway, I got a pack of it in the Indian store and immediately grabbed it, thinking I will try what my mom normally makes with it - an aviyal or a in a tangy gravy with ground coconut and tomatoes.
In the end, I ended up making a quick stir fry of it with elephant yam (chena). The combination turned out to be a winner and we loved it!
Related Posts:
Broad Beans with Lentils
Beans Carrot Thoran
Mochakottai Sundal
Beans Usili
Aviyal
Cluster beans, known as Mattikaya in Telugu and Kothavarakkai in Tamil is popular in the north as Guar. In Malayalam, we just call it Kothavarakka, a slight variation in pronunciation from what its called in Tamil. I am a little confused about what Chitkaya/Chikkadikaya is? Is it another name for the vegetable in Telugu?
Anyway, I got a pack of it in the Indian store and immediately grabbed it, thinking I will try what my mom normally makes with it - an aviyal or a in a tangy gravy with ground coconut and tomatoes.
In the end, I ended up making a quick stir fry of it with elephant yam (chena). The combination turned out to be a winner and we loved it!
What I Used:
Serves 4
Cluster beans - 2 cups, cut into 1" pieces
Yam - 1 cup, cubed
Coconut - 4 tbsp, grated (optional)
Chopped garlic - 2 tsp
Shallots - 4
Coriander powder - 1/2 tsp
Jeera powder - 1/2 tsp
Chilli powder - 1/2 tsp
Salt - to taste
Coconut oil - 2 tsp
How I Made It:Serve hot with rice and gravy.
1. Cook the cluster beans and yam separately in water till they are tender. Cooking them together will make the yam bitter. The water used to cook the cluster beans should not be used since it will be bitter.
2. Heat oil in a pan and lightly fry the garlic and shallots. Then add the coriander, chilly and jeera powders and fry for another 30 seconds.
3. Mix in the coconut, yam and beans with some salt and leave it on sim for 4-5 minutes.
Related Posts:
Broad Beans with Lentils
Beans Carrot Thoran
Mochakottai Sundal
Beans Usili
Aviyal
Rosemary Tofu and Vegetables En Croute
 Don't dishes sound better with some French thrown into the title? This is a dish that may be better suited for colder weather, but I needed to use up the puff pastry I made the other day. You may want to keep this in mind for Thanksgiving dinner. I also wanted to use up the potatoes, carrots, and beans from the farmer's market. I put tofu in the filling, but you could use beans instead, or both.
INGREDIENTS
- 1/2 recipe puff pastry (1 sheet)
- 2 potatoes, diced
- 4-5 small carrots, sliced
- handful of yellow beans, chopped into 1/2" pieces
- 1/2 pkg extra firm tofu, small dice
- 1 tbsp olive oil
- 1 yellow onion, halved and sliced
- 1 large garlic clove, minced
- 1 tsp crushed rosemary
- 1 tsp sage
- 1/2 tsp marjoram
- 1/2 tsp parsley
- salt and pepper
- 1 tbsp flour
- 1/4 cup nutritional yeast
- 3/4 cup soy milk
- 1/4 cup vegan sour cream
- soy milk for brushing
METHOD
1. Place potatoes and carrots in a pot and cover with water. Bring to a boil, cover, and simmer for 8-10 mins, until potatoes are getting tender. Add beans and simmer another 5 mins. Remove from heat and drain.
2. While veggies are cooking, heat a non-stick frying pan over medium heat. Add tofu and let cook for a few mins to release some of the water. Spray tofu with oil and cook until golden. Remove from pan.
3. Heat 1 tbsp of oil in pan and saute onion and garlic for 5 mins, until soft. Add tofu and vegetables and mix well. Add spices and season to taste.
4. Add flour and nutritional yeast and mix well. Add soy milk and stir well. When thickened, remove from heat. Stir in sour cream. The filling needs to completely cool before you can put it in the crust. Stick the pan in the fridge while you prep the dough.
5. Preheat oven to 375 degrees. Line a baking sheet with parchment paper.
6. On a floured surface, roll dough into a 13" x 16" rectangle. Place cooled filling in a line down the centre (there is a lot, so heap it on). Fold sides into the middle, making sure they overlap and inch or so. Fold ends in and press down to seal.
7. Flip over onto the baking sheet (seam is now down). Seal ends by pressing down on them with a fork. Brush with soy milk. With a sharp knife, cut slits along the top every 1 inch or so.
8. Bake for 35 to 40 mins, until golden brown.
Tuesday, July 29, 2008
Raspberry Mango Ginger Turnovers
 Because I am insane I made my own puff pasty today. It actually was not that hard. I followed this recipe (because it had pictures), subbing Earth Balance for the butter. I stopped buying puff pastry from the grocery store once the trans fat thing hit the news, and the brand they sell here still has 3.5 g of trans fat per serving. Pepperidge Farm puff pastry is trans fat free (but nowhere near fat free, of course) and is vegan. But there is something satisfying about making your own. I stood around for a good 5 minutes congratulating myself! Whatever puff pastry you use this filling will still taste awesome.
INGREDIENTS
Makes 4 large turnovers
- 1 sheet of puff pastry (1/2 of the recipe posted above)
- 1 1/2 cup fresh raspberries
- 1/2 cup finely chopped mango
- 3 tbsp sugar
- 1 tbsp flour
- 1/2 to 1 tsp ginger powder
- 1/2 tsp almond extract
- soy milk and coarse sugar
METHOD
Preheat oven to 400 degrees
1. Mix together raspberries and mango. Add sugar, flour, ginger, and almond extract and mix well.
2. Roll pastry sheet on a floured surface into a 12" by 12" square. Cut that into 4 equal squares. These are fairly big turnovers, so make them smaller if you want.
3. By this time, the filling will have released quite a bit of water. Strain the filling so it is not too juicy. Place 1/4 of the filling in the middle of a pastry square. Fold into a triangle and seal edges with a fork. Smooth edges with your fingers, making sure no filling can leak out. Repeat with remaining filling and pastry.
4. Place turnovers on a baking sheet lined with parchment paper. Brush with soy milk and sprinkle with coarse sugar. Cut two slits in the top of each turnover.
5. Bake for 20-25 mins, until golden brown. 
Monday, July 28, 2008
On Steaming Seitan
 I have received many emails over the past month asking me what a steamer is, or how I steam my vegan sausages. In this case, picture is worth a thousand words.
Fettuccine Marsala
 The first thing I did when I got home was pull out the pasta maker because I didn't get to play with it enough before I left for the research trip. I made a batch of Bryanna's fresh vegan pasta which turned out really well. I have learned that the secret to good eggless pasta is not to cook it too much. Once you have some pasta on hand (you can refrigerate or freeze fresh pasta), this dish is quick, easy, and tasty.
INGREDIENTS
Serves two
- 3 cups cooked fettuccine
- 1 tbsp olive oil
- 2 shallots, finely chopped
- 2 cloves garlic, minced
- 12 cremini mushroom, quartered
- 1/3 cup marsala
- 2 tbsp sugar
- 1/4 cup tomato paste
- 1/2 cup water
- salt to taste
METHOD
1. Get water boiling and cook your pasta.
2. Meanwhile, heat oil over medium heat in a saucepan. Saute shallots and garlic for 5 mins, until soft. Add mushrooms and cook for 4-5 mins, until beginning to soften.
3. Add marsala and sugar to the pan and cook until almost all reduced. Then add paste and water and bring to bubbling. Add more water if you want a thinner sauce. Season to taste.
4. Add cooked pasta to the pan and heat through. Garnish with parsley and serve.
Brinjal Curry
This is a super simple yet yummy recipe I got from a friend who had invited us for lunch when we had just moved here. She had made a lot of dishes and this was my absolute favourite. What's better, it uses only 4 main ingredients, not counting salt and oil! She also told me that this is an adaption of a SriLankan recipe.
If you love brinjal (also known as aubergine, kathrikka, ennagayi, in various languages), then this is a sure shot winner recipe.

Serve with rice and some gravy.
You may also be interested in Kannadiga Brinjal Palya.
If you love brinjal (also known as aubergine, kathrikka, ennagayi, in various languages), then this is a sure shot winner recipe.
What I Used:
Brinjal - 1 cup, chopped
Onions - 1 big, chopped
Red chilli powder - 1 tsp
Turmeric powder - 1/4 tsp
Gingelly oil (nallennai/sesame oil/til oil) - 3 tbsp
Curry leaves - 10
Salt - to taste
How I Made It:
1. Heat oil and add the chopped brinjals. Note that you have to use gingelly oil for this dish. Anything else will spoil the taste completely.
2. Fry till the pieces start breaking up and become a bit soft. At this stage, add the onions, turmeric powder, chilli powder, and curry leaves.
3. Let it cook for a good 20-25 minutes till the onions are fried and blended in with the brinjal. Add salt, mix well and fry for another 5 mins.
4. Remove from fire if you see that the curry is separating from the oil. That's when you know its done.
Serve with rice and some gravy.
You may also be interested in Kannadiga Brinjal Palya.
Sunday, July 27, 2008
Raspberry Shortcake with Blueberries
 When life gives you berries, you have to make shortcake. To me it is the quintessential summer dessert. Of course, strawberry season is over so it's time to move on to raspberries and blueberries. These personal-sized shortcakes have a wonderful pinkish hue from the berries, and are nice and tender with the right amount of sweetness.
INGREDIENTS
Makes 9 medium, or 12 small, shortcakes
- 2 cups all purpose flour
- 4 tsp baking powder
- 2 tbsp sugar
- pinch of salt
- 1/4 cup cold Earth Balance margarine
- 1 cup raspberries, mashed with a fork
- 3/4 cup soy creamer (or milk)
METHOD
Preheat oven to 450 degrees. Grease a muffin tin.
1. Whisk flour, baking powder, sugar, and salt together. Cut in margarine (or work in with your fingers) until mixture resembles coarse bread crumbs.
2. Mix in mashed berries and milk in with a fork. Use two spoons to drop dough into 9 or 12 sections of the muffin tin. Sprinkle each with a bit of sugar. Bake for 12-15 mins. Cool on wire racks.
From here, you have a few choices. My original plan was to make vegan cream, but I had no coconut milk. So, I made the vegan clotted cream from Vegan Yum Yum. You can also serve it with soy or rice ice cream, or douse the whole thing with some non-dairy milk (still my favourite way to eat shortcake).
On Code Reds, a Good Read, and Coming Home
 I am home! After a two hour delay in Toronto due to two Code Red shutdowns (read: lightning storms), I have finally returned to the northland. Ahhhh. The weather is a nice change from hot and humid Philadelphia, though I am sure I will miss the perks of the big city soon enough. I spent my time in the airport reading--I already had a 3 hour layover, so the additional delays just added to my pain. I purchased Tristram Stuart's The Bloodless Revolution and got through about half of it. It is a British history of vegetarianism and charts how Hinduism and contact with Asia challenged Anglo notions of food and diet. It is a fascinating look at how the clash of eastern values of non-violence and Christian ideas of dominance shaped British culture from the 1600s to modern times.
 We are having a banner year for raspberries, and are even getting some wild blueberries--we would get more if some animal wasn't getting to them first. I picked some this morning and promptly made pancakes.
Friday, July 25, 2008
Easy Yellow Curry Tofu and Noodles
 I am heading back home to Ontario tomorrow so the cupboards here are getting a wee bit bare. I looked around at what I had and came up with this quick and easy dish. I love this picture because you can see the steam rising off of it--that's fresh food, baby!
INGREDIENTS
Serves 4
- about 4 cups cooked somen noodles
- 1 pkg firm tofu, cubed
- 1 can coconut milk
- yellow curry powder to taste
- 1 tsp salt (or to taste)
- 2 tbsp brown sugar
- 3 cup frozen mixed veggies
METHOD
1. Do what you have to do to cook your noodles.
2. Meanwhile, prep tofu. You can toss it in flour or cornstarch and fry in oil (like I did), or just cube it. Or cube it and fry in a lightly oiled pan until golden. Your call.
3. Heat coconut milk over medium heat in a saucepan. When bubbling, whisk in curry powder, salt and sugar. Add veggies and return to bubbling. If you are using plain tofu cubes, add them in now. Let simmer while noodles finish.
4. Rinse noodles under cold water and drain well. Place 1 cup of noodles in four bowls and top with sauce. Top with tofu cubes and enjoy!
Thursday, July 24, 2008
Vegan Dad on the Road: Horizons
 Tonight I ate one of the best meals of my life at Philadelphia's premier vegan restaurant, Horizons. It is so awesome to go to a place where you can eat everything on the menu, and where you don't have to quiz the server on the ingredients of every dish and how it is prepared. I emailed for a reservation and for permission to take some pics. The owner, Kate, gave me a warm welcome, and the staff was helpful and friendly. I placed my order began sipping on my drink. I was soon greeted with complimentary focaccia with fresh basil olive oil for dipping (pictured above). It was incredibly tender with a wonderfully buttery flavour.
My first course was the Golden Beet Panzanella Salad. I have to say that my favourite part of the dish was the beets--they were tender and had a very mellow flavour. The smoked tofu was also very nice. My only complaint is that the tomatoes had a bad taste and texture; I think they may have been refrigerated.

Second course: Grilled Seitan with yukon potato mash and horseradish cream. By far, this is the best seitan I have ever had. I have experimented a lot with seitan but nothing has come close to the tenderness, texture, and taste of this dish. Superb grilled flavour that was only enhanced by the horseradish cream (which is really quite mellow with a nice tang).

For dessert: saffron creme brule. Oh, baby.

Quiz Time at the Grocery Store
 Do you ever feel like you are giving the cashier a produce quiz every time you check out? Such was the case when I hit the local supermarket on the weekend. Once we sorted out the basil and cilantro, it was on to the other items in my basket. First up: a portabello mushroom. "What kind of mushroom is this?," she asks. Fine. Not everyone eats a wide variety mushrooms. But, I knew we were in trouble with item #2: chanterelle mushrooms.
"Is this some kind of fruit?," she asks. Also fine. It's not like I buy these everyday either because they are a tad exotic. Lastly, these babies:

"What in the world are these?," she asks. I just stood there, blinking.
Wednesday, July 23, 2008
Poori Masala
 This is one of the quickest meal I can make. The potato masala takes not more than 10-15 minutes and the pooris maybe 15 minutes. I hate rolling out chappathis so whenever I don't feel too guilty about deep frying, I go for this.
I think this is one meal that can classify as truly Indian since its available and cooked in almost all the states of India, in some form or the other. In most cookbooks that feature state-specific specialties in India, this recipe finds its way in.
I have started using Canola Oil for my cooking since I came to Singapore and it does seem really light and healthier than other cooking oil options. Its comparatively cheaper too. Read more about it here.
Now, onto the recipe.
For the Pooris
What I Used:
Makes about a dozen pooris
Wheat flour/atta - 2 cups
Salt - 1 tsp
Warm water - approx. 1 cup
Oil - to deep fry
How I Made It:
1. Mix salt into the atta and make a thick dough (than used for chappathis) adding the warm water little at a time.
2. You can leave the dough to rest for an hour, covered, but mostly when I make this for dinner, I don't get time to do this and it comes out well anyway.
3. Divide the dough into 12-15 small balls and roll out with a pin, making sure the thickness is even. Only then the pooris will puff out when frying.
4. Deep fry in the oil till turning over until both sides are golden brown.
For the Potato Masala
What I Used:
Potatoes - 3, boiled, cubed and peeled
Onion - 1 small, or half of a big one, chopped
Green chillies - 3, slit
Grated ginger - 1/2 tsp
Jeera - 1 tsp (I powder it before use)
Turmeric - a pinch
Mustard seeds - 1/2 tsp
Urad dal/Channa dal - 1/2 tsp (optional)
Curry leaves - 10
Salt - to taste
Oil - 2 tsp
How I Made It:
1. Heat oil in a pan and add mustard seeds and urad/channa dal. Wait for them to splutter and then add the green chillies and onions. Saute till translucent.
2. Now add the jeera, ginger and turmeric and fry for 10-15 seconds.
3. Finally add the potatoes. Mass a few of the pieces to form a gravy, mix well with added salt and remove from fire.
Serve hot with pooris.
This too goes to Srivalli's Curry Mela. She almost threatened me since I forgot to do so :D
Tuesday, July 22, 2008
Vegan Dad on the Road: Capo Giro
 I finally took Claire's advice and went to Capo Giro today for some sorbetto. Oh, baby. This is by far the best dairy-free, fat free, ice cream-like dessert I have ever had. Smooth, creamy, and spectacular flavour. Kind of a weird combo here, but I went for the black fig (totally awesome) and espresso (equally awesome) flavours. It was somewhere in the 90s in the city today so this was the perfect way to end lunch. I am definitely going back before I leave Philly.
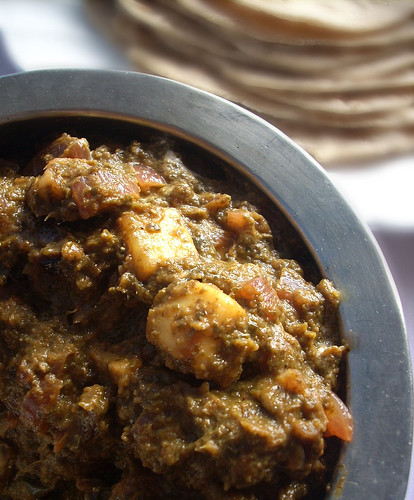
Palak Paneer/Cottage Cheese in Spinach Gravy
TH loves Palak Paneer. If you give him butter naan and palak paneer every day, I don't think he would tire of it so easily. That and pizza!
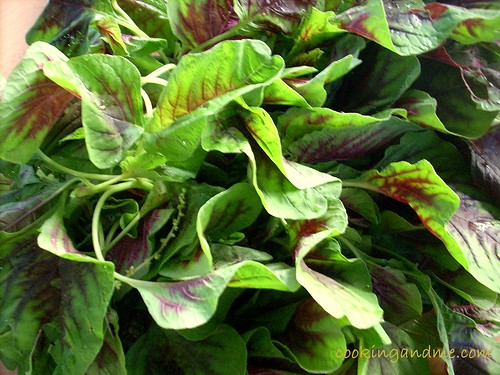
I got some fresh organic red spinach from the wet market complete with roots and snatched up the last bunch before it was all gone. I knew there are so many great recipes for palak paneer in our blogosphere so wasn't too worried about finding one.
 Zeroed in on Sailu's blog, finally. I didn't make many changes to her recipe, except for quantities of some. Be warned that this is not one of those quick and easy recipes. It takes time to cook but is definitely worth the effort and time.
What I Used:
Serves 2
Recipe source
Paneer - 1 cup
Spinach/Palak - 4 cups, shredded
Onions - 1 medium, chopped
Ripe tomatoes - 2 big, pureed
Ginger garlic paste - 2 tsp
Green chillies - 2, slit
Cumin - 1 tsp
Chilli powder - 1 tsp
Coriander powder - 2 tbsp
Curry masala - 1 tsp (optional)
Cream/malai - 1 tbsp (optional)
Ghee - 1 tbsp
How I Made It:
1. Heat ghee in a pan and fry the paneer cubes lightly. Drain and set aside.
2. Add cumin seeds to the leftover ghee and let them splutter. Then add the onions and green chillies, frying lightly.
3. Add ginger garlic paste, red chilli powder, coriander and curry masala and fry for 2-3 minutes.
4. Add the tomato puree and let this paste cook for a good 10 minutes. It will splutter and fall all over your cook top so reduce flame to sim. Stir occasionally. Meanwhile, blanch* the spinach and make a paste in the same blender you used to puree the tomatoes.
6. Add the fried paneer and required water with salt. I added very little water since I like a thick gravy for this dish. Combine and cook for another 2-3 minutes, depending on how much water you have added.
7. Finally blend in the cream and stir in well before removing from fire.

I served it with chappathis but next time its going to be naan :)
Notes
- Its not necessary to blanch the spinach if you don't feel comfortable with the process. Boiling it in some water is also fine. Use that water later to make the gravy thinner as desired.
- The original recipe called for blanching and peeling the tomatoes. I avoided that too.
- Next time, I will try making a paste of the onions too because it was irritating to bite into it when the rest of the gravy was so creamy.
I am sending this to Manina's Eating with the Season, Srivalli's Curry Mela and Vandana's Paneer: A Delicacy
I got some fresh organic red spinach from the wet market complete with roots and snatched up the last bunch before it was all gone. I knew there are so many great recipes for palak paneer in our blogosphere so wasn't too worried about finding one.
Zeroed in on Sailu's blog, finally. I didn't make many changes to her recipe, except for quantities of some. Be warned that this is not one of those quick and easy recipes. It takes time to cook but is definitely worth the effort and time.What I Used:
Serves 2
Recipe source
Paneer - 1 cup
Spinach/Palak - 4 cups, shredded
Onions - 1 medium, chopped
Ripe tomatoes - 2 big, pureed
Ginger garlic paste - 2 tsp
Green chillies - 2, slit
Cumin - 1 tsp
Chilli powder - 1 tsp
Coriander powder - 2 tbsp
Curry masala - 1 tsp (optional)
Cream/malai - 1 tbsp (optional)
Ghee - 1 tbsp
How I Made It:
1. Heat ghee in a pan and fry the paneer cubes lightly. Drain and set aside.
2. Add cumin seeds to the leftover ghee and let them splutter. Then add the onions and green chillies, frying lightly.
3. Add ginger garlic paste, red chilli powder, coriander and curry masala and fry for 2-3 minutes.
4. Add the tomato puree and let this paste cook for a good 10 minutes. It will splutter and fall all over your cook top so reduce flame to sim. Stir occasionally. Meanwhile, blanch* the spinach and make a paste in the same blender you used to puree the tomatoes.
5. Add the blanched spinach to the above paste and cook for another 10 minutes or so. The ghee will start separating at this point.Blanching is a cooking term that describes a process of food wherein the food substance, usually a vegetable or fruit, is plunged into boiling water, removed after a brief, timed interval and finally plunged into iced water or placed under cold running water (shocked) to halt the cooking process. - Source
6. Add the fried paneer and required water with salt. I added very little water since I like a thick gravy for this dish. Combine and cook for another 2-3 minutes, depending on how much water you have added.
7. Finally blend in the cream and stir in well before removing from fire.
I served it with chappathis but next time its going to be naan :)
Notes
- Its not necessary to blanch the spinach if you don't feel comfortable with the process. Boiling it in some water is also fine. Use that water later to make the gravy thinner as desired.
- The original recipe called for blanching and peeling the tomatoes. I avoided that too.
- Next time, I will try making a paste of the onions too because it was irritating to bite into it when the rest of the gravy was so creamy.
I am sending this to Manina's Eating with the Season, Srivalli's Curry Mela and Vandana's Paneer: A Delicacy
Monday, July 21, 2008
Roasted Red Pepper and Mushroom Baked Wrap
 This dish is based off of a wrap I had on the weekend at a place called Marathon Grill, a wrap I thought could be much improved. The chanterelle mushrooms give a wonderful flavour and texture to the filling, and they are complemented by the smoked paprika. The cheese is entirely optional here, but it does add a bit of salty, fatty, flavour which is nice. I used Veganrella, which I have never had before and which I have to admit is rather interesting/nasty on its own. But when mixed with other flavours it really works. I also baked the wrap which begs the question: when does a wrap become a chimichanga?
INGREDIENTS
Makes 2 wraps
- 1 tbsp oil
- 2 large flour tortillas
- 1 portabello mushroom, sliced
- 1 roasted red pepper, skinned and sliced
- 1/2 cup chanterelle mushrooms
- water
- 1/2 tsp chili powder
- 1/2 smoked paprika
- salt and pepper to taste
- 1/2 cup roasted garlic hummus
- shredded vegan cheese
METHOD
Preheat oven to 450 degrees
1. Heat oil in a frying pan over medium heat. Fry portabello mushrooms for 5-7 mins, until mushroom softens and begin to release its water. Add a splash of water, if needed. Add roasted pepper to the pan and fry for 2 mins.
2. Add chanterelle mushrooms and fry for 3-4 mins, until they begin to soften a bit. Add spices and season to taste, adding a splash of water to help mix all the spices into the mushrooms. Remove from heat.
3. Spread 1/2 of the hummus in a thick layer in the middle of each of the tortillas. Top with 1/2 of the mushroom mixture. Top that with as much cheese as you see fit. Wrap up, tucking in ends, and place seam side down on a baking sheet.
4. Spray each wrap lightly with oil. Bake for 20-25 mins, until golden. Let cool, then serve. You can eat it with a fork, or let it cool more and eat it with your hands.
Sunday, July 20, 2008
Trying to Get my Mojo Back
 Now that my conference is over I had high hopes of getting back into the kitchen and making something great. OK, maybe not great, but at least passable. Let's face it, I am pretty wiped after two solid weeks of research capped by a presentation at a conference. I was not about to reinvent the wheel (or whatever the culinary equivalent is). I had bought a jar of green curry simmering sauce at Trader Joe's for such an occasion and envisioned making a nice tofu curry. The curry itself was nothing new (really just a store-bought version of this recipe), but I thought it would be cool to serve the curry in noodle nests that would cradle the sauce and veggies. For the life of me I could not figure out how to make a noodle nest that did not look like a pile of noodles. I tried a sort of noodle braid (failure), frying some noodle (big time failure), and cooling noodles in a small bowl (not really a nest). Finally I got too hungry to experiment any more and just spooned sauce over some noodles. Tasty, but not what I was after. Not a bad picture, though.
Welcome to Edible Garden!
In addition to being passionate about cooking, I am also a blogger addict and an obsessive template-changer. For many months now, I have been irritated, frustrated and downright pissed about my boring readymade templates. What was most irritating was my lack of coding skills and I would stare at the html/CSS code in my template page for hours, trying to figure out what they meant. For those of you who have been a visitor for a while, you'd probably remember how sometimes you come here thinking this is Nags' blog and then see a template that's so different from the last time that you think you are in the wrong place. That's how many times I used to change it.
Well, finally finally, I have a template that I actually like and this time, I made all the major tweaks to it. Its nothing great. Just a minima three column that I modified painstakingly. It took me a long time. Its not yet exactly what I want either but once the header was ready, I couldn't wait another day! I learnt a good deal of html from here and I read code from online tutorials like it were an Agatha Christie novel!
As I have mentioned many times before, Shaheen was my first inspiration for food blogging. At that time, I was just excited about getting started so I didn't really give much thought to what name I should give my site or how it should look. When blogger asked me to type a title, I asked myself why I was doing this and the answer was I am doing this 'for the cook in me'. And that name stuck as my blog title for over a year. I was quite happy with the egg curry pic I took that day, though today I think I can confidently say I can take better pictures :) I have met many many talented, friendly and encouraging food bloggers who've mostly had only lovely words to say for my baby-steps towards cooking and from whom I have learnt more than I ever imagined.
Recently, TH got me the domain www.cookingandme.com since he was quite surprised it was available and that it was quite cheap! On the very same day the name Edible Garden came floating from somewhere and got stuck in my head. It refused to leave till I got a template, created a header and put the words on it.
So that's what this site is going to be called from now on - Edible Garden!
Welcome to Edible Garden, guys.
Expect more changes in here but I am still going to be same 'ol Nags :) Feel free to let me know your constructive thoughts and I will see if I know enough html to act on it. Thanks for all your support!
Saturday, July 19, 2008
Vegan Dad on the Road: Govinda's
 Just a brief post about my lunch trip today to Govinda's. I got the chicken cheese steak sandwich (or something to that effect) and a root beer. The taste was pretty good, though nothing exceptional. I certainly enjoyed the fact that it was close to where the conference was being held, but the service was really, really slow. The cooks kept screwing up peoples' orders which just made things even slower. I ate outside on a very rickety table, preferring the fresh air to the cramped quarters and rather dingy decor inside. Still, I think I will go back once more before this research trip is over just to enjoy the experience and convenience of eating at an all veggie restaurant.
Thursday, July 17, 2008
Brief Hiatus
I am going to be busy over the weekend attending a conference here in Philly. I will be out to dinner with grad school colleagues and all that, so I shan't be posting for a few days. Tonight was the plenary session followed by a reception. The food was really heavy on the meat and cheese (surprise, surprise) so I spent my time drinking beer and eating garnishes. To be fair, they did have some very mediocre grilled tofu cubes and some fruit skewers. It's always hilarious to get a group of historians together--picture a bunch of ill-dressed, socially awkward, introverted nerds trying to socialize.
Vazhakka Podimas
This is a typical tamil dish which I was quite oblivious about until I got married. My mom-in-law is an awesome cook and she has a bunch of these really simple recipes that use so little masala and ingredients but taste so great. Vazhakka podimas is one of them and its one of TH's favourite. Only catch is, we need to go all the way to Little India or Serangoon in Singapore to get Vazhakka (Plantain).
To know the difference between raw bananas and plantain, please read this quite funny post by the Jugalbandits.
Like I mentioned, this is another one of my quick-fix dishes and tastes great with hot rice and rasam.

What I Used:
Plantain - 2, steamed and grated
Grated coconut - 2 tbsp (optional)
Chana dal - 2 tsp
Mustard seeds - 1/2 tsp
Jeera powder - 2 tsp
Chopped green chillies - 2
Hing - a pinch
Turmeric powder - a pinch
Coconut oil - 1 tbsp
Lime juice - 2 tsp
Salt - to taste
How I Made It:
1. Steam the plantain (with skin) till done. I just put it on the steamer plate that came with my rice cooker and it was done along with the rice. If you don't have a steamer, you can poke the plantains with a fork and microwave it on high for about 3-4 minutes. Let it cool completely.
2. Skin and grate the plantain coarsely.
3. Heat the oil and temper with mustard seeds and the chana dal. Roast the chana deal for about 10-15 seconds till it turns a light brown. Don't let it burn.
4. Add the jeera powder, turmeric, chillies and hing and fry for another 15 seconds.
5. Next, add the coconut and grated plantains and stir in salt. Mix well on sim and add some curry leaves or coriander leaves if you like.
6. Remove from fire and mix in the lime juice. I normally do this just before serving, when the dish is still warm and not too hot.
This dish is really tasty and the plantains become quite soft once cooked. We both love it! Potatoes can be cooked in the exact same manner too.
To know the difference between raw bananas and plantain, please read this quite funny post by the Jugalbandits.
Like I mentioned, this is another one of my quick-fix dishes and tastes great with hot rice and rasam.
What I Used:
Plantain - 2, steamed and grated
Grated coconut - 2 tbsp (optional)
Chana dal - 2 tsp
Mustard seeds - 1/2 tsp
Jeera powder - 2 tsp
Chopped green chillies - 2
Hing - a pinch
Turmeric powder - a pinch
Coconut oil - 1 tbsp
Lime juice - 2 tsp
Salt - to taste
How I Made It:
1. Steam the plantain (with skin) till done. I just put it on the steamer plate that came with my rice cooker and it was done along with the rice. If you don't have a steamer, you can poke the plantains with a fork and microwave it on high for about 3-4 minutes. Let it cool completely.
2. Skin and grate the plantain coarsely.
3. Heat the oil and temper with mustard seeds and the chana dal. Roast the chana deal for about 10-15 seconds till it turns a light brown. Don't let it burn.
4. Add the jeera powder, turmeric, chillies and hing and fry for another 15 seconds.
5. Next, add the coconut and grated plantains and stir in salt. Mix well on sim and add some curry leaves or coriander leaves if you like.
6. Remove from fire and mix in the lime juice. I normally do this just before serving, when the dish is still warm and not too hot.
This dish is really tasty and the plantains become quite soft once cooked. We both love it! Potatoes can be cooked in the exact same manner too.
Wednesday, July 16, 2008
Vegan Dad on the Road: Sahara Grill
 The archive stays open late tonight so it means I walk home from the train station in the dusky dark. The fireflies were out, which made me happy. Fireflies remind me of summers at my grandparents' place in Ohio (I guess it is too cold in Ontario for fireflies). An extra long day of research meant little was happening in the kitchen today. I did stop by the Sahara Grill today for a light lunch of pitas and hummus. It wasn't bad, but nothing special. As you can see, they pour oil over the top (not necessary) and it was more tangy than I like it. Oh well. I then went to Rittenhouse Square and relaxed in the shade before heading back to work.
Tuesday, July 15, 2008
Masala Chai For Click
I have been quite disappointed with the pictures I am able to take in my apartment in Singapore. The kitchen does not have any windows so I set up a small table in the washing area. The natural light there in the morning is too bright and in the evening is too dull. I have tried in vain to produce some decent coffee and tea pics but failed, so here I am, posting an old one.
I had made this Masala Chai for a previous version of MBP. I still make this tea on and off, when I am in the right mood, mostly when its raining. This is my entry to this month's Click Event - Coffee and Tea.
 Masala Chai for Click
I had made this Masala Chai for a previous version of MBP. I still make this tea on and off, when I am in the right mood, mostly when its raining. This is my entry to this month's Click Event - Coffee and Tea.
Masala Chai for ClickQuick and Easy Maque Choux
 I'm not really sure this dish can be called maque choux since many of the ingredients are missing. But, that's what makes it quick and easy, right? The basic essence of the dish is still here--creamy corn with a hot pepper bite.
INGREDIENTS
- 2 cups cooked corn
- 1 heaping tbsp vegan sour cream, or vegenaise
- 1 tbsp plain soy milk
- hot sauce to taste
- sliced green onion for garnish
METHOD
1. Mix all ingredients together and top with green onions.
Monday, July 14, 2008
Rotini with Creamy Basil Tomato Sauce
 Yesterday's jerk tempeh dish was originally going to be made with tofu, but the tofu I had bought was too crumbly for the grill. That meant I had a pack of tofu that needed to be used up soon. I also had two leftover Tofurky sausages from last week that needed to be used up as well. The end result was this dish. The sauce is really simple to make and is nice and creamy with bursts of basil flavour. Fresh basil is best, but use dried if you don't have any.
INGREDIENTS
- 1 cup raw cashews
- 4 cloves of garlic
- plain soy milk
- 1/2 pkg tofu
- 1 jar marinara/pasta sauce
- 2 tsp oil
- 2 vegan Italian sausages, sliced
- 1/2 cup finely chopped fresh basil (or about 2-3 tsp dried)
- salt to taste
- about 400g rotini, cooked
METHOD
1. Start boiling water and cooking your pasta
2. Place cashews and garlic in a blender and pour in enough soy milk to just cover. If you have time, let sit for 5-10 mins to let the nuts soak up some of the soy milk. Blend until smooth.
3. Add tofu and blend again until smooth. Add in more soy milk if too thick. Add in 1/2 jar of pasta sauce and blend again until smooth. Set aside.
4. Heat oil in a large pan over medium heat and fry sausage slices until browned. Pour in mixture from blender and remaining 1/2 jar of pasta sauce. Bring to bubbling and simmer while pasta finishes cooking. Add more soy milk if too thick. Stir in basil and season to taste with salt.
5. Drain pasta and toss with sauce. Again, add soy milk if too thick. Serve.
Perfect Diet Drink - Honey Lime Ginger Concoction
I am not too big on taking diets but occasionally I feel like I have put on weight or that my stomach is flabbier or one of those crazy things that girls feel all the time and men don't understand. During those times, here is a drink that has really worked for me.
Disclaimer * - Like my mom says it could be my imagination that I am losing weight when I take this but try it for a month, atleast, first thing in the morning (after brushing your teeth please!) and let me know the result.

You will need:
Warm bordering on hot water - 1.5 cups
Freshly squeezed lime juice - 1 tbsp
Freshly grated ginger - to taste (I add very little)
Honey - again, to taste, but not more than 2 tbsp
Mix well, and drink away.
Disclaimer * - Like my mom says it could be my imagination that I am losing weight when I take this but try it for a month, atleast, first thing in the morning (after brushing your teeth please!) and let me know the result.
You will need:
Warm bordering on hot water - 1.5 cups
Freshly squeezed lime juice - 1 tbsp
Freshly grated ginger - to taste (I add very little)
Honey - again, to taste, but not more than 2 tbsp
Mix well, and drink away.
Sunday, July 13, 2008
Grilled Jerk Tempeh and Mushrooms with Roasted Peach Salsa
 I decided that since it was Sunday I had some time to do a wee bit of grilling. They don't have a propane BBQ where I am staying so I purchased some hardwood charcoal at Trader Joe's and went totally old school. The idea for the dish started with a packet of jerk seasoning I bought at the Reading Terminal Market the other day. As far as jerk seasoning goes, it is fairly mild. I thought it would taste good with tempeh and so I began constructing what was in my mind was a terrine-like dish. In the final analysis, I don't think it works as a coherent dish, but all the different elements of the dish are tasty (I particularly like the roasted peaches). I am posting the recipe and you can do with it what you want. Instead of tempeh on the top and bottom I think it would work better to pile everything on a slice of tempeh.
INGREDIENTS
Marinade
- 1 tbsp oil
- 1/4 cup orange juice
- juice of 1 lime
- 1/2 tsp salt
- 3 tbsp jerk seasoning (or to taste)
- 1 pkg tempeh, cut in half vertically and horizontally
- 1 portabello mushroom
- 1/2 red pepper
- 1/2 cup (frozen) corn
- 1 large peach peeled and halved
- salt and pepper
- 1 cup chickpeas
- 1/2 tsp jerk seasoning
- 1/4 tsp salt
- splash of oil
METHOD
1. Combine ingredients for the marinade and marinate tempeh and mushroom for a few hours. Steam or boil the tempeh first if you think it has a "taste."
2. Make 2 rectangular containers out of heavy duty foil. Place corn in one. Toss chickpeas with spices and oil and place in another. Wrap peach in foil.
3. Start roasting the red pepper (BBQ should be nice and hot). When skin in blackened, remove from grill and place in a bowl. Cover with a lid and let steam.
4. Place corn and chickpea foil containers on med-hi grill (stir every min or so to keep stuff from sticking). Place peach on the grill, turning every few mins. Grill tempeh and mushrooms, basting with extra marinade, until done. Mushrooms should have released some water, tempeh should be golden, as should corn and chickpeas.
5. Remove skin from roasted pepper. Chop pepper and peach, and mix with roasted corn. Season with salt and pepper.
6. Mash chickpeas with a fork (add splash of water, if needed). Slice mushroom.
7. Put a tempeh slice on a plate. Top with mashed chickpeas and mushroom slices. Top with another tempeh slice (if you want) and peach salsa.
Subscribe to:
Posts (Atom)


