Thursday, July 30, 2009

Mixed Vegetable Saagu Recipe

I tried potato saagu a while back and loved it. However, I never knew it was a Karnataka / Mangalore dish. Ever since Sia announced her RCI event, its been nagging at the back of my head, constantly coming back during the weekend when I try to decide what to make. Finally, last weekend, I took the plunge and browsed through the blogs she had listed in her event announcement. The first one itself did not disappoint me. Ramya's Mane Adige is a chock full of awesome Karnataka recipes and I found just the one - Mixed Vegetable Saagu Recipe! I tweaked the recipe a little bit depending on the ingredients I had in hand.
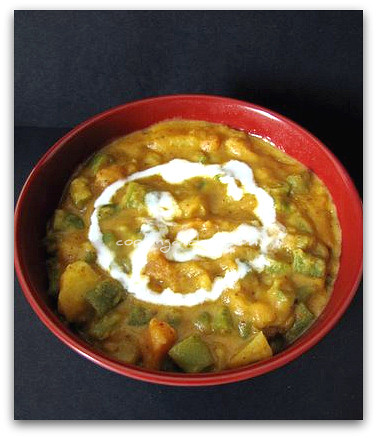
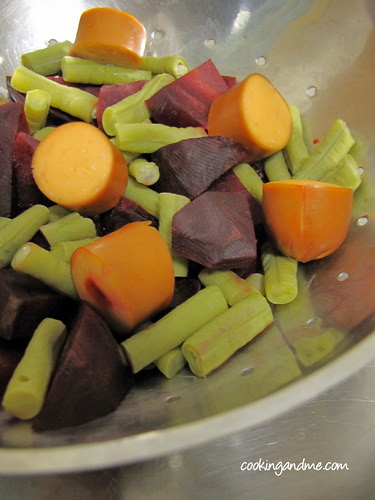
Mixed Vegetable Saagu Recipe
Serves: 2
Recipe adapted from Mane Adige

What I Used:

1 cup chopped mixed vegetables (I used beans, carrots, peas and potatoes)
4 tbsp thick coconut milk
4 shallots, finely chopped (or use 1 small onion)
A generous pinch of hing /asafoetida / perungaayam
A pinch of turmeric
Salt to taste taste

For Masala:

2 tbsp grated coconut (fresh or frozen)
A 1" cinnamon stick
3 cloves
4 black peppercorn (or 1/2 tsp crushed pepper/pepper powder)
1 tsp grated ginger
2 shallots / small onions
2 tsp Pottukadalai / chana dahlia / split chickpeas
2 green chilies (adjust to taste)

For Tempering:

1 tbsp oil
1/4 tsp mustard seeds
A few curry leaves

How I Made It:

1. Cook the vegetables in a closed pan until soft with very little water. Don't cook them too mushy.
2. Grind the ingredients listed under 'For Masala'.
3. Heat oil in a pan and add the ingredients listed under 'For Tempering'. When the mustard seed start spluttering, add the chopped shallots or onion. Fry until golden brown. Add turmeric powder and hing to this.
4. Next add the ground masala and fry for another minute or so before adding the cooked vegetables.
5. Add 1 cup water and let the curry simmer for about 5 mins. You can adjust the consistency at this stage by adjusting the water. Add salt.
6. Turn off heat and pour the coconut milk over the curry. Mix well.
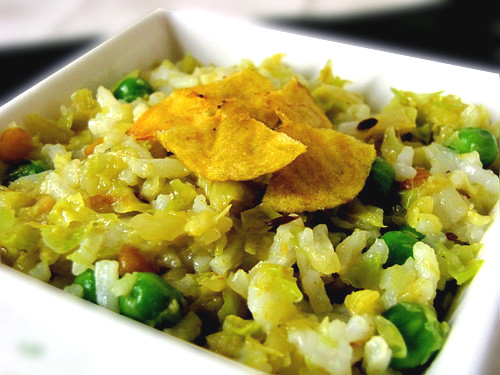
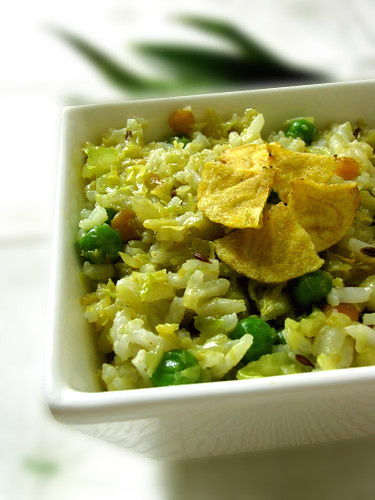
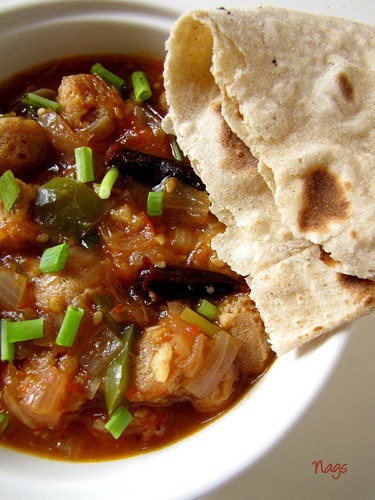
Serve hot with poori, chapati, roti or rice.


This goes to Sia's RCI - Udupu & Mangalore, an event conceived by Lakshmi of Veggie Cuisinie.

Wednesday, July 29, 2009

Simple White Bean Stew

Summer really has been quite cool this year so stew makes perfect sense. I was in the mood for simple, clean flavours and this really fit the bill. I love beans for their simplicity, and lately I have been making a concerted effort to cook my own and steer away from canned beans. The trick is to get a bag of beans soaking in the morning before you head out of the door, then cook them in the evening as you are noodling around the house. Store the cooked beans in small portions in the freezer and bring them out when you need them.

INGREDIENTS
- 2 tbsp olive oil
- 2 bay leaves
- 1 large onion, chopped
- 1 celery stalk, chopped
- 1 large carrot, chopped
- 2 cloves garlic, minced
- 2 cups canellini beans
- 1 14 oz can chopped tomatoes, juice and all
- 1 1/4 cup white wine
- water, if needed
- 1 tbsp lemon zest
- juice of 1 lemon
- salt and pepper to taste
- 2 tbsp chopped fresh parsley

METHOD
1. Heat oil over medium heat in a saucepan. Add bay leaves, onion, celery, carrot, and garlic and cook for 5-7 mins, until soft but not brown. Add beans and stir well.
2. Add tomatoes, wine, zest, and lemon juice. Add some water if you want a thinner stew. Season to taste. Simmer, covered, until veggies are cooked (about 20 mins). Remove bay leaves, stir in parsley, and serve with some nice Italian bread.

Vegetable Spring Rolls - Step by Step Recipe

This has been in my drafts for the longest time. I had a few people email me asking me for the recipe for spring rolls and that's when I realised how long its been since I made them. In fact, after marriage, though I have tried many other snacks, spring rolls never featured anywhere.

I became lazy and bought the spring roll sheets from the supermarket. I have made these from scratch before, and its not hard, just a bit more time-consuming. In fact, if you buy spring roll sheets, the whole process is very quick.

So here's a step by step look.

First, get the filling ready. Refer end of post for the vegetable spring rolls filling recipe.

These are the spring roll sheets I got. There were 20 sheets in one packet. You have to defrost them to room temperature before separating the sheets.

Lay out one sheet, add about 2-3 tbsp (depending on the size of your spring roll sheets) of the vegetable filling towards one corner.

Fold in the end of the corner first and then both sides.

Once these ends are firmly placed, start rolling towards the other end until fully done.

For the store-bought pastry sheets, the end was easy to just stick to the rest of the roll, but if you make your own, then you may need to use some 'adhesive' like egg white or besan-water paste.

Once you have made the required number of rolls, deep fry until golden brown.

That's it! Cut them up and serve hot with some tomato sauce. They make an excellent and quick starter.

Vegetable Spring Rolls - Filling

What I Used:

Mixed vegetables - 1 cup, chopped long and slim/shredded (carrot, beans, cabbage, peas, corn, capsicum, etc)
Onions - 1, sliced
Ginger garlic paste - 1 tsp
Soya sauce - 1 tbsp
Chopped green chillies - 1
Salt and pepper - to taste
Oil - 2 tsp

How I Made It:

1. Heat the oil in a pan and fry the onions until transparent and pink.
2. Add the ginger garlic paste and fry for another minute.
3. Next add the vegetables and green chillies, sprinkle some water and cook closed until soft, yet crunchy.
4. Turn heat to high and add the soya sauce. Mix well for a minute on high.
5. Lower heat. Mix in salt and pepper. Remove from fire and cool.
Notes:

- Baked vegetable spring rolls are also an option but I haven't tried it yet. With someone like TH at home, baking something that's traditionally deep-fried is a situation that never arises!
- You can use any mix of vegetables you want. However, cabbage and capsicum really enhance the taste.

Tuesday, July 28, 2009

For the Love of Berries (and Summer)

Can fresh berries from the garden make up for months and months of cold and snow? Lately, I am beginning to think yes. Winter was particularly cruel this year, and summer has been rainy and cool, but the berry crop has been absolutely fantastic. We spent the weekend at the cottage and when we came home the canes were laden with berries. After picking I weighed the berries--the total was 6 1/4 pounds! That was enough for 8 jars of jam and a cookie sheet worth of berries for the freezer.
This year we are also enjoying wild blueberries. Last year the birds harvested the berries before I could, but a strategically placed net has thwarted them this year. I only have a small patch in the backyard that yields about 1.5 cups of berries every week. The first crop went into some pancakes, the second into some banana hemp muffins. Speaking of pancakes, I tried the slow-rise pancakes from Vegan Yum Yum. They are totally awesome and worth the extra planning it takes to make them.

I will be back soon with an actual recipe and less gloating about summer berries.

Monday, July 27, 2009

Bean Sprouts for Click - Bi Colour

I am in a photography rut so fishing out an old picture that I love and sending to Click - Bi Colour.

Bean Sprouts (Blue & White)

Sunday, July 26, 2009

Cabbage Rice Recipe

No story this time, not even the miniscule amount I write usually. Just a good bowl of hot cabbage rice, garnished with banana chips (or benana chips, as TH calls them, to tease the malayali accent that I supposedly have) and served with love (not so much for the afore-mentioned person though. Hmpff!)


What I Used:

1.5 cups cooked rice
1 cup shredded cabbage
1/4 cup green peas
1 small onion, chopped small (optional)
3 green chilies, sliced (adjust to taste)
1 tsp ginger-garlic paste
1 tsp cumin seeds / jeera / jeerakam
2 tbsp coriander powder / malli podi
1 tsp channa dal / kadala paruppu
A pinch turmeric powder
A few curry leaves
2 tbsp oil
Salt to taste

How I Made It:

1. Transfer the chopped cabbage, a pinch of salt, green peas and turmeric powder to a vessel. Sprinkle some water. Keep on low fire and cook closed until the cabbage is soft.
2. Heat the oil in a pan. Add cumin seeds and channa dal.
3. When the jeera starts spluttering and the dal turns a light brown, add the green chilies, curry leaves and onion. Fry until the onions turn a light brown. (If using onions, of course)
4. To this, add the coriander powder and the ginger-garlic paste. Fry for 1-2 mins.
5. Now add the cooked cabbage and peas to the above. Add salt. Mix and combine well.
6. Remove from fire and combine the rice with the mixture.

Serve hot with papad.

Saturday, July 25, 2009

Lucques' Yellow Tomato Gazpacho

It's been hot and breezeless here in los angeles, and since I'm not into air conditioning, it's been a pretty sweaty week as well. I was coping OK until I made a frozen pizza for lunch and thought I was going to melt off the face of the erf. It didn't show signs of cooling down anytime soon, and I began dreading my next attempt.

"What am I going to maaaaaake? I don't waaaant to coooook anything."
To which Matt would say, "Can I turn on the air conditioning?"

So I was ecstatic to discover this no-cook / heatwave-approved attempt in Suzanne Goin's, Sunday Suppers at Lucques. If you live in los angeles, no doubt you've heard of Lucques, AOC or Tavern. But all you really need to know is that this cookbook is swarming with painstakingly difficult recipes, except this one that Goin calls "foolproof." Yeah, Suzanne? I'll see about that.

Sunday Suppers' version:

our version:
(Yeah. Ours is a little chunkier, but we'll get to that later.)

This recipe is all about the produce. Starting with some amazing yellow heirloom tomatoes.
A jalapeño and orange pepper.
Next we had to blanch the tomatoes, which means you try to make the tomatoes look like Blanche from The Golden Girls. We achieved this by dropping them in boiling water for thirty seconds (making them nice and hot) and then into an ice bath to cool off from all that promiscuity.

Here they are demoralized.

After chopping the supporting veggies, we threw everything in a bowl in preparation for blending.

And that's where the foolproof recipe turned on us--the blender was leaking. And when actually blending, the minimal leak turned into a flowing river of yellow gazpacho, so once things looked just crushed and mixed together, we stopped blending.
(This picture isn't worth a thousand words. It became a much bigger mess, I swear.)

The recipe called for straining, but because we had to pull it early, when we tried passing it through the strainer, we basically had no soup left. So we put everything in the bowl and embraced its chunkiness.

Personally, I think I would prefer it chunky, of course I haven't tried the Lucques-perfect strained version, but despite the blender malfunction, the end product was totally delicious, and after chilling it for an hour, it was incredibly refreshing. So maybe it is foolproof?

Oh, there I am, after eating a big bowl of soup. Ooops, cat's out of the bag. Gatsby here. Really is foolproof. byyyeeeeeee!

Friday, July 24, 2009

Raspberry Syrup

Did I mention that I am drowning in raspberries? Not a bad thing, I suppose. I thought I would try my hand at a raspberry syrup, mainly for flavouring lemonade this summer. This is pretty serious stuff and little goes a long way as you can see by the deep red colour--a spoonful or two will flavour a tall glass of lemonade. It is not too sweet and still maintains the punch of a fresh raspberry. It is rather thin, so if you want to drizzle it over pancakes, cook some of the syrup with water, sugar, and a thickening agent (arrowroot, perhaps). I made a lot, so half the recipe if you so desire.

INGREDIENTS
Makes 4.5 cups
- 6 cups raspberries
- 1/2 cup water
- 1 tbsp lemon juice
- 2 cups sugar

METHOD
1. Crush berries in a saucepan, add water and lemon juice. Bring to bubbling over med-hi heat and cook for 1 min, stirring constantly.
2. Pass mixture through a fine sieve, using the back of a spoon to get all the liquid out.
3. Place liquid back in the saucepan and add sugar. Bring to boiling and cook for 1 min, stirring constantly (be careful not to over boil).
4. Transfer into a glass jar and cool.

NOTE: if you pour the syrup into a sterilized canning jar and seal, it is hot enough to create a vacuum seal. You might want to seal several smaller jars to use throughout the summer.

Thursday, July 23, 2009

The NTUC 3-Day Diet Program

NTUC is National Trades Union Congress, a labour union that has a bunch of services under its wing in Singapore. A couple of years back, NTUC Fairprice, the Supermarket chain, introduced the NTUC 3-day diet program. It was a detox-cum-weight-loss aimed diet that listed out the exact food you can have during a period of 3 days.

Since this was a trend a few years back, I hadn't heard of it until a Singaporean colleague told me about it at lunch one day. She forwarded me the list of stuff we can eat and three things caught my attention, making me want to try it - peanut butter, vanilla ice cream and average weight loss of 2kg in 3 days.

I am sharing the list here in case any of you want to try it.

Disclaimer: Diet police and people who feel this is unhealthy/shouldn't be shared/is polluting minds of healthy people, may choose not to read the rest of the post. Its each person's personal choice whether they want to try it or not. I am not for or against this, just sharing something I came across and tried myself.

Here's the shopping list, stuff you'll need to buy the day before you start.
1 grapefruit
2 bananas
2 small apples
long beans
200 gms beetroot
100 gms broccoli
50 gms carrot
100 gms cauliflower
3 chicken sausages
200 gms tuna
100 gms cottage cheese
10 Ritz biscuits
300 gms vanilla ice cream
Cheddar cheese slices
1/4 honeydew
The total list cost me about 28 SGD. These items are very easily available in Singapore and I am hoping its not an issue in India. The diet is not very substitution-friendly so you may see varying results if you do too much swapping. Note that cottage cheese here doesn't mean paneer but if you can make your own paneer from low fat milk, then that should work too.

Here's the meal schedule.
Day 1-BREAKFAST
Black tea/coffee
1 grapefruit
1 slice toast
2 tsps peanut butter

Day1-LUNCH
Black tea/coffee
4 oz (100g) tuna
1 slice toast

Day1-DINNER
1 chicken sausage
1 cup (50g) long beans
4 oz (100g) beetroot
4 oz (100g) ice-cream
1 small apple

Day2-BREAKFAST
Black tea/coffee
1 egg boiled/poached
1 slice toast
Half a banana

Day2-LUNCH
Black tea/coffee
4 oz (100g) cottage cheese
5 Ritz biscuits

Day2-DINNER
2 chicken sausages
4 oz (100g) broccoli
2 oz (50g) carrots
Half a banana
4 oz (100g) ice-cream

Day3-BREAKFAST
Black tea/coffee
1 egg hard boiled
1 slice toast

Day3-LUNCH
Black tea/coffee
1 slice cheddar cheese
5 Ritz biscuits
1 small apple

Day3-DINNER
4 oz (100g) tuna
4 oz (100g) beetroot
4 oz (100g) cauliflower
1/4 honeydew
4 oz (100g) ice-cream

Important Notes:

Do not vary or substitute any of the above foods. Salt and pepper to be used and not other seasoning. Where no quantity is given, there are no restrictions other than common sense. Toast is to be dry - no butter or margarine. Tuna, string beans and beetroot can be frozen. Ice-cream is to be vanilla flavour only.

This diet is to be used for 3 days at a time. In the three days you will lose 2 kg* (avg weight). After 3 days of dieting you can eat normally. Remember, not to overdo it. You can try this program up to twice a month.

My Notes:

Any kind of diet is a torture for me, simply because I hate restrictions in food. I like to eat what I please, when I please and I trust myself to practise some restraint and not go overboard on most days. I tried this because it was just 3 days and I had immense curiosity to see if I would lose the promised 2kg. I actually lost 2.5 kg in three days and gained back the .5kg in the next 3 days. The 2kg weight loss stuck even though I have returned to my normal food habits now.

The long gap between lunch and dinner is hard. I did this Monday - Wednesday since being at work makes it easier for me to control food and forget hunger to a large extend. Some prefer weekends so its up to you.

The smell of canned tuna was obnoxious, so I simply skipped it without substituting with anything else.

There are no vegetarian alternatives to the diet and I may not be the best person to come up with one. If you have any thoughts on that, please do share in the comments section.

Will I do this again? I am not sure. As of now, the answer is no. I can't take that level of hunger. I get cranky. Its not hard, its just hard for me :)

If you try it, I'd love to hear from you.

Wednesday, July 22, 2009

Raspberry Ripple Ice Cream

One of the things I love about my house is the plethora of raspberry canes in the backyard. I really am not a very good gardener (and the cool northern summers don't help either) which is why I love raspberries. They thrive in our sandy soil and never need watering or fertilizing. Every year the canes provide hundreds and hundreds of raspberries, and we thank them for it. After making 12 jars of jam, I turned my attention to ice cream. The ripple here is actually an old-style jam; the kind people made before commercial pectin. Boiling the fruit activates the natural pectin and turns the sauce into jam. This is a pretty intense jam which does not freeze solid, which I think helps deliver more raspberry flavour.

INGREDIENTS
- 1 recipe vanilla ice cream (cheaper version), made with 1/2 the vanilla
- 1 cup mashed raspberries
- 1/2 cup sugar

METHOD
1. Heat crushed raspberries in a saucepan over med-hi heat, until bubbling, stirring constantly. Remove from heat and pass though a very fine sieve, using the back of a spoon to mash the pulp and squeeze all the liquid out.
2. Place liquid back in the saucepan and add sugar. Heat to boiling over med-hi heat. Cook for 8-10 mins, stirring constantly. You want the mixture to thicken and coat the spoon you are stirring with. You will notice that the bubbles will begin to bubble within the mixture, rather than bubbling up the sides of the saucepan (if that makes sense). If you are a jam maker, the mixture should "sheet" off a cold spoon.
3. Cool mixture overnight in the fridge, covered.
4. When making the ice cream, drizzle raspberry mixture in for the final 3 churns, or so. You want the ice cream to be solidified before you add in the jam.

SIDE NOTE ON FREEZING FRUIT
Are you burdened with bushels of extra fruit this summer? More than you can possible eat? Freezing is a great idea and makes for a great addition to smoothies throughout the year. When freezing fruit, lay it out on a cookie sheet and stick in the freezer. When frozen, transfer to a container or bag. This way the fruit freezes as separate pieces (instead of one solid mass), making it easy to get just a few pieces out when you need them.

Tuesday, July 21, 2009

Grilled Portabello and Onion Sandwich

The only thing better than sourdough bread is toasted sourdough bread. The crispy and crunchy outside contrasting with the soft inside just makes for a perfect sandwich. Tonight's recipe is nothing special, but it sure is tasty. And, it is a meal you can make on the BBQ on one of those hot summer days when you want to stay out of the kitchen.

INGREDIENTS
Makes 4 sandwiches
- 4 large portabello mushrooms
- 1 tbsp olive oil
- 1 garlic clove, minced
- 1/3 cup marsala, or red, wine
- salt and pepper
- 1 large sweet onion, skin on
- 8 slices sourdough bread, lightly brushed with olive oil on one side

METHOD
1. Remove stem and wash mushrooms. Mix together oil, garlic, and wine in a small bowl. Season to taste with salt and pepper. Place mushrooms in a shallow dish, cap down. Toss mushrooms in marinade, and spoon excess into the mushroom's gills.
2. Heat BBQ to med-hi. Place whole onion on the grill and cook for about 15 mins, turning regularly.
3. Grill mushrooms, cap down, for about 10 mins, until softened. I grill mine cap down until marinade cooks down inside then gills (8 mins, or so). Then I flip and grill for about 2 mins.
4. When mushrooms are done, thickly slice. Peel onion using tongs, and thickly slice.
5. Grill sourdough, oiled side down, for a min or so over high heat, until nicely toasted. Assembly sandwiches (I added some Vidalia relish and a splash of Vegenaise).

Monday, July 20, 2009

Chilli Soya Chunks / Meal Maker Recipe


TH loves soya chunks. After paneer and mushrooms, this is probably his next favourite thing. Although I used to dislike the bland taste when I was younger, I have acquired a taste for it now. So I am always on the look out for new soy chunks recipes even though I tend to stick with my tried and tested Soy chunks masala recipe most of the time.

The moment I saw the chilli soy chunks recipe in Soma's eCurry, I knew I'd be trying it very soon. The ingredients were mostly every-day stuff and I always have some soy chunks (or meal maker, as TH calls it) in the house.

It was really really good, to say the least. We had it with chapatis but am sure it goes much better with fried rice.
Chilli Soya Chunks
Serves: 3 to 4
Source: eCurry

What I Used:

1 cup uncooked Soya Chunks/Meal Maker
1 onion, chopped into rough squares
1 large tomato, pureed
2 green chillies (I used Thai chilli padi)
1 small capsicum, cut into squares
2 tbsp ginger garlic paste (I used freshly minced ginger and garlic)
6 dry red chillies (adjust to taste)
2 tbsp soya sauce
1 tbsp tomato sauce/ketchup/hot and sweet sauce
2 tbsp oil
Spring onions or scallions for garnishing
Salt to taste

How I Made It:

1. Boil about 4 cups of water and add about 2 tsp salt and the soya chunks to it. Keep closed and let it soak for 30 mins.

2. Heat the oil in a pan and add the dry red chillies. To this, add the onions, capsicum, green chillies and ginger-garlic mixture. Fry for 2-3 mins on medium heat until the red chillies turn brown and the onions get transparent.

3. Drain the soaked chunks and reserve the water. Squeeze them gently to remove excess water and add to the pan. Add salt and toss well, letting it cook for about 5 mins and until well combined.

4. In the reserved water (adjust to get 1.5 cups water, adding more plain water if required), add the soya sauce, pureed tomato and tomato sauce. Mix well.

5. Turn the heat to high and add this to the pan with the soya nuggets. Mix well on high for 30 seconds and then lower the heat to medium-low. Cook closed for 8-10 mins.

6. Garnish with the spring onions, scallions and serve with rice or roti.
Note: The quantity of sauce in this recipe can be varied according to personal choice. Since I serve it with chapatis, I wanted more gravy than normal. Make sure you adjust water accordingly because as you keep this dish longer, the soya nuggets will absord more and more water making the dish drier than you may wish it to be.

Edited to add tips from The Wandering Minstrel and Soma:

- To remove the 'stink' present in soya chunks which some of you may not like, add some minced garlic and boil in water for 5 mins. Cool, squeeze out extra water and use as above.

- Soak those nuggets in a bowl of hot water, along with 3-4 spoons of milk - that takes away the raw soya taste and leaves the soya nuggets creamy and smooth.

Please feel free to share how you go about prepating the soya chunks before cooking.

Sunday, July 19, 2009

Kenny Shopsin's Mac 'n' Cheese Pancakes


Shopsin's version (above)

and here's (part of) mine:

(apologies for the overall jenky quality.)


Have you ever heard of Kenny Shopsin? I hope so. Matt and I are big fans and became even bigger fans after watching the above video (the one above mine, obvi) on the NY Times online Sunday magazine section.

Then, we got his book, Eat Me: The Food and Philosophy of Kenny Shopsin.
If you've now watched the video and/or are familiar with the book or (thanks doug d. for the reminder) the documentary on him I Like Killing Flies, I think you'll understand. If you have lived on the lower east side and visited his restaurant, Shopsin's General Store (check out the menu), I think you'll really understand. Now for... Mac 'n' Cheese pancakes!

There are three major components to mac 'n' cheese pancakes. Here are two of them.

The only other thing you need is pancake batter. Oh and a griddle/pan at the right temperature. This is important. Kenny dedicates a chapter to Pancakes and the Lost Art of Griddling and, as he would say, if it's not in the right range of temperature, "different, bad things happen."

The actual mechanics of the dish are simple: Pancake batter on the hot griddle. Drop on some elbow macaroni. Drop on some shredded cheddar cheese. Make sure your cell phone is on a string around your neck. Flip.

The pancakes were awesome, and surprisingly there's nothing strange about the way they taste. They're simply really really good, especially the ones where the cheese has become crispy on the outside but remains molteny on the inside, though we only got a few with this perfect textural combo.

Flippin' pancakes in full Shopsin regalia:
"Most of the times when a customer makes a special request, it's not about the food, but rather his own desire to be in control and to establish his own specialness. Making people feel special through this kind of ass-kissing is one of the services that a restaurant can provide to people who need it, but it's not a service that I want to provide... Some people tell me that they're deathly allergic to something and that I have to make sure it's not in their food. I kick them out. I don't want to be responsible for anyone's life-or-death situation. I tell them they should go eat at a hospital." - Kenny Shopsin

Italian Sub, Veggie Style

I decided to make some submarine buns today (or hoagie rolls, whatever you want to call them) but wanted to steer away from the rather obvious seitan route when filling them. Instead I went with a "bruschetta meets grilled veggies" route for a different spin on an Italian sub. If you have leftover sandwiches, wrap them up tightly in waxed paper and refrigerate--the flavours will meld together and the veggies really do taste great cold. Perfect for lunch at work.

INGREDIENTS
Makes 2 foot long sub sandwiches
- 2 foot long submarine buns
- 2 tbsp olive oil
- 1/2 red onion, diced
- 6 cloves garlic, chopped
- 2 tbsp balsamic vinegar
- 1 tomato, diced
- 1 tsp basil
- salt and pepper to taste
- 1 small eggplant, sliced lengthwise into 1/8" slices
- 2 small zucchini, sliced lengthwise into 1/8" slices
- 1 red pepper, roasted
- 10 cremini mushrooms
- 1 tsp smoked paprika
- sliced tomato
- shredded lettuce

METHOD
1. Heat oil in a saucepan over medium heat. Saute onions and garlic for 5-7 mins until softened. Add vinegar and tomatoes and stor well. Cook until liquid has cooked off. Season with basil and salt and pepper. Set aside.
2. While tomato mixture is cooking, toss eggplant and zucchini in some olive oil and season with salt and pepper. Grill on a BBQ over medium heat until soft, turning regularly. Roast the pepper at the same time. Skin, seed, and slice when done.
3. Toss mushrooms in olive oil and season with salt and pepper. BBQ cap side down until water has been released. Remove from grill, thickly slice, and mix with smoked paprika.
4. Assemble sandwiches. Spread a thick layer of the tomato mixture on the bottom bun. Top with red pepper, then eggplant, then zucchini, then mushrooms. Top that with tomato slices and lettuce. Top with bun and enjoy!

ON SUBMARINE BUNS
The buns are Peter Reinhart's Italian bread recipe (p. 172). I subbed the biga with 180z of sourdough starter, then reduced the liquid by about 2 tbsp (add slowly until dough forms). I brushed the final buns with soy milk and baked for 15 mins at 450 degrees.

Friday, July 17, 2009

Vegan Dad on Facebook

I really like to keep the blog mainly about food and recipes, so I created a group on Facebook to discuss the larger issues surrounding veganism and ethical eating. If you are a Facebook type, search for "Vegan Dad Blog" and join the group!

Thursday, July 16, 2009

Strawberry Daiquiri Sorbet

Prepare for strawberry nirvana, my friends. As promised, I ventured away from ice cream and into sorbet. I searched around for recipes and found two basic methods, one which required making a simple syrup (sugar cooked in water) and one which required no cooking at all. I decided to go for the latter and make things simple. The rum adds a nice subtle touch here--this recipe is not particularly boozy (there are young kids in the house, after all). You can probably make this with slightly thawed frozen berries, but I have not tried it. I hope it works, though, because it would be a real tragedy to only get this sorbet once a year.

INGREDIENTS
- 2 lbs fresh strawberries hulled (around 6 cups)
- 2-3 tbsp fresh lime juice
- 1 1/2 cups sugar
- 2 tbsp rum

METHOD
1. Place strawberries, 2 tbsp of lime juice, sugar and rum in a food processor. Process for about 5 mins on high, until smooth. Taste, and add more lime juice, if needed.
2. Place in a ice cream maker and churn as per the directions.

NOTE
You can make this right away, or you can put the mixture in the fridge to chill (you might want to do this if your ice cream maker is not super cold (at least -18 degrees Celsius). Or, you can place the ice cream maker back in the freezer and take it out to churn every few minutes. The sorbet will be quite soft (but should not be liquid) when done, and will firm up overnight in the freezer.

Wednesday, July 15, 2009

Sourdough Starter: Making Great Things Even Better

The thing about sourdough starter is that you need to keep feeding it in a regular basis--it must be doubled in size every few days with fresh water and flour to remain active. This sounds pretty daunting, and you've probably heard stories of the starter from hell that took over somebody's kitchen. I was also concerned about keeping things under control when I got my starter going a few weeks ago, and I envisioned throwing a lot of starter out as I kept refreshing. And, as much as I like sourdough, I really don't want to make and eat just sourdough bread.

Solution: add sourdough starter to other bread recipes. This way you can use up some of the starter whilst adding some great flavour to your other loaves. Here is the basic idea: the starter is a 50/50 mix of water and flour, so if you add 8 oz of starter to your dough, reduce the flour by 4 oz and the water by 4 oz. Proceed with your recipe as usual. I have used the starter in hot dog buns, whole wheat bread, and Italian bread so far (since I was using the starter I made this loaf in one day, rather than letting it sit for a day to develop flavour). I have yet to throw out any starter and all my bread tastes great.

Speaking of sourdough, my starter is developing in flavour and potency, and I am getting the hang of making and shaping the dough. Check out this beautiful loaf.