Saturday, October 31, 2009

Happy Halloween

Just a quick post to wish you all a Happy Halloween, and to remind to you sent your clocks back an hour. Instead of getting all fancy with the pumpkins this year, the boys designed their own jack-o-lanterns and I carved them up. Here they are from Sons 1 - 3.

Thursday, October 29, 2009

Giveaway for Picking Favourite Recipes!

Actually, the title says it all! I am getting a bit stuck with what new recipes to post. I know Edible Garden is far from being a comprehensive database of any one category of recipes but I keep getting different feedback from all of you, mostly good. I know you guys love step-by-step recipes and I know some of you would love to see more bachelor-friendly recipes. Microwave recipes is another category I haven't ventured into.

So just to give some direction to my thoughts here, I'd like to take your help. For your effort, I have this.


I only have three words to describe how this smells. Heav-en-ly! There words - three syllables - all the same! ;)
What you need to do:

1. Pick out three favourite recipes from this site and list them out in the comments section.

2. Tweet about this giveaway. Here's what you need to say:-

Pick 3 fave recipes and win B&BW Body Lotion! @bindya909 and link to this post.

3. Link from your latest blog post to this post with the words - Pick 3 fave recipes and win B&BW Body Lotion on Edible Garden!

If you do all the three above, then you will be counted thrice for the raffle! I will ship worldwide.
Contest ends Friday, November 6th, 2009 - 12:00 midnight Singapore time.

Looking forward to being reminded of some old recipes in here and curious to see what recipes make you happy :)

Prize sponsored by Nags

The winner is Divya Vikram! Thanks for participating Divya. I see you live in LA so please include your entire mailing address and any other info I'll need to ship this to you from Singapore.

Thanks everyone and stay tuned for the next one :)

Wednesday, October 28, 2009

Creamy Red Pepper Polenta with Roasted Mushrooms

The weather around here, in a word, has been crappy. And you can only eat so much soup before you get a hankering for something different but still warm and comforting. Creamy polenta fills the belly and has a hearty texture that satisfies. The dish is really easy to make, and it's amazing the depth of flavour you can get by chucking a few extra things into a blender.
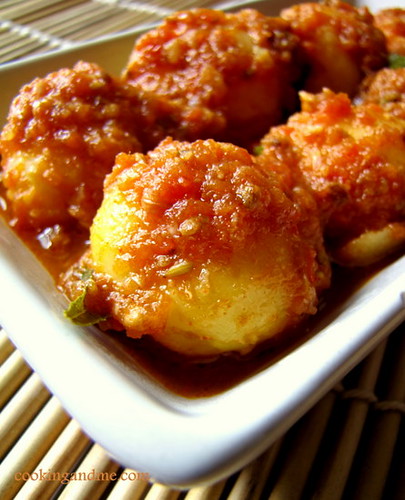
INGREDIENTS
- 4 oz cremini mushrooms, sliced
- 2 cloves garlic, unpeeled
- 1 tbsp oil
- 1/4 tsp salt
- freshly ground pepper
- 3 cups water
- 1 large red pepper, cored, seeded and chopped
- 1 leek, white and light green section, sliced
- 1/2 cup plain soy milk, or creamer (more, if needed)
- 1 cup polenta
- 1 tsp oregano
- 1/2 tsp sage
- salt and pepper to taste
- parsley, fresh or dried

INGREDIENTS
Preheat oven to 400 degrees
1. Toss sliced mushrooms and garlic in olive oil. Spread out on a baking sheet and sprinkle with salt and pepper. Roast for 20 mins, turning a few times to keep from burning. Remove from oven, let cool, then peel and mince garlic.
2. While mushrooms roast, place water, red pepper, and leeks in food processor or blender and blend until relatively smooth. Bring to bubbling in a sauce pan, then whisk in polenta. Lower heat and stir in soy milk/creamer. Loosely cover and cook for about 15-20 mins, until thick and creamy and soft. Stir regularly to keep from cooking to the bottom, and add more soy milk if it gets too thick. Stir in spices and minced garlic, then season to taste with salt and pepper.
3. Pour polenta into a large serving dish, then place mushrooms in the centre. Garnish with parsley and serve.

Monday, October 26, 2009

Potatoes in Red Coriander Sauce Recipe

This is a quick and easy Potato Recipe from Complete Indian Cooking by Mridula Baljekar, et al. I have tried quite a few recipes from this book with good success and this one was a must-try for two reasons.

1. Its the simplest recipe in the book!
2. It has the least number of ingredients and still looks so good.

Actually, there's one more reason: I love coriander. I hardly ever use coriander seeds in anything other than vatha kozhambu and the like but this recipe calls for whole coriander seeds. The flavour was delightful.

Potatoes in Red Coriander Sauce
Serves: 2
Preparation time: 15-20 mins
Source: Complete Indian Cooking by Mridula Baljekar, et al.

What I Used:

A dozen baby potatoes (or 3 potatoes, cubed)
1.5 tsp coriander seeds / malli
1.5 tsp cumin seeds / jeera / jeerakam
4 garlic cloves
3 tbsp thick tamarind juice (or 1 tbsp readymade tamarind paste)
1 pureed tomato (or chopped fine)
A few curry leaves
1/2 tsp sugar
2 tbsp oil
Salt to taste
Coriander leaves / kothamalli to garnish

How I Made It:

1. Boil the potatoes in water until they are cooked yet not mushy. You can pressure cook for 1 whistle to make the job easier.

2. Grind the coriander seeds with the cumin seeds and garlic cloves to a coarse paste using a pestle and mortar or your small mixie jar.

3. Heat oil in a pan and add the ground paste with the tamarind juice, tomato puree, curry leaves, salt and sugar. Lower fire to medium-low and cook until the oil separates (about 7-10 mins)

4. Add the potatoes and stir well until coated with the sauce. Cover and simmer for about 5 mins. Garnish with fresh coriander leaves and serve hot.


Note

- Instead of using whole coriander and cumin seeds, their powders can also be used. This will help you avoid the grinding, although the flavour will change a bit. It still tastes good, I have tried it both ways :)

Its been ages since I sent entries to any events so I am glad this fits in perfectly with Sunita's Think Spice event hosted by Priya, this month featuring coriander seeds.

Sunday, October 25, 2009

Thai Chickpea Cakes with Cucumber Relish

I am rediscovering my love of Thai food, now that I have more or less forgotten what fish sauce tastes like. I usually just end up chucking in a bunch of different sauces that I have in the fridge to get a more complex flavour: hoisin, vegetarian oyster, stir fry, soy, etc. This is a take on a fish cake--not so much a recreation of the texture and flavour, but more the spirit of the dish (whatever that means!). You can either fry or bake these. The baked version is a little dry, to be honest, by the relish moistens it right up.

INGREDIENTS
Cucumber Relish
- 1/4 cup rice vinegar
- 1/4 cup sugar
- 1/4 cup water
- 4 cloves garlic, chopped
- 1 tbsp minced ginger
- 2 large shallots, thinly sliced
- 2 cups diced cucumber

Chickpea Cakes
- 1 nori sheet
- 1 19oz can chickpeas, rinsed and drained
- 1 tbsp red curry paste, or to taste
- 1 tsp brown sugar
- 1 tbsp vegetarian oyster sauce
- 1 tbsp light soy sauce
- 1 tbsp oil
- juice of 1/2 lime
- 2 tbsp cornstarch
- 1/2 cup frozen french cut beans, thawed

METHOD
Relish
1. Heat vinegar, sugar and water over medium heat until sugar is dissolved. Remove from heat and add garlic, ginger, and shallots. When cool, add cucumber and mix well. Let marinate for as long as possible.

Chickpea Cakes (makes 12)
Preheat oven to 400 degrees
1. Rip up the nori sheet and place in a food processor with the blade attachment. Process on high speed until chopped into small pieces. Add chickpeas curry paste and pulse until chopped up but not like a paste (you're not making hummus here).
2. Dump chickpeas in a bowl, add sauces, oil, lime juice and mix well. Add cornstarch and mix well. Add beans and mix well.
3. Using wet hands, press mixture into a moistened 1/4 cup measure (don't fill it right up--more like 1/3 full. Place onto a baking sheet lined with parchment paper. Repeat with remaining mixture.
4. Spray cakes lightly with oil and bake for 15 mins, or until golden--don't over bake or they will be dry. Serve with relish.
5. You can also fry them for about 3 mins per side in 350 degree vegetable oil.

Bon Appétit's Blueberry Blintzes from 1978

A few fortunate things have resulted from starting Bon Appétempt, but receiving three Bon Appétit's from 1978 (from a Pittsburgh thrift shop nonetheless!) from our friend Katie has got to be close to the top of the list. Just wait and you'll see why.

Bon Appétit's Blueberry Blintze circa 1978:

Bon Appétempt's 2009 version:
There are sooooo many things to talk about.
First off, doesn't their picture of the blintze look completely average at best and woefully unappetizing at worst? Why would we even PICK that recipe you might be wondering. Well, take another look at the cover of that top magazine above--it's a plate of brownish-beige sausages on top of brownish-beige sauerkraut over a black background. If these magazines are any indication, then the late 70s were bad food years.

To further prove our point, check out some more images:
What is with everything being monochromatic? The upper picture is egg pasta, with fish dumplings and some nameless (thankfully) light, pink cream sauce. Quenelles? More like gross-elles! GET IT? DO YOU GET IT?!

The below flaming plum pudding speaks volumes about where the Bon Appétit editors' heads were at back in the day.
(Nice touch with the plastic holly on the ornate silver platter.)

I know what you are thinking: Can we please move on to less gross things? OK, how about the amazing ads we found.
Supersonic flight attempt? Sadly... a fail.

What about this lady and her domesticated jungle cat?
I could see myself spending some time with her (Wait, who is the little witch?).

1978 Pontiac Safari Wagon? Tremendous trunks? SOLD!

Matt and I got into the whole vibe. Here we are out for cocktails.
And here I am having a fun time trying to feed Matt while my friend looks on in horror.
But maybe, just maaaaybe, you'd like to know how the attempt went? I guess it was a success though it was probably the first time in history that upon completion of a recipe, neither of us were very eager to try it. Maybe the chunky, cottage-cheesy filling mixture had something to do with that?
But honestly, it wasn't that bad. Definitely more of a breakfast than a dessert though.

And I know Bon Appetit was doing a thing on healthy desserts, but I think the yogurt topping was just way too healthy. If I did this again, I would try it with a créme anglaise on top or at least something sweeter/ buttery-er than low-fat yogurt. I mean, c'mon.
In short, thank you, Katie!!! We owe you three Pittsburgh-born retro magazines on... other people's parties?


RECIPE:
10 servings

Blintzes
1 cup flour
2 eggs
1 cup nonfat milk
1/4 teaspoon salt
1 teaspoon butter

Filling
1 1/2 cups low-fat cottage cheese
1 beaten egg
2 tablespoons sugar
1 teaspoon cinnamon
1/4 teaspoon salt
1 cup fresh or defrosted frozen blueberries
2 tablespoons breadcrumbs (optional)
2 teaspoons butter
Low-fat vanilla yogurt

To make blintzes, place first 4 ingredients in blender and whirl until smooth. Refrigerate 1 hour. To cook, melt butter in 8-inch crepe pan. Pour in just enough batter to coat botom of pan with thin layer. cook on both sides until faintly golden. Turn onto plate or cake rack; repeat to make remaining blintzes.

Press cottage cheese through a sieve to drain off liquid. Mix together cottage cheese, egg, sugar, cinnamon and salt. If you are using frozen berries, be sure they are completely defrosted; drain and dry thoroughly on paper towels. Gently fold 3/4 cup berries into cheesee. If mixture seems runny, carefully stir in breadcrumbs.

Place a spoonful of filling on each blintz, fold in ends and roll up. Melt 2 teaspoons butter in nonstick pan and sauté blintzes until golden. Serve hot with vanilla yogurt, remaining blueberries and light dusting of cinnamon if desired.

Thursday, October 22, 2009

Thai Stuffed Omelets

I hardly ever buy veggie ground round, but for some reason it called my name on this week's shopping trip. I also finally got around to making the omelets from Vegan Brunch, so it seemed to me that these two things could combine together to make a tasty dish. The result: Thai stuffed omelets. I revised Isa's recipe a bit to make the omelet a little more durable, but they are still delicate. The soft texture of the omelet contrasts nicely with the more chewy filling, and the combination of sweet and savoury makes for a delicious dish that can either be an entree or an appetizer.

INGREDIENTS
Makes 6-8
Omelets:
- 1/4 cup instant tapioca
- 1/4 cup water
- 1 pound silken tofu (not Mori-Nu)
- 2 tbsp nutritional yeast
- 2 tbsp oil
- 1/2 tsp tumeric
- 1 tsp fine black salt
- 1/3 cup chickpea flour
- generous tbsp corn flour
- 1 tbsp cornstarch

Filling:
- 2 tbsp oil
- 1 onion, chopped
- 2 garlic cloves, minced
- 1 pkg veggie ground round (I used Yves)
- 1 tbsp vegan oyster sauce
- 1 tbsp soy sauce
- 2 tbsp sweet chili sauce
- 1 tbsp brown sugar
- 1 tomato, chopped
- 2 tbsp chopped cilantro

METHOD
Omelets:
1. Place tapioca in a food processor and sprinkle water over top. Let sit for a few mins. Add tofu, nooch, oil, tumeric, and salt. Blend until very smooth. Add chickpea and corn flour, and cornstarch and blend until smooth.
2. Heat a non-stick pan over medium heat (you may have to play around with the heat a bit to find the right temp where the omelets can cook without burning). Lightly grease and pour a generous 1/2 cup of batter into the pan. Spread out into an 8" circle with a spatula, then cook until mostly dry on top (a few mins). Flip and cook for another few mins. Remove and let cool for a min or two. I find the omelets are a bit more durable when they sit for a bit.
3. Place about 1/4 cup of filling in the middle of the omelet, then fold the opposite ends of omelet in to create a square. Place on a cookie sheet, cover with foil, and keep warm in the oven while you cook the other omelets.

Filling:
1. Heat oil in a frying pan over medium heat. Saute onion and garlic for 5-7 mins, until soft. Add ground round, sauces, sugar, and tomato. Bring to bubbling and cook for 8-10 mins, until tomato cooks down into a thick sauce. Add cilantro and stir. Keep warm while you cook the omelets.

Tuesday, October 20, 2009

Apple Jelly

Apple jelly is a small bite of heaven. Subtle in flavour, delicate in texture, and deliciously sweet. Perfect on a piece of toast for breakfast. Like most jellies, apple jelly is more work than your standard fruit jam because the juice needs to first be extracted from the apple. This is an old style jelly that does not rely on commercial pectin to set, but the extra work is well worth the end result.
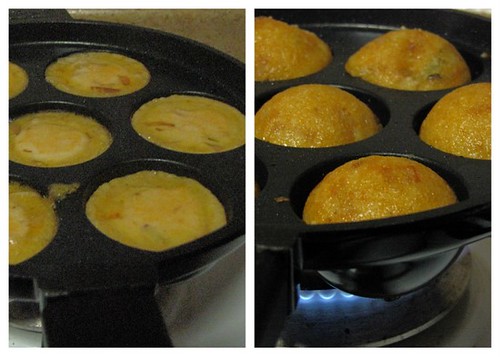
INGREDIENTS
Makes four 500ml jars of jelly
Apple Juice
- 10 lbs cooking apples
- water

Jelly
- 8 cups apple juice (from above)
- 1/4 cup lemon juice
- 6 cups sugar

METHOD
1. Remove stem and blossom end from the apples, then quarter (no need to core). Place in a large pot and cover with water. Bring to bubbling, then loosely cover. Reduce heat and cook for about 20-30 mins, mashing the apples as they soften. Don't cook too long, just until the apples are soft and easily mash-able.
2. Line a large colander with a wet tea towel and place over a large pot or bowl. Dump cooked apples into the colander and let drain for at least 2 hours. The juice will be thick, clear, and slightly pink.
3. Measure out the juice to make sure you have 8 cups. Place in a large pot, add lemon juice and sugar. Bring to boiling over med-hi heat. Boil hard for about 25 mins, stirring regularly. The jelly should sheet off a cold metal spoon when it is ready. Quite frankly, I have never figured out exactly what this means. You will find that the jelly will begin to coat the spoon you are using to stir the jelly.
4. Skim off foam, pour jelly into sterilized and warm jars, screw on lids finger tight, then process in boiling water (making sure jars are fully submerged) for 10 mins. Remove from heat, remove lid, and let cool for 5 mins. Remove from water and let fully cool. Jelly will fully set as it cools.

Monday, October 19, 2009

Masala Kuzhi Paniyaram Recipe

I thought I had posted this recipe yesterday but looks like I was dreaming while working - again! Anyway, here it is, my quick fix masala paniyaram recipe that gets made each time I have leftover dosa maavu. Originally part of the Chettinad Cuisine, its quick to prepare, easy and a very nice snack for evening tiffin. I love Chettinad recipes! Their love for food shows in their recipes, I feel.
You will need a paniyaram chatti/aebleskiver pan to make this, unfortunately, so if you don't have one yet, please do something to fix the situation ASAP.

Masala Kuzhi Paniyaram Recipe
Preparation time: 15 mins

What I Used:

Dosa/idli batter - 3 cups
Onion - 1, minced
Green chillies - 2, sliced round
Halved urad dal/split black gram/ulutham paruppu/uzhunnu parippu - 1 tsp
Red chilli powder - 1 pinch (I add it for the colour)
Hing/asafoetida/kaayam - a generous pinch
Greated coconut - 1 tbsp (optional)
Curry leaves - a few, torn into small pieces (optional)
Salt - to taste
Oil - 2 to 3 tbsp

How I Made It:

1. Mix all ingredients except oil into the dosa batter.

2. Heat the paniyaram chatti and add 3-4 drops oil into each hole. Once it heats, add spoonfuls of batter into each hole until its more than 3/4th full. Let it cook until the bottom is browned and crisp.

3. Turn over and cook the other side. Make sure that the stove is at medium-low so that the inside also gets cooked without burning the outside.

4. Once both sides are brown and crisp, drain on a kitchen napkin.

Serve hot with chutney and hot tea/coffee.

Sunday, October 18, 2009

Whole Foods' Spicy Shrimp Inari

For this attempt, we took a few (hundred?) steps outside of our comfort zone in the hopes of recreating one of our favorite Whole Foods' prepared meals: spicy shrimp inari. Have you guys ever picked it up? We eat it all the time and can't understand why the amazing spicy shimp & inari combo seems to be virtually unheard of outside of Whole Foods.

Whole Foods' version:
Our version:

Despite being our inspiration, we couldn't do our ingredierts-gathering at Whole Foods. We had to travel to the west side to the amazing Nijiya Market, a great organic, Japanese grocery store where you can find stuff like this:
What's that second bottle on the left side? We aren't sure. Oddly enough, the Nijiya employees weren't entirely sure either, but we were looking for a liquid form of dashi and are pretty sure that this mysterious bottle contains a comparable substance called dashinomoto.

Speaking of things I think I figured out during this whole process:
1. Inari is made of fried tofu pockets.
2. Fried tofu pockets are called aburage.
3. Aburage comes either canned or frozen.

We bought both versions. Below is the frozen one:
The frozen aburage is definitely visually more appetizing than its canned counterpart. And they just call for one extra step--dousing them with boiling water and then slicing them in half to get the pouches. With the canned version, you just pull them out and they are ready to go.
Doesn't look so good, right?
I kept trying to read the directions on the can of aburage, but my eye kept wandering Vivianne-ward.
I'd never made sushi rice before. It wasn't so bad except that I forgot that we were doubling the recipe and so we had to make two batches and both batches stuck to the bottom of the pan in a major way. Anyone know how to avoid this? Was it on too high of heat?
Here at bon appetempt, we like to follow recipes, but like we said, this spicy shrimp inari is elusive. We couldn't really find a recipe for it and so ended up having to wing it. One of the inari recipes we looked at called for cooking the aburage in a saucepan filled with many of those strange ingredierts from Nijiya Market. It looked something like this:

The spicy in spicy shrimp inari comes in with a spicy sauce on top of the shrimp. We're pretty sure that Whole Foods simply mixes Sriracha and mayonnaise, but guess what? We didn't have Sriracha on hand. (I know, WTF-situation.) We thought we did. (We are becoming overconfident in the condiments we think we have on hand.) We did have sambal oelek and mayonnaise, however, and after some experimenting came up with a pretty decent, if not super spicy alternative. (See recipe at end of post.)

Shrimp. Required ingrediert.

Once the tofu was finished, we let it cool and then squeezed out the excess sauce with the help of a small lemur that inexplicably appeared mid-attempt. Though not in focus, the little guy is pictured below.

Aburage is kind of like the Japanese version of the pita pocket. Once cooked, we stuffed each pouch with the rice mixture. At this point we had achieved inari but what happens next is what takes it to the next level and separates this inari from the standard inari available at every sushi restaurant.

Our patent-pending four-step spicy shrimp inari process:

Bon Appetempt, your pictures look stunning, but how did it taste, you ask?

It was great. Very similar to the original, but a little saltier. Usually, I dip the little guys in soy sauce, but our version definitely didn't need any more of that. We're pretty sure that Whole Foods uses the canned aburage and simply takes the pockets out of the can and stuffs them with sushi rice, skipping over the aburage simmering in the dashi/soy sauce/mirin/sugar potion. Either that or we used too much dashinomoto and not enough sugar. Or we should never have used the dashinomoto in the first place.

Our spicy sauce, on the other hand, was great. Much spicier than the Whole Foods one, but we liked it even more for that.

Oh and by the way, while we were at Nijiya market, we picked up some Kasugai gummy's. Whoever is in charge of translating their copy is a genius.

INARI RECIPE via HUB-UK (We didn't use the carrot)
Ingredients:

2 cups prepared sushi rice
3 Tbs. Mirin
3 Tbs. Sugar
4 Tbs. Soy sauce
1-1/4 cup Dashi
1/4 cup Shredded par-boiled carrot
Salt
4 Deep-fried tofu cakes (aburage)*
or
8 Canned tofu pouches

Note: Aburage can be bought canned or frozen at many Asian food markets. The canned variety are already seasoned and sliced; if using these, plan on three or four pouches per person.

Bring the prepared sushi rice to room temperature.
(If using canned aburage, skip this next step) Pour boiling water over the deep-fried tofu cakes to remove oil. Cool, then slice each tofu cake in half lengthwise to make eight tofu pouches.

In a small saucepan, combine the mirin, sugar, soy sauce and dashi together. Simmer over low heat until hot. Drain gourd strips, then add the gourd strips and tofu pouches into the stock. Heat to boil. Cover, then reduce heat to low and simmer for 20 minutes. Remove from heat and allow to cool. Squeeze the tofu pouches and gourd strips dry. Set aside.

Mix the shredded carrot with the sushi rice.

Moisten hands, then pick up enough rice to make a small, oval-shaped ball. Open a tofu pouch; gently slide the rice ball into the pouch. Fold the sides in and top flap over the rice to close pouch. Repeat with remaining rice and tofu pouches.

Serves 4

SPICY SAUCE RECIPE via BON APPETEMPT
3 tablespoons mayonnaise
2 tablespoons sambal oelek
1/2 teaspoon mirin
1 1/2 teaspoon lemon juice

Mix it all together. Enjoy.


Saturday, October 17, 2009

Pumpkin Rolls (and Bread)

Tonight's post is kind of two ideas in one. First, adding pumpkin to just about any kind of bread is a good idea. I peel and seed the pumpkin, chop it, and boil it in water for about 30 mins until it is soft. I then drain it and blend it in a food processor until very smooth. I have found that this puree can be subbed in for water in bread recipes, almost cup for cup. Start by simply replacing the water with the puree, then add in more as needed. It gives the bread a wonderful light orange/yellow colour and makes it tender and moist.

Second, I give you mini buns. Not really a ground-breaking idea, I know, but hear me out. This year the boys' school changed to something called the equal day. Instead of two recesses and a lunch break, the kids get two 40 min "nutritional breaks," one in the morning and one in the afternoon. This makes packing food a little more interesting, but I have had great luck with these mini buns. The recipe is Peter Reinhart's Italian bread recipe from The Bread Baker's Apprentice: the starter is made as per the book, but the final dough is made with whole wheat flour, and the water is replaced with pumpkin puree. Each bun weighs 50 grams, is brushed with soy milk after rising, and is baked at 400 degrees for 14 mins. The great thing about these is that there is no crust to leave behind, so the kids gobble them all up, one in the morning and one in the afternoon. I make 40 of them at a time (double batch of dough), freeze them, and pull them out as I need them throughout the week.

Wednesday, October 14, 2009

Apple Juice

We have apples coming out of the wazoo! I guess it is too cold to grow apples up here (there are no local orchards that I know of), so my in-laws bring us a whole whack of apples from down south every fall. So, after making apple pie, apple crisp, and huge batch of apple sauce, we still had tons left. The obvious thing to do next was to try my hand at apple juice. OK, first just let me say that apple juice is A LOT of work. I don't know how they can sell huge cans of it for 99 cents. I started with a recipe in my canning cookbook that called for 24 lbs of apples to be chopped, cooked in 8 cups of water, then hung in a cheesecloth and left to drip for 2 hrs. That sounded like too much work, plus I doubted any cheesecloth could hold 24 lbs of cooked apples. Enter my Jack LaLanne power juicer! I figured the juicer would eliminate the initial cooking step and perhaps filter the juice a bit. Well, it didn't work exactly as planned since the juice still needed considerable straining to filter out all the sediment. Here is what I did to get a delicious juice with an amber colour and cidery taste. Son #1 set up the photo for tonight's post.

EQUIPMENT/INGREDIENTS
Makes about 6L of juice
- 24 lbs apples
- 1 juicer
- 2 clean tea towels, damp (they will get stained)
- two large pots/bowls
- kitchen thermometer
- 6 1L canning jars and lids

METHOD
Sterilize your jars. Get a large pot of water boiling to process the jars of juice.
1. Use large rubber bands to affix the tea towels over the top of the pots/bowls. Don't make the towel tight over the bowl; rather, make sure it dips into the bowl so it can hold the juice.
2. Working in batches, chop the apples and process them through the juicer. Pour into the towel over one of the bowls and let drip through. You will find that the towel quickly gets gummed up with a pectiny residue, so I made this a pretty rough filtering. Once most of the juice passed through, I detached the towel and squeezed the remaining juice through. Then, I poured it through the other towel while I cleaned the first towel. I then passed it through the first towel once again.
3. Once all the juice has been filtered, heat to 190 degrees F and keep at that temperature for 5 mins. Pour into jars, top with lids, then screw the ring on finger tight. Place in pot of boiling water (making sure water covers lids), return to boiling, then boil for 10 mins with lid on. Remove from heat, remove lid, and let sit for 5 mins. Remove jars from water and let cool.

Monday, October 12, 2009

Thakkali Muringakka Aviyal Recipe / Tomato and Drumsticks in Coconut

I don't know if this a common Kerala recipe but ever since I can remember amma has been making this a quick side dish for Chicken Biryani. Her rationale is, biryani is intense and doesn't have coconut and any Malayali should know that we always pair curries with coconut and without coconut together, to balance the flavours.

Amma sent me the recipe through my uncle who typed it out while she listed the things to be done. The picture was taken in Kottayam when I was there this August and amma made it, not me :)

thakkali muringakka aviyal

Thakkali Muringakka Aviyal Recipe
Source: My mom
Preparation time: 30 mins

What Is Needed:

4 tomatoes, sliced into six long pieces
1 drumstick / muringakka, cut into 3" pieces
1/2 cup grated coconut
12 peeled shallots / chinna vengaayam / cheriya ulli
2 flakes garlic
1/4 tsp jeera / cumin seeds / jeerakam
1 tsp red chilly powder
A few curry leaves
1/4 tsp mustard seeds / kaduku
1 tbsp oil (preferably coconut oil)

How Its Made:

1. Add the chopped drumstick to about 1 cup water with with some salt and the chilly powder. Keep on a medium flame and cook until soft. The mixture shouldn't be too watery, so if it is, boil some more on a low flame.

2. To this, add the cut tomatoes and cook some more until the tomatoes begin to soften.

3. Grind together - coconut + jeera + garlic to a coarse paste.

4. Heat oil in a pan and add the mustard seeds. When they pop, add the shallots and curry leaves. Fry for about 2 mins, until the shallots soften.

5. Next, add the ground coconut paste and fry for another 1 min. To this, add the drumstick and tomatoes. Mix well. Simmer for 2-3 mins until well combined. Adjust salt.

Serve hot with steamed white rice or chicken biryani.

Thanksgiving Roundup

This post won't help my Canadian readers, but perhaps it will be of some use to all you Americans (and anyone else celebrating Thanksgiving some time soon). First, let me apologize for the lack of a picture (of food--this is from our fall hiking trip). I was all ready to snap a pic of the feast when I realized my battery was dead. Sigh. For the entree I made the Thanksgiving Mini Pot Pies than I blogged about a few days ago. I made a triple batch of the roasted mushroom gravy to pour over absolutely everything. Both the pot pies and the gravy went over very well with vegans and omnis alike. I was afraid that the pies would be a little redundant, but that really wasn't the case. The other problem was how to serve the pies since they were baked in a ramekin. I placed them off centre on the plate, then piled all the other dishes around the ramekin--it worked perfectly. The other dishes were pretty standard: mashed potatoes, baked yams, acorn squash, peas, carrots, and corn. I also made stuffing, though it I didn't stuff it anywhere. First, I made Peter Reinhart's Italian Bread recipe, subbing the water in the dough (not the starter) with pureed pumpkin. The result is a wonderfully soft and golden loaf. I cubed the bread and tossed it with onions and celery that had been sauteed in olive oil. I seasoned it all with sage, thyme, and salt and pepper, and added raisins and dried cranberries and baked at 350 in a greased pan for about 1 hr and 15 mins.

Saturday, October 10, 2009

Happy 2nd Anniversary

I just realized I forgot to toot my own horn and celebrate the 2nd anniversary of the Vegan Dad blog on September 8. Go back and look at my first month of posting. Yikes.

Friday, October 9, 2009

Saying Farewell to Gourmet with Red Wine Caramel Apples

The recession has directly affected my life in many, many ways, but for some reason this week's announcement of Condé Nast shutting down Gourmet magazine felt oddly personal. Maybe because the magazine was responsible for roughly one-third of Bon Appetempt's posts? Or because it was the first food magazine I subscribed to? Or because of all the food mags Gourmet seemed to allot the most space to food writers and I'd recently written an essay on failure in food and life that I'd been looking to pitch to the editors?

Probably all of that has something to do with my reaction, but I think what it boils down to is that Gourmet was like my AIG or Lehman Brothers. It had been around since the 40s. It was 69 years old. It was too beautiful to fail!

Apart from writing letters to Condé Nast, the only other thing we felt we could do was this little tribute to the most recent issue that arrived in our mailbox.

Gourmet's version:

our version:
As you may have guessed, the recipe involves apples. Our market didn't have macintosh available, so we went with The Jonagold Apple, which is apparently a cross between a Golden Delicious and a Jonathan apple.

For better or worse we did not have Popsicle sticks, so we went for the next best thing on hand: wooden chopsticks.

All you need to make this attempt your very own:

First, you reduce the red wine. Then, in a separate pot, you make the caramel by boiling sugar and water. Next, you add the wine reduction and the heavy cream and let it simmer.
Once it cools down a bit, you get the apple in there, which brings us to where the project became a minor fail. The recipe calls for a few gadgets that we didn't have and decided not to purchase--one of which being a candy thermometer. We were supposed to get the caramel up to 238°F and then bring it down to 200°F.

Apparently we haven't learned our lesson that science sometimes cannot be eyeballed. (We stuck the apple in the sauce when Matt turned to me and said, "That looks like 200°F.") Sooooo, the red wine caramel never thickened to the point it should have, and what resulted was an extremely thin layer--a tiny hint of caramel covering the apple.

That being admitted, the stuff was delicious. It tasted like the best pie filling we ever had. We ate it straight off the spoon and then later, Matt put it over ice cream. It just never achieved the thickness we had come to expect from a caramel apple.

At first, we assumed that this was our fault, a consequence to our unscientific approach (and it still most likely is), but upon checking out the recipe on Gourmet's site (which is still there as of now, thank God), it appears that others have also found that this particular caramel recipe doesn't thicken enough to really stick to the apples.
But we can't and won't go out on Gourmet with a fail. (The next two and a half lines should be read in the voice that Mel Gibson uses to summon his army in Braveheart.) No. This will not be our last Gourmet appettempt. We will go on attempting(!!) via The Best of Gourmet as Matt's parents recently bought us the book pictured below. And though I loved it before this news, it now seems like a rare artifact, a reminder of what a gorgeous, inspiring, and thoughtful publication Gourmet was.

And thus, Gourmet lives on!

RECIPE:
Makes 8 apples
Active Time:30 MIN
Start to Finish:1 HR

8 small McIntosh apples, stemmed, washed well, and dried
1 1/2 cups red wine
2 cups sugar
1/2 cup water
6 tablespoons heavy cream

EQUIPMENT: 8 wooden ice-pop sticks; a candy thermometer

Insert a wooden stick halfway into each apple at stem end. Line a tray with wax paper and lightly grease paper.

Boil wine in a small saucepan over medium heat until reduced to 1/2 cup, 8 to 10 minutes. Remove from heat.

Bring sugar and water to a boil in a 21/2- to 3-qt heavy saucepan over medium heat, stirring until sugar has dissolved, then wash down any sugar crystals from side of pan with a pastry brush dipped in cold water. Boil, without stirring, swirling pan occasionally so caramel colors evenly, until dark amber. Add reduced wine (mixture will bubble up and steam) and swirl pan. Add cream and simmer, stirring, until incorporated, then continue to simmer until thermometer registers 238°F. Remove from heat and cool to 200°F.

Holding apples by the sticks, dip them in caramel and swirl to coat, letting excess drip off, then hold apples up (stick end down) for about 15 seconds to allow more caramel to set on apples. Put caramel apples, stick side up, on greased wax paper and let stand until caramel firms up, about 30 minutes.

COOKS’ NOTE: If caramel becomes too thick* to coat apples, reheat over low heat to loosen.

*not gonna happen