Wednesday, April 29, 2009

Click Spring/Autumn Entry

This month has been a bit crazy so I didn't even get time to think about Click, let alone obsess about what I send in. I didn't want to miss it though so I am sending a picture from my archives. One that a lot of you liked :) 

A Slice of Yellow

Since I come from a part of the world where there are no distinct seasons, I had to check with them whether this is acceptable. And it is! Phew! 

Stromboli

If you heard a collective yowl ringing through the sky around supper time, that was my kids accusing me of violating the sanctity of pizza by adding greens. Back in the summertime when I was researching in Philly, someone suggested that I make a vegan stromboli in honour of the city. I am finally getting around to it. Looking around on the internets I found that there seemed to be no one way to make stromboli, and that the ingredients varied from recipe to recipe. Some were rolled, some were more like a big calzone. No matter what way you make it, the great thing about stromboli is that you can pack a ton of ingredients inside and you don't have to worry about the cheeseless top drying out. Here is what I did, but really the ingredients are up to you.

INGREDIENTS
- 1 recipe pizza dough (they are all pretty much the same)
- 2 tbsp oil
- 1 large sweet onion, halved and sliced
- 1/2 red pepper, diced
- 1/2 green pepper, diced
- 1 clove garlic, minced
- 4 cups sliced mushrooms
- 4 kale leaves, stem removed, chopped
- 1 tsp oregano
- 1 tsp basil
- 1 tsp parsley
- salt and pepper to taste
- sliced pepperoni
- 2 cups chopped chicken-style seitan
- spaghetti sauce
- soy milk for brushing

METHOD
1. Make your dough as per whatever recipe you are using.
2. Heat oil in a frying pan over medium heat. Saute onion for 5-7 mins, until softened and beginning to brown. Add peppers and garlic and fry for 2 mins.
3. Add mushrooms and cook until they have released their water (about 5 mins). Add kale and seasonings and cook for a few mins until kale softens (it will finish cooking in the oven). Remove pan from stove and place in the fridge to cool down).
4. Heat a pizza stone in the oven set to 400 degrees.
5. I have make this two ways: rolled and braided. If you are going to roll the stromboli, make two smaller ones (I followed the method in this recipe). If you are braiding it (like pictured above), you can make one big one (I followed this video). The basic idea is to put down some sauce, top with pepperoni and setian, then top with veggies. The trick is keeping the sauce away from the edges so you can seal up the dough nicely.
6. When your stromboli is rolled or braided, brush with soymilk and place on a piece of parchment paper on a pizza peel. Transfer to the pizza stone (parchment paper and all). Bake until golden brown. Smaller rolls will bake in about 25-30 mins, larger ones in about 35-40.

Does it Count as Tackling Something Semi-Ridiculous if Working From a Recipe From Real Simple Magazine?

Well, I'm counting it. 1. because it still involved doing something I'd never done before, which is make pizza from frozen pizza dough. AND 2. because I'm driving cross country in two days, so cut me some slack, please. Thanks!


my version:


It all started with four balls of frozen pizza dough, which had to thaw for 6 hours.

Matt enjoyed tossing the thawed dough in the air to the tune of "So you want to make a pizza, yum, yum, yum!" You guys know that one? I didn't.

We forgot to take pictures of the rolling-out process, but here is one of Matt's knife skillzz.
Italian food is pretty.

I wish I had a digital recorder so that you could click on this and hear that pizza song. Yum Yum YUMMMMMMM.

COMING SOON: pictures of something that is going to change the face of Bon Appétempt as we know it.

Monday, April 27, 2009

Fried Egg Sambal

Egg Sambal is typically a Malaysian dish but can be found in Indonesia too. I have tried it at various food stalls here in Singapore and always loved the tangy flavour. It seemed like the perfect thing to make after we got back from tiring 3-day vacation in Bali. Yes, I know. We should've come back revived and all that but thanks to the heat, that really didn't happen. I did manage to shop a bit for handmade soap and aromatherapy stuff so no complaints! 

Since I was really lazy to cook up anything, I didn't hardboil the eggs like they usually do for egg sambal. I fried them up and cut them into strips. The gravy used is very similar to the gravy base I made for stir-fried tofu. It made a great side-dish for a simple vegetable rice

Fried Egg Sambal Recipe

What I Used:

Eggs - 4
Tomato - 1, finely chopped
Onion - 1, finely chopped
Tomato paste / ketchup - 1 tbsp
Garlic - 3 pods, crushed
Tamarind paste - 1/2 tsp
Red chilli powder - 1 tsp
Coriander / malli / dhania powder - 1 tsp
Turmeric powder - a pinch
Oil - 2 tsp + 2 tsp
Salt - to taste
Spring onions - 2 stalks for garnish (optional)

How I Made It:

1. Break the eggs into a bowl and mix well with salt. Pour onto a heated pan with 2 tsp oil and make a thick omelette. Once cooled a bit, cut into strips and keep aside. 

2. In the same pan, add 2 tsp oil and add the onions and garlic. Fry lightly until the onions turn soft and transparent. Take care not to burn them by maintaining the heat at medium-low.

3. Next, add the turmeric, coriander, chilli, salt and tamarind paste and fry for about a minute. Then add the chopped tomatoes and cook till the tomatoes break down and the oil separates from the sauce. 

4. Add the fried egg strips and mix well without breaking them too much. If the omelette is thick enough, the strips will hold their shape while mixing. Simmer for a minute or so, remove from fire, garnish wtih cilantro / spring onions and serve warm as a side to any rice dish or even roti. 

Sunday, April 26, 2009

Southern-Style BBQ Tofu Burger

I say "southern-style" because I am fairly sure that no one south of the Mason-Dixon line actually eats anything like this. This dish just kind of came together on the fly and I was happy with the result. I knew the kids would totally freak out if I made them eat greens on anything that looked like a burger, so I let them eat them on the side. They still did not thank me.

INGREDIENTS
Makes 8
- 1 recipe southern-style greens (I left the stalks on this time for some crunch, and opted out of the onions)
- 2 tbsp oil
- 1 Vidalia onion, halved and sliced
- hot sauce to taste
- 1 pkg extra firm tofu, cut in half vertically, then each half sliced into 4 pieces horizontally
- 1/2 cup BBQ sauce (more if needed)

METHOD
1. Get your greens cooking.
2. Heat oil in a frying pan over medium heat and saute onions for 5-7 mins, until nicely browned. Douse with as much hot sauce as suits your fancy, mix well, and remove from pan.
3. Add a bit more oil to the pan and fry tofu for a few mins each side, until golden brown. Add BBQ sauce to the pan and simmer until sauce is nice and thick (5-7 mins) , turning tofu regularly.
4. To make the sandwiches, place a slice of tofu on a bun, top with some onions, and then some greens. Add whatever fixin's suit your fancy (I just put some Vegenaise on the top bun), and eat!

Friday, April 24, 2009

Sweet Potatao and Kale Quesedillas

The other night we went to a pasta dinner at the boys' school--a way to meet with other parents and build school spirit. We had a great time, but between chatting and trying to shove pasta into the mouths of kids, Vegan Mom and I really didn't eat a lot. We were both feeling pretty peckish later that evening so I whipped up these fantastic quesedillas (he said, tooting his own horn).

INGREDIENTS
Makes 6-8
- 1 large sweet potato, diced
- 2 tbsp oil
- 1/2 large Vidalia onion, sliced
- 1/2 cup frozen sweet corn
- 1 clove of garlic, chopped
- 1/2 jalapeno pepper, seeded and minced
- 1 cup canned black beans, rinsed and drained
- few dashes hot sauce
- 1/4 cup salsa
- 1 tsp chili powder
- 1/2 tsp cumin
- 1/2 tsp cinnamon
- salt and pepper to tatse
- 2 kale leaves, stalks removed, chopped
- 6-8 small wheat tortillas
- margarine

METHOD
1. Place chopped sweet potato in a small pot and cover with water. Bring to bubbling, reduce heat, cover, and simmer for about 15 mins, until potatoes are tender.
2. While potatoes are cooking, heat oil in a frying pan over medium heat. Saute onions for 5-7 mins, until starting to nicely brown. Add corn and cook for another 5 mins, until corn begins to brown.
3. Add garlic and jalapeno and saute for 2 mins. Add beans and hot sauce and mix well. Add salsa and spices, and season to taste with salt and pepper.
4. Drain potatoes and roughly mash. Add to pan along with the chopped kale. Cook for a few mins, until kale is softened and a a nice brilliant green. Add more salsa if mixture is too dry. Adjust seasonings to taste. Remove from heat. Heat a different fryin pan over medium heat.
5. Spread a thin layer of margarine on one side of a tortilla (not necessary if you are using a cast iron pan). Spread a layer on half of the un-margarined side of the tortilla. Fold tortilla in half, then fry for a few mins per side, until golden brown. Remove from heat and slice in 3 triangles.

Thursday, April 23, 2009

The Indian Cooking Knol-edge Contest

Most of you may already know about the Indian Cooking Knol-edge Contest run by the Google India team. In case you haven't heard about it yet or haven't had the time to read the email, here are the details once again. The sooner  you get started on this, the more chances you stand of winning fame, fortune (read Sanjeev Kapoor!) and awesome prizes!!

Let me break down the necessary details of the contest for you:

1. The contest is run by Google India. Yes, Google. As in the search company. Awesome, no? :)

2. The idea is to submit recipes in one of the following Indic Languages - Hindi, Tamil, Telugu, Kannada or Malayalam using Indic Transliteration What this means is, you don't need a special keyboard or even writing knowledge in any of these languages. If you can speak it, you can write recipes using it! For more information, do check out this page

3. Don't worry if none of that made sense. Click here to check out some samples recipes. 

4. You can submit any Indian recipe either previously used in your blog or from scratch. You can add a plug for your blog which may result in some extra traffic. Sweet! 

5. The contest ends on June 20, 2009 and winners will receive Sanjeev Kapoor cookbooks and prizes worth 150 USD from Google!!

6. Raring to go? Click in the contest entry link from this page and start sending in your recipes. You can submit as many recipes as you want!

7. Here is the link to the FAQ page in case you get stuck. 

Good luck and may the best recipes win :) 

Notes

- You may have follow-up questions. Although I may not know all the details to help you out, do leave a comment if you are really (really really) stuck. The FAQ page should answer most of your questions though. 

- Neither Nags nor Edible Garden is directly linked to this contest. All disputes and other issues are to be dealt with Google India team directly (I love how important that point sounds)


Wednesday, April 22, 2009

Medium Étempt: Bon Appétit's Panang Tofu Curry

It's amazing how many of Bon Appétit's main dishes are meat-based. And when I saw this one, it was just like in the pre-blog days when I wasn't seeing recipes in terms of the final picture match up. Back then, I just wanted to eat some delicious food. BUT, of course I still have to do the final picture match up because that's still really fun. I mean, I'm having fun right now.
their version:
my version:
(I really don't know why my color is so off. Too much turmeric?)

I started off with one smile of produce, substituting limes for the kaffir lime leaves the recipe called for.

There's not too much to show as far as this recipe's process, which was basically just chopping things and adding them to a pan, so let me take this time to show you the weird baby pepper that was inside of my red pepper:

Weird, right? I mean, it's green, too. Do red peppers start out green or is this just some freaky pepper that I could've sold on ebay for one million dollars?

I must say that before I added the red and white elements, it was looking sort of gross.

All in all though, this was a tasty, inexpensive meal that fed my roommate and I for days. For this latter fact alone, it would go under the label of success.

Tuesday, April 21, 2009

Indian-Style Potatoes and Spinach

Boy are my kids getting tired of the greens! Ha! Too bad, laddies! I keep giving them the same lecture on getting enough iron, calcium, etc. Of course, they can't really complain when the food tastes this good. I took the recipe from Best Ever Curry Cookbook and adapted the method.

INGREDIENTS
- 2 tbsp oil
- 1 tsp mustard seeds
- 1 large onion, halved and sliced
- 2 cloves of garlic, chopped
- 1" piece of ginger, minced
- 4 large Yukon gold potatoes, cubed
- 1/2 cup water (more if needed)
- 1 tsp chili powder
- salt to taste
- 2 handfuls baby spinach

METHOD
1. Heat oil over medium heat. Add mustard seeds and fry until they begin to pop and splutter. Add onion, garlic and ginger and fry for 5-7 mins, until translucent.
2. Add potatoes, water, chili powder, and salt and mix well. Add a little more water, if needed, to make a nice sauce. Reduce heat, cover, and cook for 12-15 mins, or until potatoes are cooked. Stir occasionally.
3. When potatoes are cooked, add spinach to the pan. Cover and cook for a few mins until spinach wilts but is still a nice vibrant green.

Monday, April 20, 2009

Kerala Olan Recipe

I am back from a week-long, too-short, too-hectic vacation to India. I visited both Chennai and Kottayam and had a gluttonous 6 days in Kottayam, where my mom cooked every possible dish that I missed while in Singapore. 

A lot of stuff has happened in this one week. I have 675 new posts to catch up on in my Reader, had to wade through close to a hundred emails and this doesn't include my work email and other pending stuff! Like they say, I am going to need another vacation to get over this one! The most important update I have for you is the new group blog a few of us have started - Beyond Curries. I am horribly late in introducing it but in case you haven't seen or heard of it yet, do check it out. 

Anyway, onto the recipe now. I made this a while back and almost posted it a few times. Olan is an essential dish in the traditional Kerala Onam Sadya and even for wedding sadya. The dish is mild, flavoured only with coconut milk, jeera and green chillies. Its not strong enough to be the only dish in your meal so I would recommend pairing it with some spicy kuzhambu or theeyal to bring out the taste of the olan. 


What I Used:

3/4 cup black-eyed beans 
1 cup pumpkin, cubed 
3 - 4 green chillies 
1.5 cups coconut milk 
1/2 tsp Jeera / jeerakam powder
Salt to taste

To Temper:

2 tsp coconut oil
1/2 tsp mustard seeds
4 shallots sliced thin (optional)
A few curry leaves 

How I Made It:

1. Soak the beans for atleast 5 hours and pressure cook for 3 whistles in 3 cups water. Set aside.  (I have once done this without soaking it and it came out fine. I am sure it depends on the kind of beans, the place and other factors so please soak them to be on the safer side)

2. Add the cubed pumpkin, slit green chillies, jeera powder and a little bit salt into a pan with 1 cup water and let it cook on a low fire until soft. Cook closed for best results but check to make sure it doesn't get too mushy. This shouldn't take more than 5-7 mins. 

3. Add the beans and 1/2 cup coconut milk to the cooked pumpkin pieces. At this stage, adjust water so that the curry is not too watery or dry. Ideally, there should be enough liquid to cover the pieces. Cook for another 4 mins or so on low fire. If you feel the curry is too watery, add 1 tsp rice flour mixed with 2 tbsp water and mix well. 

4. Add the rest of the coconut milk, adjust salt and heat through for not more than 2 mins.  Remove from fire. 

5. Heat oil and add all the ingredients for tempering. Once the shallots turn a golden brown (if using, otherwise just wait for the mustard seeds to pop), add it to the curry. Mix well and serve hot. 


Notes

- Back home, my mom makes this with ashgourd (kumbalanga) and cowpeas (vanpayar). This is said to the more authentic version, the one that we see in Kerala Sadya. The reason why pumpkin is not used or is used in addition to ashgourd is because of the other important dish in a sadya that already uses pumpkin - erissery

- You can use a mix of ashgourd and pumpkin, mix of yellow and white pumpkin or only yellow pumpkin, like I have done. Even with the beans there is a lot of flexibility. Cowpeas (Vanpayar) is the most common but sometimes people add the pods from yardlong beans (achinga payar).


Sunday, April 19, 2009

White Bean and Spinach Pasta

In keeping with my recent theme of quick and healthy meals (with greens), here is an Italian dish that is delicious in its simplicity.

INGREDIENTS
- 450g whole wheat rotini
- 2 tbsp olive oil
- 1 onion, chopped
- 1 large garlic clove, minced
- 1/2 cup marsala, or red wine
- 1 15 oz can canellini beans, rinsed and drained
- 1 28 oz can can diced tomatoes (juice and all)
- basil (fresh or dried) to taste
- salt and pepper to taste
- 3 cups baby spinach (or more)

METHOD
1. Cook pasta in salted water until just about done (leave it a bit underdone so it can suck up the sauce).
2. While pasta is cooking, heat oil in a saucepan over medium heat. Saute onion for 5-7 mins, until translucent. Add garlic and sauet 1 min more.
3. Add wine and beans and mix well. Let bubble and reduce for a few mins. Add tomatoes and mix well. Season to taste with basil and salt and pepper.
4. Drain pasta and return to pot. Return pot to medium heat. Add in sauce and spinach. Bring to bubbling and let cook for 8-10 mins, or until pasta and spinach has fully cooked and sauce has reduced. Serve.

Thursday, April 16, 2009

Martha Stewart, This Wasn't Fair.

When I saw the below cover of Martha Stewart Living, it was love at first sight. I have to make those eggs, I thought.

So, I read through the instructions, I disregarded the part about blowing the innards out and opted for hard-boiling, all 18 of them, (despite my dislike of buying tools) I bought Martha Stewart brand decoupage glue, I had friends over to help me hand-cut those ridiculously tricky little paper silhouettes from Martha's template online because I wasn't going to buy the bunny and egg Martha Stewart craft punches, which retail for 10 dollars each. And well, here are the results. First, of course, Martha's version:

And, ugh, mine:

So maybe things started to go wrong in the dyeing stage. I used the Paas kit because I grew up with Paas and I like using those little tablets and the wire egg-dropper even though it doesn't really work. But I couldn't get the colors deep enough or even close to Martha's colors, especially that pea green color. How did you get that color, craft editors at Martha Stewart? (Honestly, I think they spray-painted them.)

Things got much worse at the decoupage stage even though they started out looking only mildly unsuccessful.

But see in the background the M.S. template I printed out? The silhouettes are light blue. Well, the directions say to transfer those images to a different sheet of paper, but it didn't say that if you cut them straight from the template, that your eggs will end up looking like total failures...

I wanted the white side of the paper to show, but the glue was causing the blue color to creep in. Eventually, we learned that the blue side needed to be face up if they were going to look like anything resembling Easter in the slightest.

The prettiest thing to come out of all of this was the paper towel we used to soak up excess dye:

I think I'm going to need some time to heal before I attempt another Martha craft, but I think everyone at the Pesach/Easter party appreciated (or appreciated making fun of) my efforts.

Wednesday, April 15, 2009

Black Bean Noodles

So much going on here lately. The battle to keep our community school open continues . . . hard to say if we are making progress. I also broke my KitchenAid mixer, which means I had to close down the bakery. I was planning to stop when the baby came in June, so this just hastened the inevitable. There was no way to knead everything by hand and still make money. It's still sad, though, because I really enjoyed baking for the neighbourhood. But, there is still plenty of other things to do, which means quick and easy meals like this are always welcome.

INGREDIENTS
The amounts are up to you, depending on how many mouths you have to feed.
- noodles (I use an eggless chow mein noodle)
- broccoli, but into small florets
- minced garlic
- tofu, cut into cubes
- black beans, rinsed and drained
- black bean sauce
- hoisin sauce
- green onions, sliced

METHOD
1. Cook noodles as per the directions given.
2. While noodles are cooking, heat a wok over high heat. Add a few splashes of water along with the broccoli. Stir fry broccoli in the water for a few mins, until it gets tender but is still bright green (add more water when needed).
3. Add garlic and tofu and fry for a few mins, adding more water, if needed.
4. Add cooked noodles to the pan, along with the beans. Add enough sauce to your liking. Heat through. Add sliced green onions, stir well, and serve.

Monday, April 13, 2009

Channa Saag

This is something I put together in my quest to get more kale into my diet. As far as I remember, channa is the hindi word for chickpeas, and saag means spinach. This dish is packed with all sorts of nutritional goodness, and even though they protested at first, the boys ate all their greens.

INGREDIENTS
- 2 tbsp oil
- 1 large sweet onion, halved and sliced
- 1 large garlic clove, minced
- 1" piece of ginger, minced
- 4 large tomatoes, chopped
- 1 tsp garam masala
- 1 tsp coriander
- 1/2 tsp cumin
- 1/2 tsp cinnamon
- 1 tbsp chili powder
- 1 can chickpeas, rinsed and drained
- 3 cups chopped kale (though stems removed)
- 3 cups chopped spinach
- juice of 1 lemon
- 1/4 cup plain soy yogurt
- salt and pepper to taste

METHOD
1. Heat oil on a large pot over medium heat. Saute onions for 12-15 mins, until nicely browned. Add garlic and ginger and saute for 2 mins.
2. Add tomatoes and spices and bring to bubbling. Cook for 5-7 mins, stirring regularly, until tomatoes have reduced to a paste.
3. Add chickpeas and kale and cook for about 5 mins, until kale is tender. Add spinach and cook 2-3 mins, until tender. Stir in lemon juice and yogurt.
4. Season to taste with salt and pepper, adjust spices to your liking, and serve.

Asparagus Thoran Recipe


Yeah you read right. I actually made a thoran with asparagus and it tasted good enough for me to want to share it with you! I originally bought the asparagus to make some baked or grilled dish with it. That's the week I fell sick and couldn't think beyond the simplest recipes like rasam or thoran or dal chawal. So here you go. 


What I Used:

Asparagus - 15 spears
Grated coconut - 1/2 cup
Jeera / cumin seeds / jeerakam - 1/2 tsp
Turmeric powder - a pinch
Green chillies - 2 to 3
Shallots - 3 to 4, sliced thin (optional)
Curry leaves - a few
Oil - 2 tsp
Mustard seeds - 1/4 tsp
Salt - to taste

How I Made It:

1. Wash and remove the hard end of the asparagus spears and cut into 1" long pieces. Place in a pan, drizzle some water generously and cook covered on low fire for about 5 mins until the pieces are softer yet crunchy. Note that I used very slender variety of asparagus so probably the cooking time was much lesser. 

2. Grind the coconut with the jeera, turmeric and green chillies. 

3. Heat the oil in a pan and add the mustard seeds and curry leaves. Once the mustard seeds start to pop, add the sliced shallots and fry until golden brown. Then add the cooked asparagus and the ground coconut. Adjust salt. Let it cook for about 5 mins more until the coconut and asparagus is well combined. 
Makes a good combination with steamed white rice and some curry. 


Sunday, April 12, 2009

A Trio of Macaroons: Happy Pesach!

So, I don't know about you guys, but I had a Martha Stewart weekend. First up was the trio of macaroons: plain, chocolate chunk, and chocolate. Now, I don't want to brag, but I think this might be my closest picture to date. Of course, you can be the judge.

Here's Martha's version:
and here is mine:
OK, just kidding. Here is mine:

Not bad, right?


My one failing was that I couldn't get mine as tightly packed as Martha's. I believe the reasons behind this were twofold.

1. the recipe calls for you to run your hands under cold water before beginning to shape them with your hands and placing them on the baking sheet, but I only did that once, and what I realized by my 3rd batch was that you were supposed to do that each and every time you shaped them.

And 2. my unsweetened coconut wasn't as finely shredded:


So the first two batches came out much flatter and looser:


But the last batch, where I rinsed my hands before each and every shaping, came out much better.
mmm... Happy Pesach everyone!

Tuesday, April 7, 2009

Eggless Chocolate Melting Moments Recipe

Eggless Chocolate Melting Moments Recipe
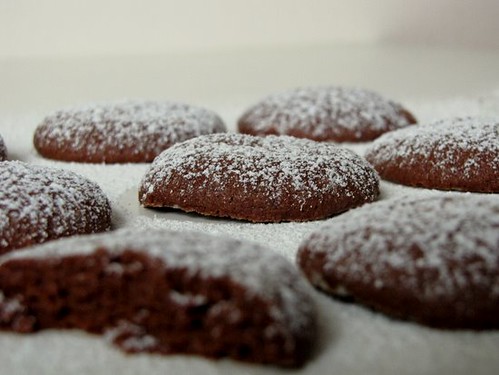
Here's another easy-to-bake recipe for baking beginners, a cookie this time! Melting moments are classic cookies or biscuits that use cornflour along with normal flour for a melt-in-your-mouth texture. I added a twist to them by making it chocolate flavoured.

Eggless Chocolate Melting Moments RecipeI am sorry for not including the cup measurements. I was adding and subtracting ingredients on a hunch so my cup measurements all went out the window. You can use the culiverter tool on the bottom of the right sidebar to get measurements in cups in case you don't own a kitchen balance. Please don't let that deter the aspiring baker in you.

I don't have step by step pictures for this but its really not as complicated as a cake or a brownie. I do have a picture of the dough, which is not very pretty but I felt you'd like to see it.

Eggless Chocolate Melting Moments RecipeIts really simple with no complicated ingredients or steps. Not even an egg! So all you vegetarians out there, you can go for it too! Probably a good cookie to bake for easter too.

Eggless Chocolate Melting Moments Recipe

What I Used:
(makes 12)

125gm butter, at room temperature
60gm icing sugar + more for dusting
100gm plain flour / maida
25gm cornflour
20gm cocoa powder

How I Made It:

1. Beat butter and sugar using a hand beater or an electric beater on low until smooth, creamy and combined.

2. Sift the plain flour, cornflour and cocoa together into a bowl (if you don't have a sieve, just make sure you mix them well until combined).

3. Add the flour mixture little at a time to the butter mixture and mix until its all combined.

Eggless Chocolate Melting Moments Recipe
4. Make small balls with the dough and press gently. Space them a good 2 inches apart on a tray. The cookies spread while baking. I didn't need to use a baking sheet, the cookies were quite well-behaved and didn't stick to the tray at all.

5. Bake in a preheated oven at 180 C. It took about 30 mins to bake. Let it cool completely before removing from the tray and dusting with some icing sugar. Its hard to tell when its done because of the colour but I would recommend that you check after about 20 mins, probably by taking out just one cookie, letting it cool a bit and tasting it.

Eggless Chocolate Melting Moments Recipe
Notes:

- You can store these for about 4 days in an air tight container.

- Its great to pack and send people, or to take to someone's house when you are visiting, which is what I did.

- If you want a more rounded shape for your melting moments, shape into balls and don't flatten. The cookies flatten as they bake so the rounder you start off, the more rounded the end result. I wanted flat ones, so I flattened the dough a bit.

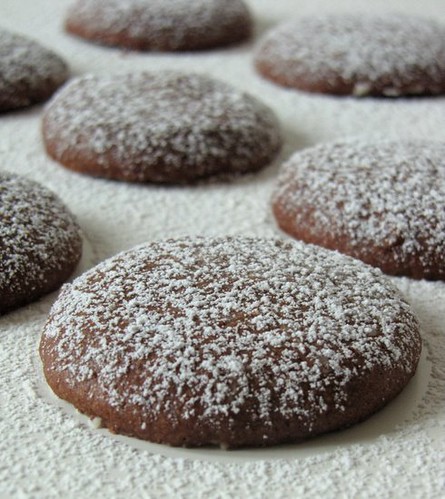
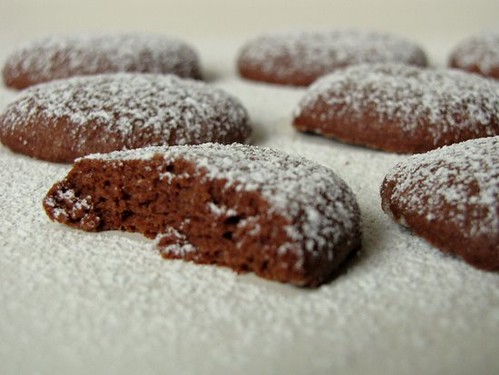
This pic was taken 4 days after I made them. Still pretty and tasty, I can tell you ;)

Eggless Chocolate Melting Moments Recipe