If you have an item to submit or would just like to chat about the stuff in here, email me at meetmykitchenthings@gmail.com.
You can also join the Facebook page and be part of an exclusive group that takes part is raffles and regular giveaways. Stay tuned as I flesh this out, woncha?
Sunday, January 31, 2010
organic and chic's chocolate cream sandwiches
Today's Cookies without Borders bake sale for Haiti called for some serious baking, which for me meant breaking out Sarah Magid's Organic and Chic and... edible gold dust. Remember The Goldies? Exactly!


...even though it was touch and go for a while at the beginning. The cookie batter was super thick, causing my brand new KitchenAid some major agita. I turned it off and finished the rest by hand, split the mass into two separate piles, sandwiched that mass between two sheets of parchment paper and then tried my best to roll them into 1/8 inch thick sheets with help from a nice bottle of cab sauv.


Organic and Chic / Sarah Magid's version:

(Sorry about the poor representation--it's a picture of a picture.)
our version:

Just wait. It gets even better!
...even though it was touch and go for a while at the beginning. The cookie batter was super thick, causing my brand new KitchenAid some major agita. I turned it off and finished the rest by hand, split the mass into two separate piles, sandwiched that mass between two sheets of parchment paper and then tried my best to roll them into 1/8 inch thick sheets with help from a nice bottle of cab sauv.

Matt saw me struggling, drank some of the wine, and hopped in for support.

The cookies were delicious as straight sandwich cookies, but since this was an attempt with a cause beyond our own food wants, we decided to kick it up a notch by dipping them in chocolate and painting the dipped portion of the cookies in gold dust. With that said, I give you this tribute to chocolate and gold dust.


Wait. Wha? Has that cookie been dipped in gold? I'll take two... for charity (cash4gold charity?).


Thanks to everyone who organized the bake sale. I'd say it was a total success--even though you couldn't tell by the look on our friend Neal's face! Neal, what gives? You didn't get any of our magic, golden cookies? 

Ciabatta: Baking Through the Bread Baker's Apprentice
 I love this recipe. I have blogged about it before and I make it on a regular basis. I have made the poolish version and the biga version, and have made it with water and with soymilk. This time I made ciabatta rolls so I can enjoy some tasty sandwiches this week.
GENERAL NOTES
1. I prefer making this with water, since it makes for a nice chewy loaf with the characteristic holes. Soy milk is nice if you want a softer loaf.
2. I prefer the poolish version.
3. To make the rolls, I divided the dough into 10 portions, then folded each one like the larger loaf. I baked them for 14 mins.
4. I make the dough with the full 6 oz of water, and sometimes a few splashes more. A wet dough is what leads to the holey structure.
5. I have never made this by hand, but instead rely on my stand mixer to work the dough.
VEGAN NOTES
None, other than the soy milk not above.
Saturday, January 30, 2010
Challah: Baking Through the Bread Baker's Apprentice
 Several months ago a reader asked if I had a vegan challah recipe to share, and I fired off some vague reply about getting around to veganizing Reinhart's recipe. I really hope that person is still reading the blog because this turned out rather well, I think. Of course, I have never actually had challah before, so I have nothing to compare it to. You might be able to tell from the pic that I totally messed up the braiding. Turns out, its just like a regular braid but I thought Reinhart was teaching me some new braiding system. Lesson learned for next time.
GENERAL NOTES
1. I made one large braided loaf--it was a pretty big loaf.
2. I made the dough with 7 oz of water, but I would up it next time to make it a little more pliable.
VEGAN NOTES
1. I replaced the eggs with an equal weight of soy yogurt.
2. I replaced the egg yolks with 1 tbsp of ground flax whisked into enough water to make the 1.25 oz called for.
3. I used soy milk instead of an egg white wash.
About This Site
A ladel, a spoon,
a counter-top boon
A spice, a rack, that brings memories back
A book, a cook,
a loved one's look
This is the place it all comes together.
Ok, I can't rhyme or write poetry.
What I can do is put together an awesome collection of 'Kitchen Things', but with your help of course. Here's how.
'Meet My Kitchen Things' is a place where you get to share your kitchen things, be it your favourite ladle, rolling pin, blender, stove, oven, wok or baking dish. We can also talk about your favourite ingredients, something new you came across recently, a food brand you love or despise, a cookbook that changed your life or just a ranting about how you just cannot cook like your mom.
This is where others can take a virtual peek into that corner of your kitchen which not even your actual guests get to see. Fun? You bet!
I am thinking of updating the site once a week so stay tuned for that. If you want to share your favourite kitchen thing, check out the step by step guide for more details.
Have fun sharing. Kitchen things are awesome!
Thursday, January 28, 2010
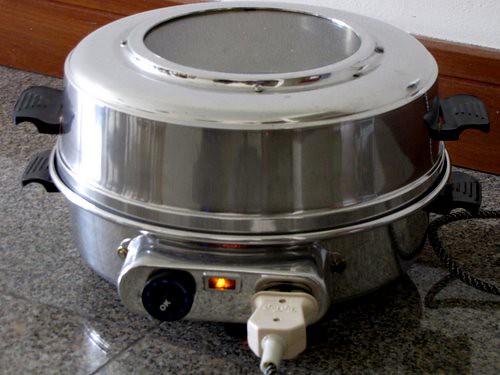
Meet My Oven - The Cheap, Basic Oven from India
My butterscotch blondies recipe is special for two reasons:
1. It was my first step by step recipe
2. I posted pictures of my oven and every other reader of this blog immediately had a gazillion questions about it!
Ok, I tend to exaggerate a bit but in this case, its only a teeny bit. True story.
Considering all the emails I have replied (happily, may I add) on the subject, this post is terribly late. But then, here it is, finally, after a break of 9 days, my longest in a while.
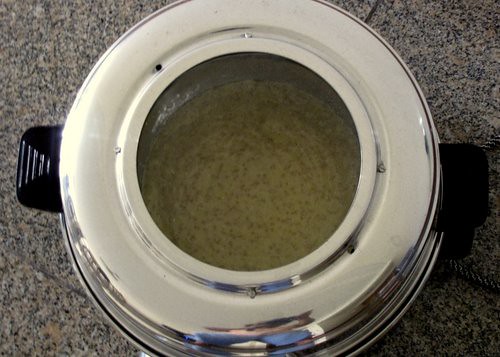
This, is my oven.
And this here, is the list of FAQs. Go crazy folks!
Q. Where did you buy the oven? What's the price?
Amma got this for me from Shah Enterprises in Kottayam, Kerala (that's my hometown). The brand name is OK. I am positive you'd get this in most home appliances stores in Kerala although I am not sure of other places. If anyone has seen or heard of this, please leave a comment.
The price is about Rs. 1200. No, I am not going to convert that into USD for you. Sorry, too lazy.
Q. How big is it?
Hmm.. not that big. Its the size of.. hmm.. ok let me put it this way. An 8x8 tray will fit into it just right. Anything bigger, you will have to maneuver it by tilting the sides, etc. Amma has a bigger one so this is available in various sizes, I am sure.
Q. What's the maximum temperature? Can it bake everything from cakes to bread to cookies?
The max temperature is 220C. Usually, cakes and cookies are backed at 180C. For bread, you need a slightly higher temperature but I have baked plain white bread with very good results. In fact,all the baked good in this site are made in this oven. You can check out the recipe index here.

Q. Does the oven come with a warranty? Is it worth carrying all the way from India to somewhere abroad?
The answer to this really depends on how bad you want that oven. I wanted it real bad because the prices in Singapore for ovens is atrocious. I am used to this since amma has had it for over 20 years. Having said that, this thing works on a filament coil heating system so if the filament gets rusted or broken, it will result in a loose contact which is frustrating, especially while baking. So it depends on your luck on the most part. Some may last only a year but most will go on and on forever.

Good luck and if you have more questions, leave a comment and I will answer them :)
Disclaimer: I am not recommending this oven to anyone. This post is more informational since a lot of you had questions about the oven when I put up pics in the butterscotch blondies step by step recipe page. The oven is very basic, quite small and may not work well for all recipes that need to be baked. However, the ones you see on this blog have all been tried and tested in it so you can safely go ahead!
1. It was my first step by step recipe
2. I posted pictures of my oven and every other reader of this blog immediately had a gazillion questions about it!
Ok, I tend to exaggerate a bit but in this case, its only a teeny bit. True story.
Considering all the emails I have replied (happily, may I add) on the subject, this post is terribly late. But then, here it is, finally, after a break of 9 days, my longest in a while.
This, is my oven.
And this here, is the list of FAQs. Go crazy folks!
Q. Where did you buy the oven? What's the price?
Amma got this for me from Shah Enterprises in Kottayam, Kerala (that's my hometown). The brand name is OK. I am positive you'd get this in most home appliances stores in Kerala although I am not sure of other places. If anyone has seen or heard of this, please leave a comment.
The price is about Rs. 1200. No, I am not going to convert that into USD for you. Sorry, too lazy.
Q. How big is it?
Hmm.. not that big. Its the size of.. hmm.. ok let me put it this way. An 8x8 tray will fit into it just right. Anything bigger, you will have to maneuver it by tilting the sides, etc. Amma has a bigger one so this is available in various sizes, I am sure.
Q. What's the maximum temperature? Can it bake everything from cakes to bread to cookies?
The max temperature is 220C. Usually, cakes and cookies are backed at 180C. For bread, you need a slightly higher temperature but I have baked plain white bread with very good results. In fact,all the baked good in this site are made in this oven. You can check out the recipe index here.
Q. Does the oven come with a warranty? Is it worth carrying all the way from India to somewhere abroad?
The answer to this really depends on how bad you want that oven. I wanted it real bad because the prices in Singapore for ovens is atrocious. I am used to this since amma has had it for over 20 years. Having said that, this thing works on a filament coil heating system so if the filament gets rusted or broken, it will result in a loose contact which is frustrating, especially while baking. So it depends on your luck on the most part. Some may last only a year but most will go on and on forever.
Good luck and if you have more questions, leave a comment and I will answer them :)
Disclaimer: I am not recommending this oven to anyone. This post is more informational since a lot of you had questions about the oven when I put up pics in the butterscotch blondies step by step recipe page. The oven is very basic, quite small and may not work well for all recipes that need to be baked. However, the ones you see on this blog have all been tried and tested in it so you can safely go ahead!
Tarka Dhal
 My teaching schedule is really cramping my cooking this semester. A late afternoon course twice a week means needing to have large pots of food cooked up the day before so leftovers can be served up quick for the kids. This is a toned down version of tarka dahl. There are supposed to be dried red chiles in the onion mixture to give the dish some zing, but there is no way the kids will go for any "spiky" dishes. Feel free to punch this up as you see fit.
INGREDIENTS
- 1 cup red lentils, rinsed
- 2 1/4 cup water
- 1" piece of ginger, minced
- 2 garlic cloves, chopped
- 1/4 tsp tumeric
- salt to taste
- 2 tbsp oil
- 1 large sweet onion, halved and sliced
- 1/2 tsp mustard seeds
- 1 tomato, chopped
METHOD
1. Place lentils, water, ginger, garlic, tumeric and salt in a pot. Bring to boil, reduce heat, loosely cover, and simmer until lentil are thoroughly cooked (about 1/2 hour). Add more water, if needed, or uncover if too runny.
2. Heat oil in a frying pan over med-hi heat. Saute onion with mustard seeds until it turns a nice golden brown. Add in tomato and cook for 2 mins.
3. Pour onion mixture over the lentils, garnish with cilantro, and serve.
Monday, January 25, 2010
Casatiello: Baking Through the Bread Baker's Apprentice
 This is a version of brioche done Italian style, and the non-vegan version is supposed to be loaded with cheese and salami. For one insane moment I thought about replacing that with vegan cheese and meat, but quickly decided that the final product would probably be pretty gross. Instead, I went with sundried tomatoes for bursts of flavour, and some nutritional yeast for a more cheesy flavour. I also used Ener-G egg replacer this time, but felt that yogurt or silken tofu would have made for a moister loaf.
GENERAL NOTES
1. While I was intrigued with the idea of baking the loaf in a bag, I opted instead for 9" round pans. Reinhart calls for 8" round pans, but I don't have any. The final loaf was slightly thinner, but filled the pan just fine.
2. Because the thinner loaf, I baked the loaves for a total of 35 mins, instead of 40.
VEGAN NOTES
1. I replaced the milk with soy milk.
2. I replaced the eggs with 2 Ener-G eggs, but would opt for soy yogurt next time.
3. I replaced the butter with Earth Balance, and so I did not add any salt into the dough.
4. I replace the salami with 4oz sundried tomatoes in oil, drained, and chopped.
5. I added 1/3 cup of nutritional yeast to the dough.
Sunday, January 24, 2010
Martha's Lemon Souffles
What is it that takes you from casually thinking a certain recipe might be good—from dog-earing the page, or mentioning to the person sitting next to you, "Oh, that looks good,"—to the action steps of writing down the ingredients, going to the grocery store and making the recipe come to life?
For me, it starts with a photo. I need an image of the finished product for inspiration. But, it goes far beyond that. If there's one thing I've learned from this blog, it's that the photograph needs to do more than just entice me with flavors or rather the idea of the flavors as imagined in my head, it must also win me over on a less conscious/more psychological level, a level that asks the question: does this recipe suit the kind of life I imagine myself living? Martha Stewart recipes almost always hit it home when it comes to meeting the needs of this latter element.
Take the below photo for example. The moment I saw it, I was committed to attempting the recipe. It's just magical—the way the souffle has puffed out of the ramekin, kind of on a tilt, like it's tipping its flat, perfectly browned hat to me. Anyone who could produce eight of these (presumably) after already serving a majestic main course and elegant appetizers, clearly knows something about living life. Don't you want more than anything to break through that crispy top layer with that well-placed spoon and take a bite? Doesn't the image seem to exude an air of organized optimism? Isn't it an absolute food dream?
Martha's version:

But alas, dreams don't always come true. Our version:

I match your disappointment and raise you one major bon appetempt FAIL.
Like I told Matt before I made him watch the episode of The Bachelor: On the Wings of Love where Roslyn gets kicked out because she wasn't there for the right reasons: Let's just get through this, OK?
So, this was another recipe I did with Mom back in Pittsburgh. This explains the existence of eight matching individual baking ramekins. This is also possibly where one of the major mistakes occurred. Obviously, the whole thing about souffles is that they are supposed to rise like crazy, so each ramekin needs a good buttering and then sprinkling of sugar to keep them from sticking, however, and I don't know if this really counts as a huge mistake or not, but after we did this, Mom read off a little note along the side (but not included in the main directions area) that said: To help them rise properly, use upward brush strokes to butter the dishes. Sooo, there was that.

There was also the failure of our egg yolk to turn thick like "a pudding" after whisking for one to two minutes. At the time, I didn't think it was that big of a deal, but afterward, Mom shook her head and said: "I knew we didn't get the egg yolk mixture thick enough."


I don't know, though. The recipe said that you could make these ahead of time by leaving the uncooked mixture in the ramekins for up to three hours and then just pop them in the oven after dinner, which is basically what you'd have to do if you were having a dinner party for eight since souffles must be served immediately, however, I believe we should have run a knife around the edges before we placed them in the oven, thus freeing them for their big rise. Again: I don't know, though.


I pulled them off everyone's place setting and put them back in the oven and though this second time, they were no longer soupy and disgusting, the taste was still not great. More than lemons or sugar, I tasted the egg. And for the first time in recent memory, I wanted nothing to do with my dessert. Seriously, no one cleaned their ramekin that night. Sorry, family.

The (arguable) good news? I'm fascinated with the souffle now. Already wrote down the recipe for a savory, non-individual one.
BUT first up will be something for a bake sale for a good cause!
Cookies Without Borders: A Bake Sale for Haiti.
WHEN: Sunday, January 31, 2010. 2 – 5 pmWHERE: Scoops Gelato. 712 N Heliotrope Dr. 90029. In East Hollywood, just north of Melrose, between Normandie and Vermont.
LOVE TO BAKE? If you love to bake and want to donate a few of your favorites, WE NEED YOUR HELP! Let these guys know and they'll give you more information.
For souffle recipe, click HERE.
Saturday, January 23, 2010
Roasted Vegetable Ragout
 We spent the afternoon hiking through the snowy woods, so this thick and hearty stew made for the perfect dinner. I really apologize for the truly terrible picture--the colour is reminiscent of those pictures of luncheon meats from the 70s they used to hang over the deli counter in the grocery store. I love the combination of vermouth, tomato, and basil in this dish, and I like a stew so thick you can eat it off a plate. Roasting is worth the extra time to bring out the sweetness of the onions, but feel free to use whatever veggies you want.
 INGREDIENTS
- 1 large sweet onion, cut into wedges
- 3 red potatoes, diced
- 2 large carrots, sliced
- 6 garlic cloves, chopped
- 15 Brussels sprouts, halved
- 1 19oz can white kidney beans, rinsed and drained
- 2 tbsp oil
- salt and pepper
- 2 tsp basil
- 1 28oz can diced tomatoes, drained
- 2/3 cup dry vermouth
- 1 cup spaghetti sauce
METHOD
Preheat oven to 450 degrees
1. Toss veggies and beans in oil, season with salt and pepper, and then mix in basil. Spread out on a heavy baking sheet with sides (I used a stoneware sheet). Drain tomatoes very well and spread out over veggies. Bake for about 1 hour, turning veggies every 20 mins, until cooked and nicely browned.
2. Transfer veggies into a large pot. Add in vermouth and bring to bubbling. Cook for 10-15 mins, until reduced, then stir in spaghetti sauce. Bring to bubbling again, adjust seasoning, and serve. If the Brussels sprouts need more cooking, reduce heat, cover, and simmer until tender.
Thursday, January 21, 2010
(Vegan) Brioche: Baking Through the Bread Baker's Apprentice
 This is the first recipe that gave me pause. First, I have never had brioche in my life so I was not sure what the end result was supposed to be like. Second, the recipe calls for 5 eggs, which meant that veganizing was going to be a bit of a challenge. From what I can gather, brioche is all about working in as much butter as possible into the dough whilst adding eggs to up the protein content so the brioche actually holds its shaped when baked. Thankfully, Reinhart provides three versions with varying amounts of butter. I went with the middle class brioche recipe figuring that 1 cup of margarine would be easier to work with (rather than the 2 cups in the upper class recipe) and therefore my egg substitutes would have a better chance of actually doing what they were supposed to do. The end result was absolute perfection: a light, delicate, and tender brioche that rose like a dream. I was more than pleased, especially because I guessed on how to best replace the eggs.
GENERAL NOTES
1. I only refrigerated the dough for the minimum time (4 hours) and had great results. I imagine, though, that leaving it overnight would make the dough even more tender.
2. I don't have brioche pans so I put the brioches a tete in muffin tins. I made 16.
3. Because I used Earth Balance, I added only a pinch of salt to the dough.
4. I used Method 2 to shape the brioche.
VEGAN NOTES
1. I replaced the milk with plain soy milk.
2. My thought on the eggs was to replace the weight of the eggs (8.5 oz) with a mixture of egg replacers. I whisked 2 tbsp of ground flax into 1/3 cup of water (final weight 3 oz). I then blended in 2 oz of soy yogurt, and 3.5 oz of silken tofu with an immersion blender. I have no idea if these proportions can be altered, I just know they worked for me.
3. I added 1 tbsp vital wheat gluten to the dough.
4. I replaced the butter with Earth Balance margarine.
5. I brushed the brioche with soy milk instead of an egg white wash.

Tuesday, January 19, 2010
Food Photography Basics - Choosing Your White Table
I'm kidding. This post doesn't have much to do with food photography as such. I have to revive that series, I know I know.
But meanwhile, I am going to answer the question many of you have asked me through comments and emails.
"What's that white background that you use in most of your pictures?"
And today, I present to you.. TADAAA..
 OOPS! Oh wait! That's my extremely cluttered, not-white-at-all coffee table.
 Here's my white table I use for food pics.

He may look a bit confused but that's because he is not used to being photographed without food on him, you see.
 Its very convenient to have a hard, white base that easily cleanable and portable. The table weighs less than
See what I mean? A white base reflects light well and enhances the picture when you later edit using Picasa or any other software. I love using a plain white base most times partly because I am too lazy to do an elaborate set up but mostly because I love the simplicity. Try it!

The table is from Ikea. Its a Lack Table that I bought for 20 SGD. I tried searching the Ikea website for the link but looks like they have stopped this product, maybe temporarily.
Moral of the story: grab the white table the moment you see it because by the time you consider it and decide, it may be too late.
Happy clicking on white!
** Coming up: a post dedicated to my oven which is another topic I get the most emails on. Looks like nobody is really reading my recipes eh? Ok, kidding :D
Bagels: Baking Through the Bread Baker's Apprentice
 Next on the baking challenge: bagels. I have made this recipe many times and have always had great results. I have blogged about these bagels before (you may recognize the pic above), and have even provided my own variations. These bagels are chewy and soft and absolutely amazing. I have not made them for a while so it was nice to revisit an old favourite.
GENERAL NOTES:
1. The recipe says it makes 12 large or 24 mini bagels, but they are pretty big bagels. I usually make 16 bagels so they aren't too huge. Even the "mini" bagels are a pretty good size. If I bake these for the kids' lunches I make a 50g boule and shape it into a true mini bagel.
2. The recipe calls for high-gluten or bread four. I have tried adding in some vital wheat gluten to the bread flour to up the gluten content but I don't like the texture this gives the final dough. I prefer just adding a bit more bread flour to get a stiff dough.
3. I always find that the bagels brown unevenly in the oven, but it does not seem to matter too much. Rotate the pans to brown them as evenly as possible, but I find that the bagels are done after 10 mins even if they are lightly browned.
VEGAN NOTES
- none
Sunday, January 17, 2010
Fine Cooking's Slow-Cooker Osso Buco
So, while visiting family back in Pittsburgh, I decided to do some fine cooking with my mom.
Fine Cooking's version:

our version:

(We started eating before I remembered to take a picture. Sorry.)
So I've been sort of hard on my mom in this blog. I mean, if you didn't know her you would probably peg her as someone not the least bit interested in her daughter's food-related adventures despite that daughter's various pleadings to please please check out her blog.
When really, my mom is quite wonderful—just a severe techno-phobe whose first and fairly new computer crashed about six months ago and who has happily done nothing to replace or repair it. In high school, I remember begging for call-waiting and Mom not understanding its advantages; and then, having finally talked my more gadget-friendly step-dad into getting it, her hanging up on everyone as she switched over to the other line. (She still does, only now she gives you a heads up: "Hold on, I'm probably going to lose you.")
Ironically, when it comes to cooking, my mom has every gadget, baking dish, and pan known to man, right down to a tiny blow torch for creme brulee-ing. And while I was home, I wanted to take full advantage. Up first: the slow cooker.

Mom had been talking about this osso buco recipe she'd just read about in Fine Cooking (a magazine I had unfortunately overlooked until now and will definitely be turning to for future attempts) that called for a slow cooker and, as I soon learned by the nature of it being an osso buco recipe, veal shanks. I had experience with neither. I told Mom I was game provided that we would brave the snowy crosstown journey to the organic market to get local and organic veal.
The beauty of the slow cooker is that you can set it and forget it. Our veal shanks needed six to eight hours in there. Mom and I needed to play an intense game of tennis, do some light shopping, and see It's Complicated with Grandma. So, in the morning, we prepped the vegetables, seared the shanks, and made the gremolata (a mix of chopped garlic, parsley, and lemon zest).

When I discovered Mom's massive 48 oz. tub of ready to use garlic and began taking pictures, my mom frowned. "Are you going to make fun of me on the Internet?"
"Yes."

This recipe reminded me a lot of the Sunday Suppers' short ribs only it was soooooo much easier, though it may have just felt that way considering Mom did just about all of the dishes. Thanks, Mom! The seared meat goes into the slow cooker along with its juices, the vegetables, some white wine, and a can of diced tomatoes


After our day of tri-generational merriment, we came home to a house filled with the rich and earthy aroma of braised meat and vegetables, again very much reminiscent of the short ribs. And although we'd wrapped each shank in twine, just like the short ribs, all four had fallen completely off the bone. The meat was super tender, but—and maybe this is just because of my inexperience with meat in general or coming off the twice aforementioned short ribs—I was expecting something deeper in flavor. The short ribs were so much more intense, so much bolder, but then a lot more did go into their preparation...though still I wonder if there is something else I could have added to the pot to make it better or if it might have been improved by using red wine instead of the white or is that not what you do with osso buco?
Wow, I'm realizing it's a tough act to follow Suzanne Goin's famed short ribs, isn't it? Kind of like comparing the twins played by Danny Devito and Arnold in the fun-loving classic 80s movie of the same name.

That's definitely a little harsh, especially considering the dish was a success—and thank goodness because dessert was a classic fail. (You'll see what I'm talking about next post.)
We served each piece alongside garlic bread to sop up the extra sauce, but I think if I did it again, I would pair it with polenta or even a cheesy risotto.
RECIPE via Fine Cooking:
1/2 cup all-purpose flour
Four 1-1/2- to 2-inch-thick veal shanks (about 2-1/2 lb.)
Kosher salt and freshly ground black pepper
2 Tbs. unsalted butter
1 cup dry white wine
One 14-1/2-oz. can diced tomatoes
3/4 cup lower-salt chicken broth
1 small red onion, chopped (1-1/2 cups)
1 medium carrot, peeled and cut into 1/4-inch-thick rounds (1/2 cup)
1 stalk celery, chopped (1/2 cup)
5 sprigs fresh thyme
3 Tbs. finely chopped fresh flat-leaf parsley
1 Tbs. finely grated lemon zest
1 large clove garlic, minced (1 tsp.)
Put the flour in a wide, shallow dish. Season the veal shanks all over with salt and pepper and dredge in the flour; shake off the excess flour.
Heat a 12-inch skillet over medium heat. Add the butter, and when it foams, add the shanks to the skillet. Cook until golden, turning once, about 10 minutes. Transfer the shanks to a slow cooker.
Add the wine to the skillet. Scrape up any browned bits from the bottom of the skillet and pour the contents of the skillet into the slow cooker. Add the tomatoes and their juices, chicken broth, onion, carrot, celery, and thyme. Cover and cook on low heat for 6 to 8 hours—the meat will be very tender and almost falling off the bone.
Transfer the shanks to a platter and cover with foil to keep warm. Pour the sauce from the slow cooker into a large skillet. Simmer over medium heat until reduced to about 2 cups, 10 to 15 minutes. Season to taste with salt and pepper.
Meanwhile, in a small bowl, combine the parsley, lemon zest, and garlic to make a gremolata. Serve the veal shanks topped with the sauce and the gremolata.
Leek, Onion and Potato Soup
 I really need to think up more clever names for my dishes. This soup starts with inspiration from French Onion Soup but ends with delicious chunks of sweet potato and white kidney beans. You will notice that this recipe calls for a lot of leeks--that is because I had a bunch of them in the fridge that needed to be used up before they went bad. Feel free to cut down on the leeks by adding more onions. To my utter amazement, the kids bolted the soup right down and gave it two thumbs up.
INGREDIENTS
Serves 6
- 2 tbsp oil
- 2 tbsp margarine
- 2 large sweet onions, halved and sliced
- 6 leeks, white and light greens part, sliced
- 2 cloves garlic, minced
- 2 cups red wine
- 5 cups water or veggie stock
- 2 tsp sage
- 1/2 tsp coriander
- 1 tsp marjoram
- 1 tsp oregano
- 2 tsp mushroom soy sauce (or regular)
- salt and pepper to taste (heavy on the pepper)
- 3 large red potatoes, peeled, small dice
- 1 medium sweet potato, peeled, small dice
- 1 19 0z can white kidney beans, rinsed and drained
METHOD
1. Heat oil and margarine in a large pot over medium heat. Add in onions and and saute for a few mins until they begin to soften. Then add in leeks and garlic and mix well. Once things are sizzling along, reduce heat to med-lo and cook, uncovered, for 45-60 mins, until onions and leeks become a nice golden brown. Stir occasionally to keep from sticking.
2. Add wine to the pot and stir to deglaze. Add in water, spices, soy sauce, potatoes and beans. Bring to bubbling, then reduce heat to low, cover and cook for 30-45 mins, until potatoes are soft but not mushy. Adjust seasoning to taste and serve.
Friday, January 15, 2010
Artos (Greek Celebration Bread): Baking Through the Bread Baker's Apprentice
 On to recipe two in The Bread Baker's Apprentice! As you can see by the self-explanatory title, artos is Greek celebration bread, and Reinhart provides the baker with three variations: a plain loaf, one for Christmas, and one for Easter. Since I didn't have any particular religious holiday to celebrate I make a more plain loaf but added in the fruit and nuts of the Christmas loaf thinking the end result would be something like a cinnamon raisin bread we could eat for breakfast. I also made the glaze but did not have any sesame seeds on hand as he suggests.
GENERAL NOTES:
1. This is one big loaf--somewhere between an American football and a rugby ball. Reinhart's instructions call for a boule, but I made more of a batard. Next time I would make an even longer batard (or even two loaves) since the final loaf was a tad unruly.
2. Unless I am making this for a holiday, I would skip the glaze next time since it was a real pain to bag up a sticky loaf of bread. I found I needed half as much as the recipe calls for, but I suppose if you made the variation with all the fancy decorations that would result in more surface area and the need for more glaze.
3. Possibly because of the vegan substitutes (below), I had to add in about 3/4 cup more flour than is called for. However, I usually find Reinhart's recipes heavy on the liquid (or light on flour) and I always end up using the minimum amount called for.
4. I used sourdough starter instead of the poolish, which meant I could make the bread in one evening.
5. I baked the loaf for the full 45 mins.
VEGAN NOTES:
1. I substituted maple syrup for the honey in the loaf and the glaze. It did not make anything taste maple-y.
2. I used 1/2 cup of soy yogurt for the 2 eggs.
3. I used full fat plain soy milk for the milk.

Wednesday, January 13, 2010
Indian Kale and Split Peas
 This is my final installment of new Indian dishes. For whatever reason, my kids ate this up with no complaints despite the obvious presence of leafy greens. I have found that I have to remove the tough stems from kale because my youngest often chokes and gags as he tries to chew and swallow them. It makes for a rather unpleasant meal. While I usually like my greens lightly cooked and still bright green, cooking the greens together with the split peas and spices for an hour makes for a wonderful flavour and soft texture. I made the dish fairly dry, but you could add more water and some tomato paste at the end to make a sauce so the dish coul dbe served over rice.
 INGREDIENTS
- 2 tbsp oil
- 2 onions, diced
- 2 cloves garlic, minced
- 1 tsp garam masala
- 1/2 tsp chili powder
- 1/2 cup yellow split peas, rinsed
- 1 cup water (more if needed)
- 1 tomato, diced
- 1 tsp tumeric
- salt to taste
- 1 bunch kale, rinsed and chopped (stems removed, optional)
METHOD
1. Heat margarine in a large pot over medium heat. Saute onions and garlic for 5-7 mins, until soft and translucent. Add garam masala and chili powder and fry for 1 min.
2. Add split peas, water, tomato, tumeric, and salt and bring to bubbling. Let bubble for 5 mins, then add kale. Stir until wilted, then reduce heat, cover, and simmer for 60-75 minutes, until split peas are cooked. Check periodically to stir, adding more water if too dry.
Subscribe to:
Comments (Atom)


