Tuesday, November 30, 2010

Basics of Baking - Getting Started

Of late, I am getting a LOT of questions from beginner bakers on how to get started on baking, what are the first few essentials, ingredients and their substitutes, ovens and types of ovens, pre-heating, etc. This is a 2-part series on the basics of baking.

Needless to say, I am definitely no expert and these notes and observations are based on my personal experiences or what I have seen work for others. Feel free to contest, share, or add in your thoughts in the comments section.

Basics of Baking - Part I - Getting Started

Of course, the first thing you need to get is an oven. I have already done a lot of research and posted about it types of oven and how to choose an oven.

The next thing is definitely baking trays and pans. There are lots of variety here in terms of what you can get and it can get confusing. However, the basic must-haves according to me, are below:

- Square and round cake pans, preferably springform


IMG_4372

Round springform pans are easier to get and may be slightly more expensive than normal pans but its definitely worth it and you will find yourself reaching out for one of these most often. An 8" or  9" diameter is the most versatile.

The material for regular cake pans doesn't really matter but stay away from glass (pyrex type ones) as your first pan. The baking time will increase and the texture may differ too. Aluminium, non stick or silicon pans are your best bet.

- Baking tray 
Most ovens come with one of these. Very handy when it comes to baking cookies or potato fries.

- A good mixing bowl, whisk and rubber/silicon spatula

IMG_2940

You can definitely use the bowls you have in hand currently but there's something special about having one just for your baking. I have a regular steel mixing bowl from Ikea that I use only for mixing during baking and its just fantastic.

IMG_2598

A whisk is very handy when you don't want to invest in an electric beater just yet. There are a lot of recipes that come out very well without beating your hands out of their sockets so don't worry about starting with just a plain old whisk.

IMG_3567

A silicon spatula makes life so so easy. Because of the silicon end, it scrapes the sides of the bowl very efficiently and spotlessly. I got my first as a gift and have since bought 2 more - very very handy during baking.

- Measuring cups and spoons

IMG_3770

Baking is more a science than art. When you are a beginner, its better not to experiment too much with quantities because the first few failures may deter you from continuing. Trust me, I have seen that happen. Stick with simple, easy, no-fail recipes and soon you can start concocting your own. Buy a good set of measuring cups and spoons, you get lots of different kinds, find the cheapest ones if you are not sure if this hobby will stick. You can graduate to kitchen scales later. Even if a recipe you really like has measurements by weight, you can easily convert them online - Google has all the answers.

- Ingredients

chocolate cupcake ing

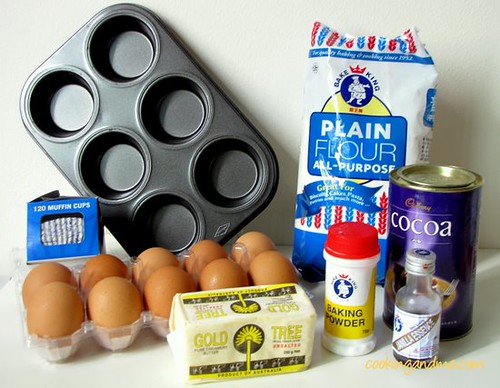
Again, as a beginner, its best to start your journey with easy recipes that don't have hard-to-find ingredients or even expensive ones. Stick to the same ingredients as mentioned in the original recipe, once you get a hang of this baking thing, you can let your creativity run wild.

I started baking at the age of 10 and one of my first successes wast the Apple Crumble Recipe. Since its not an ordinary cake or cookie, there's a wow factor in spite of the ease of baking it.


 Here are some very basic and easy recipes you can start out with:

Eggless Chocolate Melting Moments
Easy Basic Chocolate Brownies
Toblerone Candy Bar Shortbread
Banana Bread

Part II - Preheating and Temperature Setting in an Oven - Coming Next!

Silicon Bakeware in Chennai, India

Silicon is all the rage when it comes to bakeware, especially for bundt cakes and muffins.


Divya shares with us her glorious find in Westside Chennai. In her words "I searched high and dry for Bundt pans and Silicone baking moulds in Chennai and Bangalore but in vain. But during my last visit to Westside in Chennai, I came across this lovely bakeware section which had Silicone/Non-stick Baking pans in all shapes and sizes. I chose a Yellow Bundt Pan and a Blue Mini bundt and was jaw-dropped at the price Rs.99 (approx 2 USD) per piece!"


That is quite a steal Divya! Congrats!! :)

What: Silicon Bakeware in Chennai, India
Where: Westside
Price: Rs. 99 (~ USD 2 per piece)

Sunday, November 28, 2010

Giving Thanks: Golden Brown Butter and Pecan Praline Tart

It's the season of giving thanks, and truth be told, I'm feeling quite grateful for many things, one of which is you, my fair Bon Appetempt reader! All morning, I'd been searching for a funny, non-cheesy way to tell you this, but was coming up blank. It was a seriously gorgeous November day in Los Angeles—crisp-aired, chilly but sunny—and so I decided to take a break and go for a walk around my neighborhood, hoping this might help inspire. And about fifteen minutes in, I came across this strange contraption:
Do you see what's happening here? It's a tree being very much supported by a metallic, yellow arm a.k.a. the West Hollywood Street Maintenance. It's like a crutch for the tree. Plus, they literally moved the sidewalk to go around the OUTSIDE of the tree, and then gave it a nice yellow crutch just because.

Enter West Hollywood Street Maintenance metaphor:
No, I didn't knock down the one orange and white striped stand thing just to make fun of my lovely mother for not reading the blog. It was way down (much like my parents' readership) when I happened upon it.

OK, now. Moving on to Thanksgiving!

If ever there was an exact opposite of Marilyn's liver-y stuffing, it was this pecan tart. Instead of laborious egg peeling, vegetable chopping and liver boiling, there was a press-in crust, pecans, and some butter-browning. Instead of the appetite-crushing wet dog smell, the apartment filled with the warmth of toasted pecans and melted butter. And no tart pan? No problem. I used the springform one I acquired for the Ina Garten cheesecake attempt. Also, I couldn't find the golden syrup the recipe called for, but substituted (the ever present) corn syrup without issue.

Bon Appetit's version:

Jeanne Kelley / Recipe creator's version

our version:
By the way, many thanks to Jeanne Kelley, who I ran into the day after I'd made Marilyn's stuffing and who must have seen the disappointment in my face when I described the dish to her because as I went on to explain I was looking for a good pecan pie recipe, she mentioned this one. She could tell I needed an unfussy success, something that would inevitably deliver. And well, just look at that tart.
While making the pie, I also recommend fixing yourself a virgin (or otherwise) Bloody Mary with the brine left over from McClure's Spicy Picklespictured above on the left. That's the brown butter on the right. (Don't drink that.)

Thanksgiving dinner was very special. We spent it with some of our very talented and culinary-minded friends whose guest attempt is soon to come(!).
Food, friends, (football?), fizzy wine, and a fire equaled one of my favorite Thanksgivings to date. So many thank yous to everyone!

Recipe via Bon Appetit
Ingredients
crust
3/4 cup (1 1/2 sticks) unsalted butter
1 1/4 cups unbleached all purpose flour
1/4 cup (packed) golden brown sugar
1/2 teaspoon salt

filling
1 large egg
1/2 cup (packed) golden brown sugar
1/2 cup golden syrup (such as Lyle's Golden Syrup)
1/4 cup heavy whipping cream
1/4 teaspoon salt
1 cup coarsely chopped pecans, toasted

special equipment
9-inch tart pan with removable bottom (Bon Appetempt note: Don't sweat it if you don't have one. The removable bottom and tart-shape are are mainly for the presentation factor.)

The Technique: Press-In Crust
A press-in crust eliminates the (sometimes tricky) steps of rolling out the dough and transferring it to the tart pan. Instead of rolling, just combine the crust ingredients and press the sandy, crumbly mixture onto the tart pan. Start in the middle and work outward, or—if you're concerned about running out of crust as you go up the sides—start with the edges and work inward. That way, you'll have plenty of dough to form edges of uniform thickness for a pretty presentation.

Ingredient info
Look for golden syrup at some supermarkets and at specialty foods stores.

Preparation
crust
Cook 3/4 cup butter in heavy small saucepan over medium heat until butter turns golden brown (nut-colored), watching carefully to prevent burning, about 4 minutes. Remove from heat. Pour melted brown butter into 1-cup glass measuring cup. Let melted butter stand until barely warm, 15 to 20 minutes.

Meanwhile, position rack in center of oven and preheat to 375°F. Butter bottom and sides of 9-inch-diameter tart pan with removable bottom. Whisk flour, brown sugar, and salt in medium bowl to blend. Add 1/2 cup of barely warm melted brown butter and stir with fork until moist dough forms (mixture will resemble wet sand). Transfer dough to prepared tart pan. Using fingertips, press dough firmly and evenly onto bottom and up sides of pan (dough will look glossy). Let crust rest 5 to 10 minutes at room temperature. Bake crust until set and just golden brown, 15 to 18 minutes.

Filling
Meanwhile, whisk egg and brown sugar in medium bowl until well blended. Whisk in golden syrup, whipping cream, and salt. Stir in remaining melted brown butter, leaving most of darkened solids behind in bottom of measuring cup. Stir in pecans. Pour filling into warm crust, distributing pecans evenly.

Bake tart until filling is browned and slightly puffed and set at edges (center will still move slightly when pan is gently shaken), 25 to 27 minutes. Cool tart completely in pan on rack (center of filling will set as tart cools). DO AHEAD: Can be made 1 day ahead. Cover loosely and store at room temperature.

Garlic Pull-Apart Rolls Recipe - Step by Step

I had been eyeing this recipe of Suhaina's for a long time. When she brought them for our Singapore food bloggers' meet, I was totally sold. Finally managed to make them this weekend. I would highly recommend this to all those who are dying to bake but fear the yeast monster. Trust me when I say this is really fool-proof and you can feel so proud of yourself when done!

Eggless Garlic Rolls Recipe

I halved the recipe and got 8 mini rolls, enough to serve 2 very generously. We had one here and one there, through the weekend.

Garlic Pull-Apart Rolls
Recipe source: Suhaina
Makes 8 mini rolls

Ingredients:
Plain Flour - 1.5 cups
Warm Water- 1/2 cup + 1 tbsp
Yeast - 1/2 tbsp
Salt - 1tsp
Sugar - 1 tbsp
Olive Oil - 1 tbsp + 1 tsp

For Garlic Spread:
Salted butter, at room temperature - 6 tbsp
Minced garlic - 2 tbsp
Chopped coriander leaves - 2 tbsp

How I Made It:

1. Mix flour, yeast, warm water, salt and sugar together until you get a smooth, slightly stick dough.

Eggless Garlic Rolls Recipe

2. Add oil to your fingertips and knead until the dough springs back when you press with your fingers - about 4-5 mins.

Eggless Garlic Rolls Recipe

3. Wrap in cling film and allow to double by keeping in a warm place for about 45 mins. Meanwhile, make the garlic spread by simpy mixing all the ingredients.

Eggless Garlic Rolls Recipe

4. Grease a baking pan or loaf tin with olive oil. I used my Pyrex loaf pan which was the perfect size for 8 mini garlic rolls.

5. Knock down the air in the dough and divide the dough into two equal portions.

Eggless Garlic Rolls Recipe

6. Transfer one portion of the dough to a floured surface and roll gently into a rough rectangle of 1/2" thickness. Apply more flour sparingly if sticky.

7. Spread about 2 tbsp of garlic spread on one side.

Eggless Garlic Rolls Recipe

8. Roll from one end gently and firmly.

Eggless Garlic Rolls Recipe

9. Cut into half and then each half again into two halves to get 4 equal portions.

Eggless Garlic Rolls Recipe

10. Now place the rolls with the cut side up in the greased pan.
Repeat the same procedure for the remaining dough.

11. Spread a little milk on the rolls and add the remaining garlic spread on top. I am sure sesame seeds as Suhaina has added will make the flavour even better but I didn't have any.

Eggless Garlic Rolls Recipe

12. Allow to rise for another 20 minutes. In the mean time preheat the oven to 180C / 375F.

13. Bake for about 30 mins until the top is golden brown. My Pyrex glass pan usually takes longer to bake in, so mine took about 35 mins to bake just right.

Eggless Garlic Rolls Recipe

These are really really soft and have an amazing flavour. Serve fresh and hot!

Eggless Garlic Rolls Recipe

Suhaina's Notes:

1. The amount of water depends on the type of flour you are using. Use your judgment to get a slightly sticky dough that behaves when you apply oil.

2. The amount of yeast can be reduced if you don't like the flavour of yeast too much in your breads. You can add just 1 tsp and let it double over a couple of hours, slowly.

Fasta Pasta Microwave Cooker

Pasta is usually a quick weeknight dinner for us. What its not is a one pot meal. I use a wide pan to cook the pasta, a colander to drain it and another saucepan to make the pasta sauce. That's 3 pots to clean, apart from the plates and forks of course.

Here's something that can make it easier - Fasta Pasta Microwave Cooker. Works best for spaghetti.

Tuesday, November 23, 2010

The Beauty of Brass

brass ware

Isn't this gorgeous? Brass has such beauty and class, unmatched by any "modern" utensils, me thinks. It has a lot of health benefits too. Here's an excerpt.

In Britain, researchers filled brass and earthenware vessels with a diluted culture of Escherichia coli bacteria, which can cause illnesses such as dysentery. They then counted the surviving bacteria after 6, 24 and 48 hours. A similar test was carried out in India using naturally contaminated water.

The amount of live E Coli in the brass vessels dropped dramatically over time, and after 48 hours they fell to undetectable levels. The key to the result is copper, which can disrupt biological systems. The element acts by interfering with the membranes and enzymes of cells; for bacteria, this can mean death.

Pots made of brass, an alloy of copper and zinc, shed copper particles into the water they contain. The amounts that circulate into the brass water vessels could not harm humans. Even a person drinking 10 litres of such water in a single day would take in less than the daily recommended dose of copper or zinc.

Brass water pots also easily outperformed plastic ones, the researchers discovered.

DSC_0853

Need more encouragement? I am getting brass water jugs next time I head to India. Huge thanks to Purnima for sending in these beautiful pictures of her brass tableware.

In her words "I bought these from Pune, Maharashtra. There is a very popular market called Tulsi Baugh which has plenty of shops selling all kinds of copper utensils, metal decorative pieces, bells, statues etc. It must have cost me not much just Rs.450/- for one piece. These are not used for cooking just for water and fruits."

Edited to add: The vessels featured in the pictures are both copper and not brass. According to Purnima, they are lighter and easier to carry. Either ways, the benefits still remain the same, so time for a change, people!!

Monday, November 22, 2010

The Food in Egypt

I love Arabic food. Well most of them atleast.

Egyptian Food

Hummus and related dips - yum.

DSC_0101

Couscous, rice and roasted meat - yum again.

Egyptian Food

Shawarma - total YUM.

We had the yummiest chicken shawarma in Ibn Batuta Mall in Dubai. It cost 6dhm and is easily the best shawarma I have tasted!

Egyptian Food

Weird black olive salad - erm.. not yum.

Egyptian Food

Surprisingly, we found a lot of good bread and pastry in almost every buffet we had. A welcome breakfast, for sure. Warm rolls with butter melting between them.

Egyptian Food

Persimmons (the orange fruits in the boxes at the bottom) were everywhere in Cairo. Probably cheap too.

Egyptian Food

Ah yes, meet my lover - falafel. Vegetarians, get ready to eat tons of this if you every visit Egypt. Probably one of the only options you will have in a local Egyptian restaurant - unless dipping cucumber in hummus and calling it a meal is your thing.

Egyptian Food

Karkade. Dried hibiscus leaves that are then brewed into tea. I tasted them but they are not my cup of tea (hehe). Taken at Khan-El Khalili Market, a must-visit if you are in Cairo.

Egyptian Food

Egyptians love their mint. Its everywhere, literally! What a fantastic, simple and aromatic idea for a table arrangement though.

Egyptian Food

Ah yes, the Egyptian answer to nan - Aish Merahrah. Local bakeries make these in bulk and most households just buy them off the street and serve with meat, vegetables and dips. This lady was making a huge batch and willing posed for pictures (we had to pay her though, you need to pay for everything in Egypt!)

Egyptian Food

The tandoor actually runs on gas but looked ancient.

Egyptian Food

Fresh and hot. Has to be served immediately though, otherwise the bread turns hard and rubbery.

Egyptian Food

Ok don't judge my camera, this was taken in almost no light. An Arabic dessert that I had by the dozens and was present in all dessert counters. I think this is what the Greeks called Melomakarona which has Arabic origins but I could be wrong. If you know the name of this dessert, please leave a comment!

Sunday, November 21, 2010

Thanksgiving Part 2: Marilyn's (Old-School) Stuffing

This old-school stuffing taught me two valuable lessons.

New York Times' version:
photo by Andrew Scrivani 

our version:

Lesson 1. Before embarking on a recipe, really ask yourself: Do you want to eat this?

Oftentimes, with the recipes I choose to attempt, I am driven by factors unrelated to the simple notion of wanting to eat my creation. I get sucked in by the story, the photograph, the person and history supporting the recipe, the difficulty level, and/or the strange ingredients. In this case, the story would be that this recipe was one Marilyn Monroe "Scrawled on stationery with a letterhead from a title insurance company." The photograph would be the gorgeous one above showing a multicolored half stuffing-like, half frittata-like substance in a rustic black cast iron pan against the red and white stripes of a potholder. The strange ingredients? Chicken livers, ground meat, water-soaked bread and a conglomeration of dried herbs. And instead of stepping back and assessing whether or not I wanted to eat this stuff(ing), I became attached, made a shopping list, and moved forward.

With this recipe, regret came very soon after I'd gathered the ingredients and begun soaking the sourdough loaf in water. Do you know how unappealing soggy sourdough bread looks and feels? Why water, Marilyn? If we're going to soak bread in something, why not at least some manner of stock? Pouring water on bread seems to be something you might do to ruin bread. But then, if we're going to blame someone, let's blame me. I mean, what do we remember Marilyn Monroe for? I will give you one hint: It's not her cooking.
And let's not forget that this stuffing is no 5 Ingredient Fix. But yet again, it's not like I was going into this blind. Take this passage from the article: "The most unnerving thing about the recipe is its laboriousness. More than two hours passed as we soaked and shredded sourdough (to be fair, soggy sourdough more or less shreds itself), peeled hard-boiled eggs, simmered livers in water, browned the beef, cracked pepper, chopped and measured. When the ingredients were finally laid out, they filled 15 ramekins and bowls. Did Marilyn really have this much time on her hands?"

But in the immortal words of Alanis: You live. You learn. And maybe next time I will take my palate into consideration before the next attempt.

My palate! This brings us to lesson number two.

Lesson 2. I don't like liver and that's OK.

Somewhere during this past year, I began putting pressure on myself to eat more adventurously. I think this started around the time of my big culinary-point-of-view shift, or maybe even more specifically, when I read this line by M.F.K. Fisher from How to Cook a Wolf: “One way to horrify at least eight out of ten Anglo-Saxons is to suggest their eating anything but the actual red fibrous meat of a beast." This sentence definitely shamed me a bit. I mean, who did I think I was? Eating chicken breasts but never the giblets, feet, or even the wings? I began to think: A whole animal died just so that I could eat a portion of it? Is that right? Is that fair? Does that make sense?

So, subconsciously buoyed by M.F.K., I saw the livers in the recipe and tried to shake them off. No big deal. Just another part of the chicken. Even though my last dalliance with chicken livers wasn't a total success. Remember? I had paired them with water chestnuts and wrapped the two in bacon to make rumaki as a Mad Men homage. I hadn't loved working with them then, but I didn't totally hate them either. This time, though, the moment the livers hit the boiling water, the kitchen began to smell of briny wet dog, and I became a bit sad. When I took them out of the boiling water and chopped them up and removed the weird membrane-like part, I became sadder. I so very much wanted to be one of those two out of ten Anglo-Saxons not horrified at the suggestion of "their eating anything but the actual red fibrous meat of a beast."
So, I forged onward and formulated a plan. I told myself there was still a lot to like about this stuffingtake the walnuts and Parmesan cheese for examples. I liked those ingredients. I decided that all Marilyn's stuffing needed was a couple of side dishes to go with it (even though we had eaten the sausage brioche dressing from a few days ago completely solo and had been fine with that). I picked up some large portions of mashed potatoes and macaroni and cheese at our nearby grocery store. I served this trio for dinner and realized I was now treating the stuffing like a pill and myself like a dog that needed that pill hidden inside something straightforwardly delicious in order to swallow it.

Which brings us to the conclusion: I do not like liver and that's OK.

(Also, sidebar, I still didn't really eat the stuffing. I did eat the walnuts, though!)

Marilyn's Stuffing via The New York Times
Time: 2 hours

No garlic
A 10-ounce loaf sourdough bread
1/2 pound chicken or turkey livers or hearts
1/2 pound ground round or other beef
1 tablespoon cooking oil
4 stalks celery, chopped
1 large onion, chopped
2 cups chopped curly parsley
2 eggs, hard boiled, chopped
1 1/2 cups raisins
1 cup grated Parmesan
1 1/4 cups chopped walnuts, pine nuts or roasted chestnuts, or a combination
2 teaspoons dried crushed rosemary
2 teaspoons dried crushed oregano
2 teaspoons dried crushed thyme
3 bay leaves
1 tablespoon salt-free, garlic-free poultry seasoning (or 1 teaspoon dried sage, 1 teaspoon marjoram, 1/2 teaspoon ground ginger and 1/2 teaspoon ground nutmeg)
1 tablespoon kosher salt, plus more to taste
1 tablespoon pepper.

1. Split the bread loaf in half and soak it in a large bowl of cold water for 15 minutes. Wring out excess water over a colander and shred into pieces.
2. Boil the livers or hearts for 8 minutes in salted water, then chop until no piece is larger than a coffee bean.
3. In a skillet over medium-high heat, brown the ground beef in the oil, stirring occasionally and breaking up the meat, so no piece is larger than a pistachio.
4. In your largest mixing bowl, combine the sourdough, livers, ground beef, celery, onion, parsley, eggs, raisins, Parmesan and nuts, tossing gently with your hands to combine. Whisk the rosemary, oregano, thyme, bay leaves, poultry seasoning, salt and pepper together in a bowl, scatter over the stuffing and toss again with your hands. Taste and adjust for salt. Refrigerate, covered, until ready to use as a stuffing or to bake separately as dressing.

NOTE: The recipe doesn't specify, but I baked it sans any bird at 400 degrees, uncovered for 20 minutes and then covered for another 25 minutes.

Yield: 20 cups, enough for one large turkey, 2 to 3 geese or 8 chickens.