Monday, May 30, 2011

Falafel with Tahini Lemon Sauce Recipe

Remember the free spirit bloggers who baked with all sorts of egg substitutes last month? Well this month, I got to pick the theme and I went with savory party appetizers that can be cooked up in bulk.

DSC_6200

Of course I picked the theme fully intending to deep-fry, why do you ask? My initial idea was to go with cocktail samosas but had to ditch it for falafel because the shaping and filling of cocktail samosas is not exactly quick and this had to be a recipe that can easily be multiplied, leaving you time to make an effort to look good for your party.

DSC_6162

The Egyptian version of falafel is flatter,bigger, and greener because of the use of Lima beans. I know because I had that in Egypt. Sorry for showing off.

DSC_6178

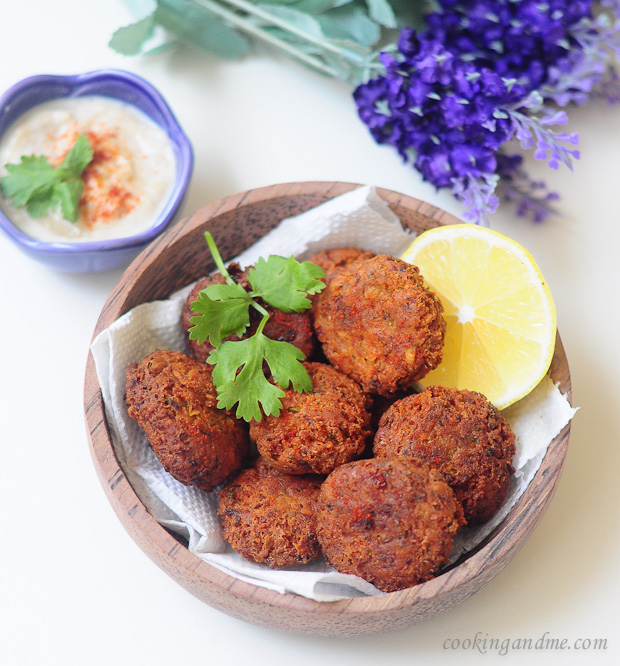
My version however, is the kind you would get in your local Middle Eastern restaurant. Its flavourful, easy to make, and absolutely delicious, not to mention photogenic.

DSC_6245

Falafel Recipe
Makes 16 small-ish falafels (easily doubles or triples)

Ingredients:
1/2 cup dry chickpeas, soaked overnight or atleast 10 hours (will be about 1 cup when soaked through)
1 tsp cumin seeds / jeera
1/2 tsp coriander powder / dhania
1/2 tsp red chilli powder
1/2 tsp minced or crushed garlic (about 4-5 cloves)
One bunch fresh coriander leaves / cilantro, chopped
1 small red onion, chopped fine
1-2 tbsp freshly squeezed lemon juice
2-3 tbsp plain flour (or crumbs from 2 slices of stale bread)
Salt to taste

Oil to deep fry

How I Made It:

1. Drain the soaked chickpeas on kitchen towels or leave them in a colander with a suspended base. Its important to drain out as much moisture as possible.

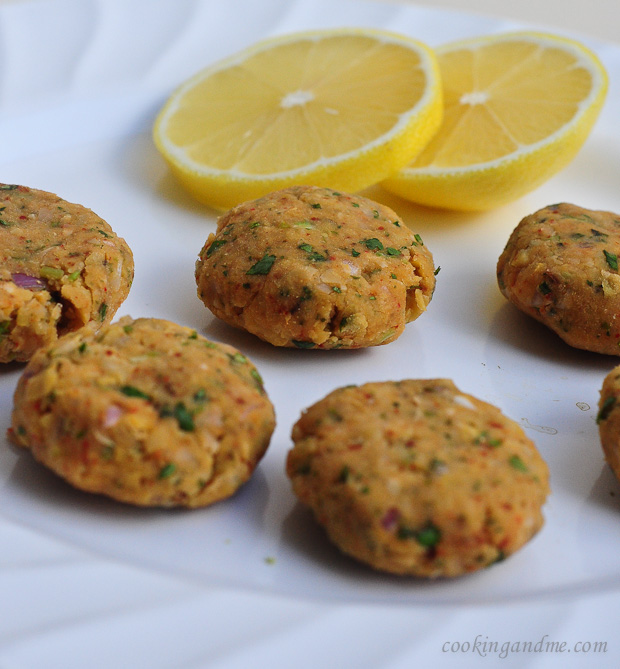
2. Transfer the chickpeas with rest of the ingredients to a food processor or mixer jar and grind until smooth and dry. You should be able to shape them easily into small discs. If the mixture is too moist or sticky at this stage, which it shouldn't be, add more flour but don't be liberal.

3. Shape into small discs and deep fry on medium heat until dark brown on both sides. Make sure you regulate the flame, otherwise the outside will get burned or cooked too soon and the inside will be raw.

4. Drain on kitchen towels and serve with tahini lemon sauce (recipe below).

Tahini Lemon Sauce Recipe

I didn't use any particular recipe or measurement for this. I thought of making hummus to go with with the falafel but didn't remember to soak enough chickpeas. I had fresh tahini that my ex-boss, brought from his home town Lebanon so it would've been a sin not to use it in some way. Thank you Charif!

DSC_6189

Here's what I did to make the sauce:

Mix 3 tbsp of tahini, 1 tbsp freshly squeezed lemon juice, a pinch of paprika (or maybe pepper?), salt to taste and enough water to make a smooth paste. You can add some roasted garlic pieces to this but I didn't have the patience time patience.

Dip the falafels in and enjoy.

DSC_6234
Special thanks to Joann for the super cute sauce bowls she gave me when I 
went brunching to her place!

Notes:

- canned and drained chickpeas should work as well but I read in many places that freshly soaked ones taste better. I have used canned chickpeas for hummus and liked it just fine so it should definitely work for falafels too

- if you plan to make this for a party, grind the ingredients and leave it in the fridge. You can take it out in advance the next day, shape up quickly (doesn't take more than 4 seconds per falafel, I timed myself) and fry up in batches.

- falafels taste just fine when gone cold too and the sauce can hold its own until a party winds down too. Just make sure you add water if the sauce thickens up on you.

DSC_6202

Here's what the other Free Spirit Bloggers cooked up for this month's theme!

DK
Lataji
Siri
Mads
Deepti
Anu

Bread Pudding French Toast

I hope you guys had a great Memorial Day weekend! I just got back from a beautiful trip to Sonoma, California, which I'm going to do a whole wrap-up of food-and-drink-wise, but until then, I give you Matt's birthday breakfast: bread pudding French toast and bacon. Try it! It was delicious—both on the first day and then again on the second, heated up and sprinkled with some granulated sugar. 

Kenny Shopsin's version:

our version:

Bread Pudding French Toast  via Kenny Shopsin's Eat Me
6 extra-large eggs
¼ cup heavy cream
1 teaspoon Fox's U-bet Vanilla Syrup or 1/2 teaspoon pure vanilla extract. (I would recommend using the full teaspoon of vanilla extract.)
1 foot of baguette, roughly chopped into chunks (about 1¼ inches)
Peanut oil for the griddle
Butter for the griddle and for serving
Warm Grade B maple syrup for serving

NOTE: The below is straight from the book/Kenny. Enjoy!
Whisk the eggs, cream, and vanilla in a medium bowl. Add the bread chunks and use your fingers to macerate the chunks so you have atomic bread particles in with the egg. Continue adding the bread and macerating it, a handful at a time, until you have added it all. Prepare the griddle according to The Art of Griddling, dump the bread chunks on the griddle, and then pour the eggy stuff left in the bowl over the chunks, Leave it all to cook for 2 minutes to set. Take a large spatula, slide it under the bread-egg mound, and turn the thing over en masse, leaving it as intact as you can. Cook for a minute on the other side and then break it up with the spatula and toss the pieces around so the edges get cooked a bit. Get a wide-mouthed bowl (I put a little spinach in it because I like the color) and scoop the whole mess into the bowl. (I use a French fry scoop for this, but since you probably don't own one, use whatever you feel will work best.) Serve with butter and warm maple syrup.

Saturday, May 28, 2011

Blogs I love - Maryam's Cheesecake for All

I don't remember how I came across Maryam's blog - Cheesecake for All - but I do remember going through every post in there on the day I discovered it. It could be the word cheesecake in the title. I am easy to please, you know.


Something about the crisp and delicious night-time shots was endearing. It also helps that she has an entire category dedicated to hot chocolate.


A lot of blogs have step by step pictures but there is something extra to Maryam's shots. They don't look overly styled but they are gorgeous nevertheless.


Although I've bookmarked a fair number of recipes in there, the only one I've tried so far is the no-fail basic pancakes. They really are perfect, she's not lying when she says that. Although her pictures are what taunted me to try it out, the recipe is now a keeper.


Maryam, I hope you keep doing what you clearly rock at.

**all images from Cheesecake for All.

Wednesday, May 25, 2011

Kerala Fish Stew / Meen Molee Recipe

As you guys probably know by now, I don't cook meat or fish in my kitchen. Although I reason I give is TH's vegetarianism, the actual truth is, he doesn't care what I cook as long as he gets his vegetarian dishes. So its my laziness in cooking separate things for him and me that's the actual reason. There, I said it!

kerala fish molee stew meen molee recipe

Due to this self-imposed limitation, I asked my amma to be a guest contributor to Edible Garden. We live in Kerala, and although we don't eat fish every day like most Malayalis do, some fish does get cooked in her kitchen on and off. So expect posts from amma in this blog from now on, with pictures styled by her and taken by my dear uncle.

Here's a previous recipe cooked and clicked by the bro-sis team: chambakka pickle.

Ok on to today's recipe: Fish Molee or Meen Molee, a very popular Kerala fish stew that's cooked in coconut milk and spices. The flavour is light, yet spicy with a good bit of green chillies in the mix. Each household in Kerala will have their own version of course, and this is amma's.

kerala fish molee stew meen molee recipe

Meet the fish. These big-eyed beauties are called Unnimary after the pretty actress of the 80s known for her large, beautiful eyes. Erm.. yeah she was quiet a sexy addition to movies back in the day.

kerala fish molee stew meen molee recipe

I apologize to my vegetarian readers and friends for this picture. But I had to demonstrate what a quick learner amma is. I gave her some photography tips over phone about good light, background, plating, no flash, etc and she followed the "rules" beautifully.

You can use any firm fleshy fish for fish molee. Cut into small-ish pieces, don't use small, whole fish. Admittedly, I don't have much experience handling fish so trust my mom on this, ok?

kerala fish molee stew meen molee recipe

Here are some of the ingredients we need. Lots of onions, fresh curry leaves and green chillies, and of course, coconut milk.

Kerala Fish Molee / Meen Molee Recipe
Serves 4
Recipe source: Amma

Ingredients:
500gm firm fleshy fish, cut into small pieces
2 large onions, sliced into long, thin pieces
8-10 green chillies, depending on heat level required
Thick coconut milk 1/2 cup (onnaam paal)
Thin coconut milk 1.5 cups (rendaam paal - if using store bought coconut milk, mix water with 1/2 cup coconut milk)
1 tsp minced fresh ginger
1 tsp red chilli powder
1 tbsp vinegar
1/4 tsp turmeric powder
1/2 tsp pepper powder
2 1" pieces of cinnamon (don't use powder)
4 cloves
1/2 tsp maida/plain flour
2-3 sprigs of curry leaves
Salt to tate
(Coconut) Oil as needed

Method of preparation:

1. Clean the fish and add a pinch of turmeric powder, some salt, and 1/2 tsp red chilli powder (this is in addition to what is listed above under ingredients) to the pieces. Rub in well and leave aside for 30 minutes to an hour.

2. Heat about 1 cup oil in a small frying wok or pan and fry the fish until half done. The idea is to semi-cook the fish rather than fry it well. Drain and set aside.

kerala fish molee stew meen molee recipe

3. Heat about 1 tbsp oil in another pan and saute the onions until soft and pink. To this, add the flour, chilly powder, pepper powder, turmeric, and curry leaves. Fry for another minute or so.

kerala fish molee stew meen molee recipe

4. Next, add the thin coconut milk along with the ginger, green chillies, vinegar, cloves and cinnamon along with salt as needed. Cook closed on low heat for about 12-15 mins until all the spices come together in the mixture.

kerala fish molee stew meen molee recipe

5. At this stage, add the semi-fried fish. When the mixture comes to boil, add the thick coconut milk, mix well and remove from fire (don't bring to boil after adding the thick coconut milk).

kerala fish molee stew meen molee recipe

Notes:

- As I have mentioned, different parts of Kerala make fish molee in a different way. Another version I have seen is much milder and lighter in colour because all the heat comes from green chillies and no red chilli powder is added. Amma's version sometimes has an orange colour because she generally uses Kahsmiri chilli powder that has a deeper red colour but milder heat. Dishes cooked in my house are not very spicy, if at all.

- Fresh coconut milk works best for this dish. Store-bought coconut milk will lend a different flavour and may not exactly satisfy your cravings if you are hoping for this authentic fish molee for your meal

- Serve hot with rice and any stir-fried vegetable or mezhukkupuratti of choice.

kerala fish molee stew meen molee recipe

Huge thanks to Amma and Radha mama for the superb step by step pictures :) 

Tuesday, May 24, 2011

Feast @East, Grand Mercure Roxy Hotel, Singapore

feast @east grand mercure hotel singapore restaurant review

If you follow my Project 365 blog, you would have seen this picture before. The vegetables are fake, the chef is not. Just saying.

feast @east grand mercure hotel singapore restaurant review

This is one of those restaurants where there's enough space for a family dinner but at the same time, the ambience is cosy enough for a dinner date or celebration for two.

feast @east grand mercure hotel singapore restaurant review

The placemats listed the history of some popular dishes in Singapore. Groovy idea, I say!

Oh, before I start talking about the food, I should mention that I was offered an assignment by Women't Weekly Singapore to review this restaurant for their June 2011 edition.

feast @east grand mercure hotel singapore restaurant review

Please don't squint too much. You have the review coming up below anyway, and not a condensed version at that! :)

We were treated to a set menu and had 2 choices for drink, soup/salad, main course, and dessert.

feast @east grand mercure hotel singapore restaurant review

I picked pink guava juice and TH picked fruit punch. 

feast @east grand mercure hotel singapore restaurant review

Some rolls to start the meal. They were crusty and chewy and warm. With some salted butter at the beginning of a meal? Divine. 

feast @east grand mercure hotel singapore restaurant review

TH's chunky tomato soup. It was very different from any tomato soup we have ever tasted. There were chunks of tomato in the soup and lots of coriander. There wasn't any cream in it as far as I could tell. Quite a homely, wholesome bowl.

feast @east grand mercure hotel singapore restaurant review

My caesar salad with grilled prawns. This is hands down the best caesar salad I have tasted and I have tasted my fair share I must say. The dressing was spot on and not too heavy as some caesar salad dressings tend to be. The prawns were cooked perfect and didn't have any annoying pieces of shell or tail ends still on it. 

feast @east grand mercure hotel singapore restaurant review

TH's entre. He could pick between pizza and spaghetti and he picked spaghetti (and I almost fell off my chair in surprise). This is probably the homeliest spaghetti we've tasted. There were lots of vegetables, the sauce was mild and had the right amount of flavour. The portion was huge and can easily serve two. So I think its safe to say that the vegetarian fare in Feast @East is like home made food :)

feast @east grand mercure hotel singapore restaurant review

My entre. (btw, how do you make that small line thing appear over the 'e'? I don't know how to do that. Ok, so this is grilled salmon with some yummy sauce over it, served on creamy mashed potatoes. Again, the portion size was huge and after that salad, I couldn't even get through 1/3rd of it. So I packed the rest. It was the right thing to do.

feast @east grand mercure hotel singapore restaurant review

TH's fruit platter. It was kinda forced on him as dessert that comes with the vegetarian set menu. Its like in-flight meals. If you are vegetarian, you get a vegan (sometimes fully raw) meal while your neighbour is downing a yummy looking chocolate cake and you are telling yourself "but I don't mind eggs in hidden form"). Anyway, fruits, I don't need to review. 

feast @east grand mercure hotel singapore restaurant review

This right here is a plate of heaven. That mini apple die was to die for and paired with good quality vanilla ice cream and butterscotch sauce, it was perfect. We both fought over it (in a dignified way) and then polished off the fruits after that. I was glad I didn't try to finish the salmon. 

feast @east grand mercure hotel singapore restaurant review

The restaurant also had pretty interesting deco. They had huge jars of candy all over the place and I saw people helping themselves to it. Groovy idea, again. 

I would recommend this place if you wish to have a quiet dinner with your partner, a celebration dinner for your family, or even a work team dinner for a large group. The food is slightly pricey, especially some particular dishes, but our entire meal was very satisfactory.

The average price for a meal (like this, with all these courses) will be around SGD 80 but they do have a very popular buffet for SGD 44++. 

Feast @East
Grand Mercure Roxy Hotel
50 East Coast Road, Roxy Square
(Opposite Parkway Parade Shopping Centre)
Singapore 428769

Reservations
Ph: +65-63405665

**Disclaimer**

This is not a paid advertorial and I am under no obligation to Women's Weekly or Grand Mercure to write this review on this site. The assignment was for the food article that appeared in the Women's Weekly magazine. 

Sunday, May 22, 2011

Strawberry Cake & A Big Fat Thank You

Dear Readers, Friends, and Dogs who can read: I'm going to tell you a story about a little cake that tasted like a strawberry Scooter Crunch ice cream bar. (So far I am the only person I know who remembers enjoying Scooter Crunches as a child.) The cake came to me from the pages of Saveur and there was something about it that spoke to me. It called for red dye and strawberry extract, two elements that people might snub their noses at, but I was so drawn to the below photo that the recipe could have called for a cup of hydrogenated soybean oil and a dash of MSG and I still would've made it.
 photo by Todd Coleman

I just love how it's kind of sphere-shaped and how the two layers are so fat and outlined in a coat of darker crust. I also love the jagged cuts, the paper plate, and what looks to be a plastic lid or tray or frisbee that it's sitting on. It looks delicious, fun, approachable, and unreal all at the same time. 

After two trips to two grocery stores and no strawberry extract, I sally-forthed. The extract was for the icing layer anyway, which I wasn't even going to tackle until the following night. In 24 hours, surely, I could find some strawberry extract.
I didn't. And as much as I would love to blame someone for this extract shortage, I have only myself. I simply couldn't make another grocery trip. And so, just like Kristen Wiig's character drives right by that cop (over and over again) in Bridesmaids, I drove right by two grocery stores on my way home from work. Besides, I knew I had fresh strawberries at home. Couldn't I just mash some of those up and use them?
My favorite part of this whole cake was what happened when Matt found it fully assembled and sitting in our refrigerator in the cake carrier. "Wait. What's our cake doing in the cake carrier?" It had been a busy week and I guess I'd forgotten to tell him that I was taking it to a dinner with my lady friends. It was a double blow. Not only did he realize that he was on his own for dinner (hardly very young-wife of me), but I was taking the cake with me too.

And so, that's how I ended up arriving to dinner with the below, what I call the Pac-Man presentation. 
Luckily, the cake was so delicious no one cared that Matt had scored first dibs at home hours earlier. And, if you'd like to see a photo of the cake fully intact with strawberry extract as it was intended to be, hop over to Lottie + Doof. He knocked it out of the park. 
And while I'm directing you to other sites, did you guys see this, or that badge my site is now wearing over towards the right of the screen? I won Saveur's Best Culinary Essay! Many many many thanks to everyone who voted for "In The Kitchen With Grandma" and to Saveur for recognizing all of the amazing blogs that create such great, thoughtful content week after week.

Strawberry Cake via Saveur (with a Bon-Appetempt option)
serves 12

16 tbsp. unsalted butter, softened, plus more for greasing pans
3 cups flour, plus more for pans
1 tbsp. baking powder
1/2 tsp. kosher salt
1 cup milk
1/2 cup seedless strawberry jam
3 tbsp. red food coloring (optional)
2 cups sugar
1 cup canola oil
1 tsp. vanilla extract
3 eggs
8 oz. cream cheese, softened
1 1-lb. box confectioners' sugar, sifted
1 tsp. strawberry extract (or, for the extract-challenged, 1/4 cup mashed fresh strawberries?)

Heat oven to 350°. Grease and flour two 9″ round cake pans; set aside. Whisk together flour, baking powder, and salt in a medium bowl; set aside. Whisk together milk, jam, and 2 tbsp. food coloring in a small bowl; set aside. Beat together sugar, oil, vanilla, and eggs in a mixer on medium-high speed until pale and smooth, 2–3 minutes. In 3 additions, alternately add dry and wet ingredients to sugar mixture, beginning and ending with dry; mix until combined. Divide batter between prepared pans and smooth tops; bake until a toothpick inserted in the middle of cakes comes out clean, about 40 minutes. Let cool 15 minutes, unmold, then cool completely.

In a large bowl, beat butter and cream cheese on high speed of a mixer until smooth and fluffy, 1–2 minutes. Add remaining food coloring, confectioners' sugar, and strawberry extract; beat until smooth. Place one cake upside down on a cake stand, and spread a healthy amount of frosting over top. Cover with second cake, top side up; frost top and sides of cakes with remaining frosting; refrigerate for 1 hour before serving. Serve at room temperature.

Wednesday, May 18, 2011

Thai Orange Curry

Technically, this is a red curry, but the tumeric in the curry paste gives the final dish a wonderful orange colour. The key here is to make your own curry paste--it's not too hard and the taste is fabulous. No one sells dried chiles around here, so I bought about 10 bags of them the last time I was in Columbus (there is a Mexican grocery store on Cleveland Avenue I used to frequent when I lived there). The paste is not too hot (best for the kids), but you can make it hotter by adding a few more Japanese chiles in place of one Guajillo chile. You can also add as many serranos as you like to the final dish. The recipes are veganized and slightly adapted from True Thai.

INGREDIENTS
Curry Paste
- 4 large dried Guajillo chiles
- 2 dried Japanese chiles
- 2 stalk lemon grass, lower section, trimmed and sliced
- 3 tbsp minced ginger
- 1 1/2 tsbp chopped garlic
- 1/2 cup chopped shallots
- 2 tbsp tumeric

METHOD
1. Stem and de-seed chiles and soak for 30 mins in hot water. While the chiles are soaking, pulse the lemon grass in a food processor until broken down into small pieces.
2. Add the rest of the ingredients to the processor and process into a paste, as smooth as you can get it. Add the water you used to soak the chiles as needed (about 1/2 cup) to make a smooth paste.

Thai Orange Curry
INGREDIENTS
- 1 can light coconut milk
- 1/2 cup, or so, curry paste from above
- 1 can chickpeas, drained and rinsed
- 8 lime leaves (I used dried), or zest of 1 lime
- serrano chiles to taste, sliced in half, lengthwise
- 1 tbsp brown sugar
- 1 tbsp hoisin sauce
- 1 tbsp vegan oyster sauce
- salt to taste
- 1/4 cup basil leaves (Thai or Italian)

METHOD
1. Heat coconut milk and curry paste in a saucepan over medium heat. When bubbling, add chickpeas, lime leaves (or zest), chiles, sugar, and sauces. Bring to bubbling again, then lower heat, cover and let gently simmer for at least 20 mins.
2. If using dried lime leaves, remove. Add salt as needed. Adjust curry paste and sauces as needed. Right before serving, add basil leaves and mix in until wilted. Serve with rice.

Tuesday, May 17, 2011

Eggless Chocolate Chunk Cookies Recipe

I love chocolate chip cookies. But you know what's better than chocolate chip cookies? Chocolate Chunk Cookies. The chunks melt while baking and stay gooey while you bite into the cookies - yum!

Eggless Chocolate Chunk Cookies Recipe

If you are a chocolate addict and love cookies, nothing should stop you from having what you like. That's why these eggless chocolate chunk cookies work really well, they can be eaten by anyone, especially those who don't eat eggs even in the "hidden" form.

Eggless Chocolate Chunk Cookies Recipe

Eggless Chocolate Chunk Cookies
Makes 3 to 4 dozen cookies
Adapted from: A Passion for Baking by Marcy Goldman

Ingredients:
1 cup unsalted butter, softened to room temperature
1 cup firmly packed brown sugar
1/2 cup white sugar
1.5 tsp vanilla extract
2 tbsp flax seed powdered (to replace 2 eggs)
2 cups + 4 tbsp all purpose flour or maida
3/4 tsp baking soda
1/4 tsp salt
1 to 1.5 cups chocolate chunks (I used Nestle chocolate chunks and love them! You can also use choc chips, but chunks are infinitely better)

How I Made It:

1. Preheat oven to 350F/180C. Line baking trays with parchment paper and baking sheets.

2. In a bowl, either by hand or mixer, cream butter and both sugars well together until very smooth (about 3-5 mins). Add vanilla and flax seed powder and mix until well blended. Add the flour, baking powder, baking soda, and salt to this mixture. Fold well until all ingredients are combined well (you don't need to mix or sift dry ingredients before adding to the wet mixture but you can if you want to).

3. Fold in the chocolate chunks finally. Scoop out using a tablespoon (adding 2 to 3 tbsp per cookie) or small ice cream scoop and place the cookies atleast 2 inches apart on the baking tray.

4. Bake for 12-15 mins until the cookies have flattened out and the edges brown nicely.

The warm cookies are heavenly. Chocolate chunks, unlike chips, melt in the cookies and remain gooey and yummy for as long as the cookies last.

Eggless Chocolate Chunk Cookies Recipe

Store in an air-tight container for up to 4 days. 

Monday, May 16, 2011

Crispy Fried Karela / Bitter Gourd / Pavakka Recipe

I can't believe I am posting a bitter gourd recipe. TH and I avoid the vegetable like a plague and although those small, very green, very bitter variety is available here in Singapore, I hardly ever give it a second glance. In Kerala, bitter gourd, or pavakka, is fatter, a very light green, and significantly less bitter than the darker green ones we see everywhere else.

fried bitter gourd / pavakka / karela.jpg

But I've never seen bitter gourd like this before. It was white and very chubby. These are from Taiwan and they were so cute that I had to pick them up, even if its pavakka and TH was gasping at the idea!

fried bitter gourd / pavakka / karela.jpg

I used the same strategy on this bitter gourd that I do on another vegetable that we don't like much - okra. I fried it. It was delicious and for once I didn't mind the bitterness, although TH still didn't have more than one spoon.

fried bitter gourd / pavakka / karela.jpg

Crispy Fried Bitter Gourd
Serves 2
Adapted from the Colocasia Fry Recipe

Ingredients:
1 medium-sized bitter gourd, cut into thin 2" pieces
1/2 tsp salt
3-4 tbsp rice flour
1/2 tsp red chilli powder
A generous pinch of hing/asafoetida/perungayam
1/4 tsp turmeric powder
1/2 tsp garam masala
1/4 tsp pepper powder
Oil for deep frying

How I Made It:

1. Rub salt into the cut bitter gourd pieces and set aside for an hour. Once the hour is up, squeeze all moisture from the bitter gourd pieces and transfer to another bowl.

2. Add rest of the ingredients to the pieces and stir well to dredge. There should be enough rice flour to coat all the pieces well (not too thickly) so if you feel you need more, adjust the quantity. The initial salt you added should be enough but add more to taste if you feel you require it.

3. Let the dredged bitter gourd pieces rest for 15 mins or so while you heat up the oil to deep fry. Fry in batches until dark brown and cooked through. Drain on kitchen towels. Its important that you make sure the pieces are thin, otherwise the inside won't be cooked.

fried bitter gourd / pavakka / karela.jpg

Serve hot with rice, rasam, and vadaam.