 Sometimes I get so caught up in trying to recreate dishes I used to eat before I went vegan that I forget how great simple veggie dishes are. This pizza (thinly sliced eggplant, zucchini, mushrooms, tomatoes, red and green peppers, and red onions) was fresh and tasty and unsullied by fake meat and cheese. A good reminder to get back to basics.
Saturday, February 28, 2009
Back to Basics
Sometimes I get so caught up in trying to recreate dishes I used to eat before I went vegan that I forget how great simple veggie dishes are. This pizza (thinly sliced eggplant, zucchini, mushrooms, tomatoes, red and green peppers, and red onions) was fresh and tasty and unsullied by fake meat and cheese. A good reminder to get back to basics.
Friday, February 27, 2009
Click: Cheese & Tofu
I almost didn't but I had to.
Unlike last month, I didn't burn my brain trying to figure out what I'll click. I was about to let this month pass silently but I got a few nudges from here and there, and ideas actually being mailed to me that I couldn't let it pass.
Anyway, here it is. I used this golden fried tofu to make an awesome dish and I will share the recipe very soon.
I thought of a few things to do but ended up doing something entirely different simply because I was too lazy and didn't want to go grocery shopping on Friday evening.
Anyway, here it is. I used this golden fried tofu to make an awesome dish and I will share the recipe very soon.

Golden Fried Tofu
My entry for Click: Cheese & Tofu
Thursday, February 26, 2009
Dal Makhani Recipe
 This dish is also known as maa ki dal, as I discovered recently. I think I can understand why. This is my least favourite dal dish to order in a restaurant. I am yet to eat a good dal makhani dish outside.
Ironically, my mom doesn't cook this so this isn't really maa ki dal to me. We are hardcore South Indian and though amma cooks an occasional rajma or paneer dish, dal makhani is too 'North Indian' for us and never really occurred to her to try and cook, I guess.
Her daughter, obviously, loves to take on more than she can chew sometimes (literally!) and takes pleasure in experimenting on never-before-cooked recipes especially when she has guests. I most often mess up on my most tried and tested recipes when I have guests (is it the pressure or is the behaviour expected, I can never tell).
Anyway, dal makhani has been on the back of my head forever and I recently got a bag of whole black lentils (whole black urad dal) and I decided to try it on an evening we had a young North Indian couple. Brave, arent I? ;)
This is a milder version of the dish as I was serving it with spiced up vegetable pulao. I also avoided the cream that is usually an essential indredient for this recipe.
Dal Makhani RecipeThis goes to My Legume Love Affair event hosted this month by Susan of The Well-Seasoned Cook.
(Serves 4)
What I Used:
1/2 cup whole ural dal (black lentils), soaked overnight
4 tbsp rajma (red kidney beans), soaked overnight with the dal
1 onion, chopped fine
1 tomato, chopped fine
2-3 cloves of garlic, chopped
1 tbsp ginger-garlic paste
1/2 tsp cumin seeds (jeera)
1 tsp garam masala
1/2 tsp red chilly powder
2 dried red chillies
2 tbsp milk
1 tbsp butter
1 tbsp oil
salt
How I Made It:
1. Heat oil in a pressure cooker and saute onions till transparent. Add salt, chilly powder and the ginger-garlic pasted and fry for a minute.
2. Next, add the chopped tomatoes and cook for a few minutes so that the mixture combines well together. Add the lentils and beans, and enough water to just cover them. Pressure cook for 3-4 whistles. Remove from fire and set aside.
3. Once the pressure leaves the cooker, keep it on a low fire. Add the milk and bring to boil. Keep it on sim and let it boil while preparing to temper it.
4. Heat the butter and oil in a pan and throw in the cumin seeds. Once they start spluttering, add the chopped garlic and the red chillies each torn into 3 pieces. Fry until the garlic starts browning and smelling lovely.
5. Remove the dal from fire and add the tempered butter-oil directly to it. Follow immediately with garam masala and mix well. Adjust salt.
Serve with warm rotis, naan or pulao.
---------------------------------------------------------------------------
Please keep those recipes coming for The Recipe Diary Contest.

Thanks to everyone who started contributing already. You are all that much closer to winning the cookbook of your choice!
Southern Style Greens
 We all know that dark leafy greens are awesome for you. Kale always ranks at the top of the list as a super veggie. This month's Nutrition Action newsletter reminded me of this fact with their veggie chart. I must admit, though, that I am always a bit stumped when it comes to finding exciting ways to serve greens. Simple steaming or sauteing always results in a chorus of "eeewwwws"from the kids. And sometimes I go crazy and cook them with a few splashes of white wine and lemon juice. This recipe, however, are by far the tastiest method of serving greens I have come across yet. And the kids like them! I used swiss chard because it cooks quickly, but you could use kale or collards as well.
INGREDIENTS
- 2 tbsp margarine
- 1 red onion, small dice
- 1 garlic cloves minced
- 1 bunch swiss chard, tough stems removed, roughly chopped
- 1 tsp hot sauce
- seasoned salt to taste
- pepper to taste
- splash of liquid smoke
METHOD
1. Heat margarine in a large pot over medium heat. Saute onion and garlic for 5 mins, until softened.
2. Add swiss chard and cook until tender, stirring regularly. When cooked, add hot sauce, season to taste with seasoned salt and pepper, and stir in liquid smoke. Serve.
Wednesday, February 25, 2009
On Bread and Canning
I love cookbooks. I have a very large shelf of them and enjoy sitting down, flipping through them, and thinking about ingredients and flavours. I recently bought two new ones and thought I would share. First, I picked up Peter Reinhart's Whole Grain Breads. This books employs new methods to draw out maximum flavour from the grain. The breads do take some time to make, but my experience has been is that it is always worth it. Since my bakery customers prefer whole wheat breads I thought I would try to expand my repertoire. Now, I am not sure how this is legal, but Google Books has an almost complete digital copy of the book if you want to check it out.
 Second, I got the BALL Complete Book of Home Preserving. As the blurb says, the book contains "400 innovative and enticing recipes include everything from salsas and savory sauces to pickling, chutneys, relishes and of course, jams, jellies, and fruit spreads, such as: Mango-Raspberry Jam, Damson Plum Jam Crab Apple Jelly, Green Pepper Jelly Spiced Red Cabbage, Pickled Asparagus Roasted Red Pepper Spread, Tomatillo Salsa Brandied Apple Rings, Apricot-Date Chutney." Aside from a few canned meat recipes (blech), everything in the book is vegan. In my ideal world I would live off the grid, growing all my own food and snubbing anything with a UPC. Until then, I just have to make due with this book.
First, I picked up Peter Reinhart's Whole Grain Breads. This books employs new methods to draw out maximum flavour from the grain. The breads do take some time to make, but my experience has been is that it is always worth it. Since my bakery customers prefer whole wheat breads I thought I would try to expand my repertoire. Now, I am not sure how this is legal, but Google Books has an almost complete digital copy of the book if you want to check it out.Second, I got the BALL Complete Book of Home Preserving. As the blurb says, the book contains "400 innovative and enticing recipes include everything from salsas and savory sauces to pickling, chutneys, relishes and of course, jams, jellies, and fruit spreads, such as: Mango-Raspberry Jam, Damson Plum Jam Crab Apple Jelly, Green Pepper Jelly Spiced Red Cabbage, Pickled Asparagus Roasted Red Pepper Spread, Tomatillo Salsa Brandied Apple Rings, Apricot-Date Chutney." Aside from a few canned meat recipes (blech), everything in the book is vegan. In my ideal world I would live off the grid, growing all my own food and snubbing anything with a UPC. Until then, I just have to make due with this book.Tuesday, February 24, 2009
Erissery Recipe - Yellow Pumpkin Curry Kerala Style
I realised a couple of weeks back that its been quite a while since I posted any Kerala recipe in here. It wasn't surprising because when I think of making a new dish, I always try to look up Brahmin recipes since that's something TH would enjoy and something I can learn too.
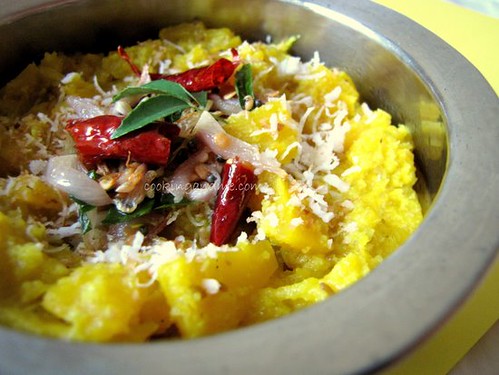 Mathanga Erissery
------------------------------------------------------------------------------------------
Thanks to everyone who started contributing already. You are all that much closer to winning the cookbook of your choice!
But on this particular weekend, I was all "I want Kerala food, coconut all the way". I usually shop for my vegetables for the week on Sunday evenings but that weekend, I headed off bright and early, ok 11am to be precise, on Saturday and guess what I saw first thing I stepped into the vegetable section.
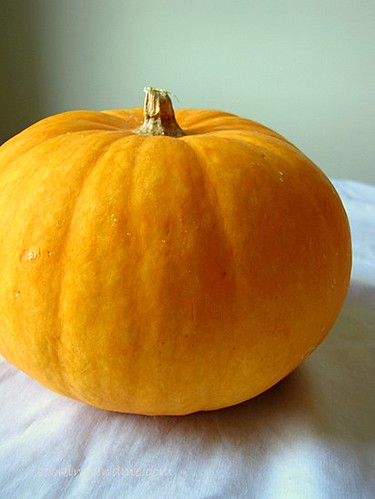 This beauty right here. I am no pumpkin lover but erissery has always held a soft spot in my heart. Mom doesn't make it that often, actually. She makes pumpkin koottu more often, with dal. But erissery is a quintessential part of the Onam Sadya and I realised I haven't even tried it myself yet. That idea and this pumpkin combined, and the rest is history ;)
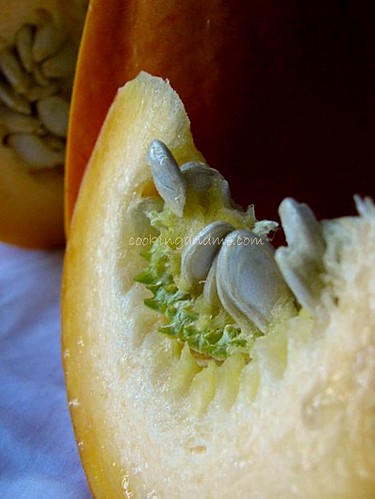
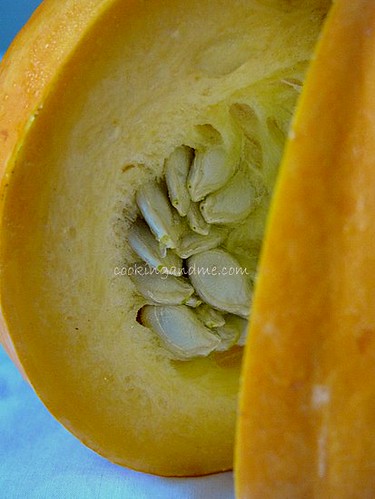 I couldn't resist more pictures of the pumkin. It was bright orange-yellow and smooth spotless on the outisde. Since this was during Chinese New Year, vegetables in Singapore supermarkets were fresh and mostly from China.
 Ok now onto the Mathanga Erissery Recipe. Mathanga is pumpkin in malayalam, by the way.
This beauty right here. I am no pumpkin lover but erissery has always held a soft spot in my heart. Mom doesn't make it that often, actually. She makes pumpkin koottu more often, with dal. But erissery is a quintessential part of the Onam Sadya and I realised I haven't even tried it myself yet. That idea and this pumpkin combined, and the rest is history ;)I couldn't resist more pictures of the pumkin. It was bright orange-yellow and smooth spotless on the outisde. Since this was during Chinese New Year, vegetables in Singapore supermarkets were fresh and mostly from China.Ok now onto the Mathanga Erissery Recipe. Mathanga is pumpkin in malayalam, by the way. What I Used:(serves 4 as a side)Pumpkin / mathanga - 3 cups, peeled and cut into 1" cubesGrated coconut - 1/2 cup (fresh works best but you can use frozen too)Cumin / jeera / jeerakam - 1 tspGreen chillies - 2, or to tasteTurmeric powder - 1/4 tspFor temperingMustard seeds - 1/4 tspUrad dal - 1 tspGrated coconut - 4 tbsp
Shallots - 3, slicedRed chillies - 3Curry leaves - a fewCoconut oil - 2 tsp (or any other oil you have)How I Made It:1. Boil the pumpkin in 1/4 cup water with salt and turmeric, until soft. This should take about 7 to 10 mins.2. Grind coconut, green chillies and jeera to a paste with requred amount of water. Add this to the cooked pumpkin and keep fire on sim. Adjust water if the curry is too thick at this stage. Add spoonfuls at a time so that it doesn't get too watery. If curry is too watery, then let it boil or add 1 tsp of rice flour mixed in 2 tsp water. Cook until desired consistency is reached, add salt and keep aside.3. Heat oil in a pan and add the mustard seeds. When they pop, add the urad dal, shallots and red chillies. Fry until the dal turns golden brown and the shallots turn transparent. Tear curry leaves and add to this. Mix well and pour directly over the cooked pumpkin curry.4. In the same pan, add the 4 tbsp coconut and fry on low heat till crispy and golden brown. Mix this into the curry and serve with steamed rice and pickles. Adding the fried coconut in the end is very important for the flavour of the curry so don't skip this step!
Mathanga ErisseryPlease keep those recipes coming for The Recipe Diary Contest.
Thanks to everyone who started contributing already. You are all that much closer to winning the cookbook of your choice!
------------------------------------------------------------------------------------------
fauxstess cupcakes: a vegan adventure
This recipe came to me via my friend, Corinne (who also helped in the baking, assembling, and gathering of the strange and sometimes expensive staples of vegan cooking (11 dollars for soymilk powder? say whaa?)), and her vegan cookbook, Vegan with a Vengeance by Isa Chandra Moskowitz. Here is her version:
 And here is ours.
 Despite the lack of the cute, flowered tablecloth, I think this might be my biggest success to date, especially since the multi-step recipe reminded me a lot of the peppermint cake that started this whole thing.
 And here is ours.
 Despite the lack of the cute, flowered tablecloth, I think this might be my biggest success to date, especially since the multi-step recipe reminded me a lot of the peppermint cake that started this whole thing.
 (one of the weird vegan ingredients...albeit the grosser but cheaper hydrogenated version.)

The cake batter called for an electric mixer, but seemed to come together fine with just Corinne and my combined massive arm strength.

I forgot to take a picture of just this cream portion, which we piped into the center of the cupcakes and which, was definitely the least successful component due to its makeup: crisco, margarine and sugar. The recipe called for superfine sugar and now I totally understand since our regular sugar never really blended properly/ tasted very grainy. Next, we dipped the cupcakes into a chocolate ganache made with soymilk instead of whipping cream:
Then, we let the faux-cream-stuffed, ganache-dipped cupcakes chill out in the refrigerator (and think about life for a while) while we whipped up the Royal Icing component (using soy milk instead of the $$$ soymilk powder) and then practiced making those famous swirls on a black plate so that by the time we were ready for the real deal, we were old pros:
Of course, then we became complacent and overconfident. Note bottom left cupcake.
Overall though, I will definitely label this under success...and Bill Cosby (why not?).
Monday, February 23, 2009
Light and Lemony Pasta
 I've been meaning to blog this since Valentine's Day when Vegan Mom and I ate it. Needless to say, things have been busy, busy, busy lately. If I have not responded to a question you left on a post, just send me an email and I will get back to you. This dish, as the name indicates, is light and lemony. Even though it is pasta (which we seem to be eating a lot of lately), the bright flavour and wine sauce make it a refreshing meal.
INGREDIENTS
- 250g capellini
- 1/2 head broccoli, cut into small florets, steamed
- 1 tbsp olive oil
- 1 tbsp margarine
- 1 red onion, halved and sliced
- 1 garlic clove, minced
- 1 1/2 cup white wine
- juice of 1 lemon
- zest of 1 lemon
- 1/4 cup nutritional yeast
- 1 can white kidney beans, rinsed and drained
- 2 cups cubed chicken-style seitan (optional)
- salt and pepper to taste
- 1/4 cup chopped fresh parsley
METHOD
1. Get your pasta cooking, and get steaming your broccoli.
2. Heat oil and margarine in a frying pan over medium heat. Saute onion and garlic for 5-7 mins, until softened.
3. Add wine to the pan with the lemon juice. Let reduce for about 5 mins. Add zest and nutritional yeast and mix well. Add beans, seitan, if using, and season to taste with salt and pepper.
4. Drain pasta and return to post over medium heat. Pour sauce over top and bring to bubbling. Cook for a few mins to let sauce absorb into pasta a bit. Stir in broccoli and parsley and serve.
Sunday, February 22, 2009
Food Photography Basics : Using The Right Bowls, Plates and Colours
Before you read this post and wonder why on earth I am taking pictures of empty bowls and plates, reading the first two posts in the series may help.
At the end of the second post I had asked for suggestions on what you would like to see next. Thankfully, most of you opted to see the bowls I have and what I think works best for food pics when it comes to shapes, colours, and types of bowls and plates to use. (I got really lucky 'cuz if you guys had picked shutter speed, I wouldn't have had time to do this post today).
So, before we take a peek into my collection, I have a couple of disclaimers:
1. This is not by any means an authoritative post on anything. All I am doing is sharing what I have and how I use them in my food pics. If you found anything useful in here, I would consider this post a success.
2. I didn't get time to edit the pics much beyond adding my watermark so bear with me and look only at the contents of the pics :D
3. All typos are due to exhaustion and susceptibility of my left wrist for coming down with carpal tunnel syndrome.
Alright then. Onto my collection.
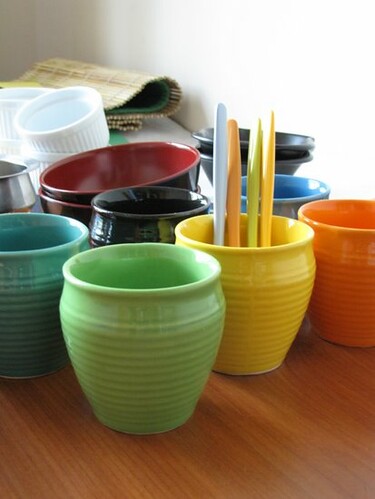
I thought I will share the set of bowls that have received the most attention. Each time I use these I get questions on whether I photoshopped them to match my food, where I got them, how many colours are there, etc.
This is the entire set - 6 colours. The bowls are small and slender and I got them as a wedding gift from my dad-in-law's friend. This one of the very few wedding gifts I use regularly - and how!
 Here are some examples of pictures taken using these bowls. I think I've used the black one the most.
 Next are ramekins! I got them about three months back and have used them in every other food pic I take - almost! I love ramekins. To begin with, they are white, and white works best for food pics in my opinion. It makes the dish stand out and these are just the right size for you to take gorgeous pics. The corrugated sides are so pretty too. I am a total ramekin fan. Does it show?
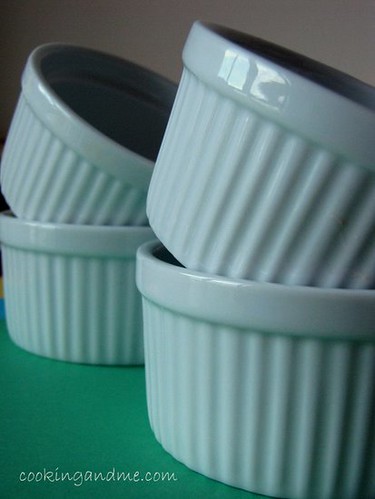 I got these in Singapore at a baking supplies store in China Town. They were about S$ 1.30 a piece and I thought that was a steal. Maybe you get them cheaper in the US, I'm not sure.
 Here are some pictures I took using these.
My pretty red and black bowls are next. I bought these at a roadside stall during my second week in Singapore because I didn't have anything to serve noodles in! They were really cheap (I think 50 cents each) and came with these tiny dishes that the Chinese use to serve their sauces in. I have used these in a few pictures and love the shape! A totally good buy, even though unintentional at the time.
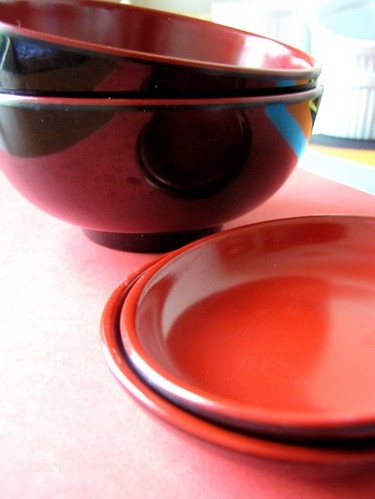 Here are some pictures taken with the bowls:
I also used the small sauce dishes in the Andhra Paruppu Podi picture.
I have only two black bowls, the ones you see below. They were a gift from TH and thoroughly overpriced. He got them at Nick Nish in Forum Mall, Bangalore for 90rs a piece. That's robbery, right?
I am not really complaing because I have used them in quite a lot of pictures. They travelled with me to Singapore and were sensible enough not to break or crack under all my other luggage.

Black looks really good when you 'shadow' the picture in Picasa. I have heavily 'shadowed' all my pics taken in this bowl and it blends nicely into a black background, bringing the entire focus on the food.
Here are examples:
Good 'ol steel bowl comes next. I have a few of these but used only one for the pic since the others are all in the fridge. These are bowls that I have in the kitchen for my day-to-day use but invariably find themselves in some picture or the other when I want them to feature in an authentic Indian recipe.
I am terribly under-stocked in good steel bowls and make do with these much-used, hand-me-downs in the kitchen.
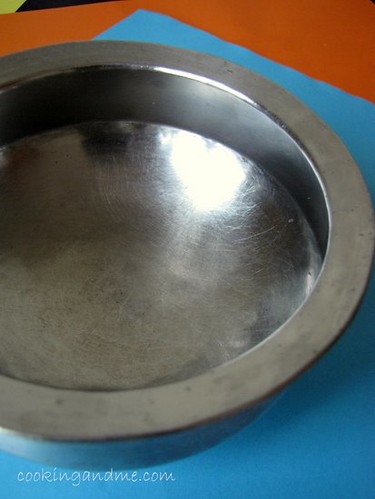
Here are examples of some steel bowl goodness:
Like I mentioned before, I feel white works best for food pictures since its neutral and also bounces light well back on to the food. The other white bowls I have (apart from the ramekins) are below. Some I brought with me from India and some I got in Singapore. None of them are above S$ 3 a piece.

The white rectangular tray
Food pics taken in this:


The wide beige-white Ikea bowls (60 cents a piece)
Food pics taken in these:
These are the only plates I have apart from my everyday steel plates. I got these at Mustafa a week after we arrived in Singapore and needed some plates to serve guests (when we made friends and they came to visit!)
I think these were about S$ 2 a piece and I bought four. I am glad I went for basic white because they form a great base for 'loose' food and I love the pictures I took with these in them.
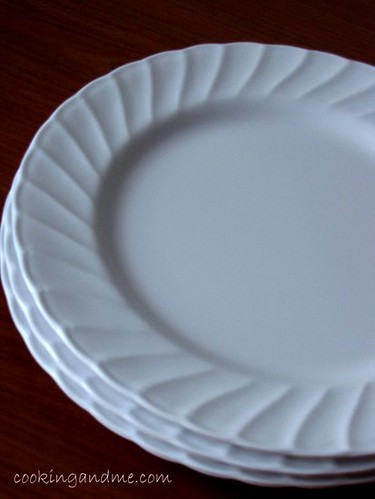
Food pics on white plate:
Here is the answer to my coloured backgrounds that many of you have asked about. Construction paper! I bought a pack for 4 dollars and they came in most of the common colours. These are A4 size so I always have to bend and break my back to make the entire picture fit in this size. But I still love them. The yellow and the blue ones you see in the pic are ruined because of oil marks on them. That's the flip side, you can't just wipe them with a wet cloth and re-use them, sadly. But you can always buy another pack ;)
 I use these in almost all my pics but here are some example pics where I have received the most number of questions about what background I used and whether I photoshopped the colour in. Photoshop is good to have, but really not necessary, trust me!
I also bought some tissues recently from Ikea. These could form good backgrounds or bases for food pics. I haven't tried them yet but I have a good feeling about them.

Blind-like coasters also make very good bases for food pics. I had a few when I was in Hyd but I brought only these two with me to Singapore. When I buy coasters, unless they come in pairs, I buy only one. That's all you need anyway so why waste money.
 Here are some pics using these coasters:
Ok, now who wants to help me put away all these and clear up the mess? Oh God! I need to do this before TH comes to iron his clothes. This table doubles up as my photography area, ironing table and the study table from where I work if I need to get something done over the weekend.
There is a window to the left, my primary (and only) light source when I take pics.

I buy a bowl or a plate whenever I go shopping. It doesn't need to be expensive, just colourful and of the right size. If you are just starting out, I would highly recommend getting some plain white bowls. I have a square white bowl on my wishlist, as well as a round wooden bowl to shoot raw ingredients in.
 Once I am done cooking, I open my cupboard and look at these beauties inside. In under 2 mins, I instinctively know how the final picture should look like. I see it in my head. Starting off with a small yet good collection will give you flexibility and motivation to take it another step, buy that extra bowl and notice things in others' food pictures that you may not have before.
 Its fun, isn't it? I am glad I got on this bandwagon of food blogging when I did. Its made me a better person. Fatter, but better :)
------------------------------------------------------------------------------------------
If you think you want to show me some love for spending most of my weekend on this post, please help me spread the word by Stumbling it.

Thanks to everyone who started contributing already. You are all that much closer to winning the cookbook of your choice!
-----------------------------------------------------------------------------------------
Saturday, February 21, 2009
bon appétempt gone global: the poke cake story
So, my sister-in-law, Andrea, did her very own cake attempt recently, and I just had to include it here. The recipe came to Andrea via Cook's Country TV, and here's their version: See those pokes? That's Jell-O! Apparently in the late sixties, pre-Bill Cosby and the focus on the fact that their product wiggles, Jell-O was struggling to find its marketing voice and so, invented this cake to help bolster their sales. I don't know if it worked or not, but can't you completely see Betty Draper serving this up?
 See those pokes? That's Jell-O! Apparently in the late sixties, pre-Bill Cosby and the focus on the fact that their product wiggles, Jell-O was struggling to find its marketing voice and so, invented this cake to help bolster their sales. I don't know if it worked or not, but can't you completely see Betty Draper serving this up?
(Sigh, poor Betty. Hang in there!)
And, here, in 2009, is Andrea's version:
And, here, in 2009, is Andrea's version:
 Now, I know that Andrea has described her pokes as not as defined as the above Cook's Country version, but given the fact that I just threw away the rest of those soggy, ill-baked heartcakes from last week, I'm going to file this under success (and Bill Cosby).
Friday, February 20, 2009
That's Why We Don't Eat Animals
 One of the great things about blogging is that you get to meet all sorts of interesting people. One such person is Ruby Roth, a talented author and illustrator who is publishing a new kids' book, That's Why We Don't Eat Animals. As you can see, the illustrations are fantastic, and the message is spot on. So for all you Vegan Dads and Moms out there, check out her website and the video below.
Scrambled Eggs with Mushrooms & Masala
I happened to chance on some Parsi recipes while random browsing the other day and came across this incredibly simple recipe for scrambled eggs, what the Parsis call Akoori. It didn't look very different from the usual masala scrambled eggs recipes I use, except that they add ground cumin in this. I wanted to follow the recipe exactly but my hands itched to use up some extra mushrooms lying around after making the Broccoli Mushroom Stir Fry, so I decided to use them up here.
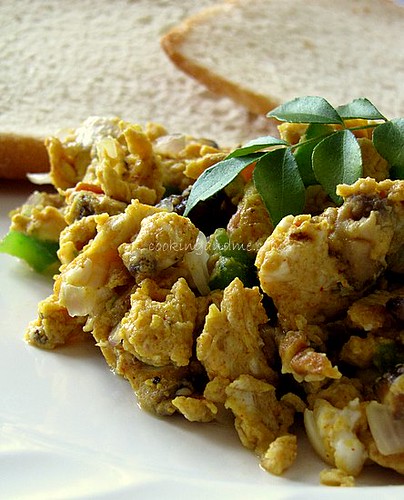
Though I really didn't create an Akoori at the end of it, I was quite intrigued by this simple scrambled egg recipe that I saw, that I had to share it.
This is no Akoori, its just plain old Scrambled Eggs with Mushrooms and Masala. Doesn't that have a nice ring to it?
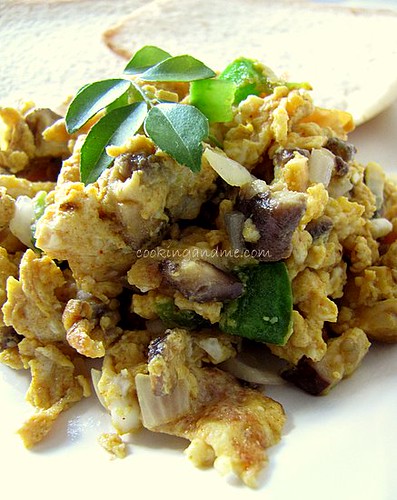 Though I prefer the first pic, this one has a better view of the mushrooms so here you go!
Thanks to everyone who started contributing already. You are all that much closer to winning the cookbook of your choice!
Though I really didn't create an Akoori at the end of it, I was quite intrigued by this simple scrambled egg recipe that I saw, that I had to share it.
This is no Akoori, its just plain old Scrambled Eggs with Mushrooms and Masala. Doesn't that have a nice ring to it?
What I Used:
(Serves 2)
Eggs - 4
Onion - 1 small, chopped
Tomato - half of one, chopped
Mushrooms, any variety - 1/4 cup (remove hard stem and quarter the cap if using button mushrooms)
Capsicum - 1/4 of one, cubed
Curry masala / Garam masala - 1/2 tsp
Ground cumin / jeera / jeerakam - a pinch
Red chilli powder - a generous pinch (you can also use 1 sliced green chilli)
Curry leaves - a few
Oil - 2 tsp
Salt - to taste
Pepper powder - for sprinkling on top while serving
How I Made It:
1. Break the eggs into a bowl and mix well with salt. If you want to separate a couple of yolks and use only the whites, that's fine too.
2. Heat oil in a wide pan or wok and saute the onions until transparent. Throw in the mushrooms next, increase the heat and let them cook for a few seconds before tossing. Let them cook again for some time and then toss again. Do this cook-toss routine till the mushrooms start sweating and get softer. (Should take about 4 mins or so depending on the mushrooms you are using).
3. Now add the cumin powder, chilli power, and the curry masala and mix well for a minute.
4. The tomatoes go in next and you can tear the curry leaves and throw them in too. Mix around for some more time until the tomatoes get a little soft and give out the water. I chopped them fine so they pretty much broke into a mushy pulp at this stage (psst.. I don't like chunky pieces of tomatoes in my egg, quite distracting!).
5. Now our stars make the entrance. Lower heat to just over sim and add the eggs. There are two ways to mix them at this stage. If you mix vigrously and continuously, you will be left with fine pieces of scrambled eggs and if you let it cook for a while and then break it up, cook-break, cook-break, then you will get slightly bigger, softer pieces of egg. I prefer the latter method so that's what I did.
6. Once the eggs are cooked through, remove from fire, sprinkle some pepper powder on top and serve with toast, rice, or anything of your choice. I won't tell anyone if you eat it as is, if that's what you prefer to do ;)
Though I prefer the first pic, this one has a better view of the mushrooms so here you go!--------------------------------------------------------------------------------
Please keep those recipes coming for The Recipe Diary Contest.
Thanks to everyone who started contributing already. You are all that much closer to winning the cookbook of your choice!
---------------------------------------------------------------------------------
Tuesday, February 17, 2009
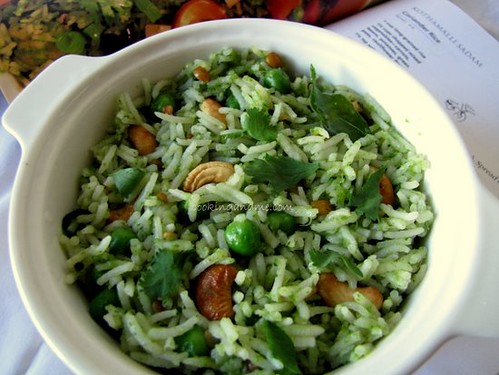
Coriander Rice / Kothamalli Sadam Recipe
This is another recipe from Chandra Padmanabhan's Southern Spice. I have been trying more and more recipes from the book with good results and this kothamalli sadam recipe is definitely a winner. Both TH and I love fresh coriander and pretty much anything made with it. When I have some extra leaves on the verge of wilting and wasting away, I chop them and add them to dosa batter, that's how much we love it!
The original recipe in the book called for mixed vegetables to be added but since I didn't have any carrots or cauliflower, I only added frozen peas. You can keep this recipe as the base and add vegetables and even paneer/tofu to get a different dish each time.
Recipe For Coriander Rice

I served it with a simple cucumber raita and papad. The flavour will be a true delight for coriander lovers!
This recipe goes to Weekend Herb Blogging hosted by Susan of The Well-Seasoned Cook. For previous hosts and recaps of WHB check out Haalo's blog.
Thanks to everyone who started contributing already. You are all that much closer to winning the cookbook of your choice!
The original recipe in the book called for mixed vegetables to be added but since I didn't have any carrots or cauliflower, I only added frozen peas. You can keep this recipe as the base and add vegetables and even paneer/tofu to get a different dish each time.
Recipe For Coriander Rice
What I Used:
(Serves 2)
Basmati rice (or any long-grained rice) - 2 cups
Green peas - 1/4 cup (optional)
Salt - to taste
For the Coriander Paste:
Fresh coriander leaves - 1 cup
Chopped onions - 1, medium
Green chillies - 2, more or less
For Tempering:
Oil - 2 tsp
Chana dal / kadala paruppu - 1 tsp
Urad dal / uzhunnu parippu - 1/2 tsp
Hing / Asafoetida - a generouns pinch
Curry leaves - a few
For Garnish:
Roasted cashewnuts - a handful
Chopped coriander leaves - 1/4 cup
How I Made It:
1. Soak the basmati rice in some water for 20 mins and cook in sufficient water until the grains are cooked, yet firm. I pressure cooked it this time for one whistle with 1:1 rice:water ratio.
2. Grind the ingredients for the coriander paste with little water.
3. Heat oil for tempering and roast the chana dal and urad dal until golden brown. Add the curry leaves and hing and mix well.
4. Now add the ground coriander paste and blend well adding enough salt. Throw in the green peas and let it simmer for 2-3 mins.
5. Switch off fire and mix in the rice while the paste is still hot.
6. Garnish with cashewnuts and chopped coriander leaves.
I served it with a simple cucumber raita and papad. The flavour will be a true delight for coriander lovers!
This recipe goes to Weekend Herb Blogging hosted by Susan of The Well-Seasoned Cook. For previous hosts and recaps of WHB check out Haalo's blog.
--------------------------------------------------------------------------------
Please keep those recipes coming for The Recipe Diary Contest.
Thanks to everyone who started contributing already. You are all that much closer to winning the cookbook of your choice!
---------------------------------------------------------------------------------
Ultimate Almond Peach Shortcake
 Here is what Vegan Mom and I indulged in on Valentine's Day. We've never been big Valentine's Day people, and with 3 kids, celebrating now means trying to stay up past 10:30. Ha! On the 14th we enjoyed a nice pasta dish (I will post that next), and then bolted these down while taking in a class piece of cinematic comedy: Dragnet.
INGREDIENTS
Shortcakes
Makes 6
- 1 3/4 cup flour
- 1/4 cup powdered sugar
- 1 tbsp baking powder
- 3/4 tsp salt
- 5 tbsp cold Earth Balance margarine
- 1/4 cup powdered sugar
- 1 tbsp baking powder
- 3/4 tsp salt
- 5 tbsp cold Earth Balance margarine
- 1/4 cup sliced almonds
- generous 3/4 cup soy creamer (or soy milk)
- generous 3/4 cup soy creamer (or soy milk)
- 1 tsp almond extract
METHOD
Preheat oven to 450 degrees
1. Whisk together flour, baking powder, sugar, and salt in a bowl. Cut in cold margarine (or use your fingers) until it resembled coarse bread crumbs. Mix in almonds, soy creamer, and extract with a wooden spoon. Add a splash more creamer if dough is too stiff.
2. Spread batter into an extra large non-stick muffin tin (or, grease and flour a pan if you don't have a non-stick one) with a silicone spatula. You should have 6.
3. Bake for 15-17 mins, until lightly brown on top. Let cool for a 5 mins, then remove from pan and cool on a wire rack.
Filling
- 2 cups chopped frozen peaches
- 1/3 cup sugar
- 2 tbsp amaretto
- 1/4 tsp cinnamon
- 1 tbsp cornstarch
- 1 1/2 tbsp soy creamer
Vegan Whipped Cream
- make this recipe
METHOD
1. Heat peaches and sugar in a pot over med-hi heat. When bubbling, add amaretto, reduce heat to medium, and let bubble away for a few mins. Add cinnamon. Dissolve cornstarch into creamer and add to peaches. Bring back to bubbling and stir for one min, allowing to thicken. Remove from heat and let cool in the fridge.
To Assemble the Shortcakes:
Cut shortcakes in half. Spread some whipped cream on the bottom half, and then some peach filling. Place the top of the shortcake on, then top with more filling and a dollop of cream.
Monday, February 16, 2009
The Recipe Diary Contest
What?
I am looking for some Indian recipes to create the ultimate Recipe Diary and would appreciate your contribution to my collection. What's more? You stand a chance to win cool cook books if you enter the contest!
How?
Follow the steps below to send me your Indian recipes.
1. Click on the button to reach the recipe submission form.
2. Enter your favourite Indian recipes.
3. Send me a picture of your recipe to naagu.v@gmail.com
Why?
I thought you'll never ask! I have THREE cool gifts to give away to winners in 3 categories.
The Super Contributors
These go to the top 2 people who submit the most number of recipes. It can be in any of the categories mentioned in the submission form.
The Super Chef
This goes to one person who comes up with the most authentic, creative and unique recipe.
The Gifts!
The winners can pick a cook book of their choice from the list here. I will be updating the list with more books so the choice is wide and completely yours.
When?
I will be accepting your entries till midnight March 3rd, 2009 (IST).
Start Submitting Now!
-Please note-
* On submitting a recipe and its picture, you agree and accept that it may be re-used or reproduced on this website or any other website of my choice. However, the credit will surely go to you and I will link to your website if you have one.
* Please feel free to submit recipes that are posted in your blog/site. As long as they are Indian recipes, I would love to receive them!
* Please do not copy/download recipes or pictures from other sites and enter them in the contest. That may constitute plagiarism.
* In case you win the contest, you will need to provide me with your name and postal address to send the gift.
* Winners will be announced on or before March 8th, 2009.
* Please do not copy/download recipes or pictures from other sites and enter them in the contest. That may constitute plagiarism.
* In case you win the contest, you will need to provide me with your name and postal address to send the gift.
* Winners will be announced on or before March 8th, 2009.
Subscribe to:
Posts (Atom)


