Wednesday, December 29, 2010

The Star Recipes of 2010

It honestly doesn't feel like a year has passed since my last recap for 2009. But it definitely has been a whirlwind year, full of ups and downs but mostly, I can remember only the good stuff, probably because they were that good!

The top recipe continues to be the Paneer Butter Masala - Restaurant Style Recipe. Most people have tried it with extremely good results and its a pleasure to see a new email or comment saying how much they loved it. If you haven't tried it yet, you should, really.


This is also the year I realised that most of you out there love easy snack recipes. The Bread Paneer Rolls definitely proved that. 


You know what? We love them too! Score!

This is also the year I realised I enjoy baking. A lot. I personally feel this is the year I baked the most and learnt the most. Enough to actually share with you through Basics of Baking posts. 

Some of my personal favourites and the ones that received the most number of thumbs up, both here and on the Facebook page


sticky date toffee cake

Garlic Pull Apart Rolls - and the first food post with pics from my new Nikon D90!

Eggless Garlic Rolls Recipe

Molten Chocolate Lava Cakes - I really love how the picture came out too!

Molten Lava Choc Cake Recipe

Toblerone Candy Bar Shortbread - the first of the "candy bar series"


IMG_4478

Ok that's quite a sugar rush and a fantastic note to end the year that was 2010. Looking forward to a wonderful 2011 and wishing you all the same! Come back soon :)

Tuesday, December 28, 2010

Pressure Cooker Indian Chickpeas

Is your body seeking nourishment after being strung out on a deluge of refined carbohydrates for the past few days (week?). I know mine is. A few months ago I bought this pressure cooker because it was on sale really cheap and I had seen the chefs use pressure cookers fairly regularly on Top Chef (Season 8 is awesome, by the way). But, since I had never used one before (and I had a slight fear of the whole thing blowing up on the stove) it sat on the shelf until now. I was a fool! Pressure cookers are awesome and can cook up dried beans in no time flat, making canned beans a thing of the past. My trick is to soak an entire bag of beans overnight, then keep them in the freezer until I need them for the pressure cooker. I then experimented with making wholesome one pot meals that could go from cutting board to table in about 40 mins (depending on your chopping skills). This is my first one pot wonder--next is an Ethiopian stew.

INGREDIENTS
- 2 tbsp oil
- 1 tsp mustard seeds
- 1 tsp cumin seeds
- 4 curry leaves (optional)
- 1/2 tsp coriander
- 1/2 tsp chili powder
- 1 cup yellow split peas, well-rinsed and drained
- 1.5 cups soaked chick peas (i.e. dry chickpeas that have been soaked for 8 hours or so)
- 2.5 cups water
- 2 onions, halved and sliced
- 2 cloves of garlic, chopped
- 1 tbsp minced ginger
- 1/4 cup chopped cilantro (plus another 1/4 cup for later)
- 1 green chile, seeded and chopped
- 1 tomato, diced
- 2 cups diced butternut squash (or sweet potato)
- salt to taste

METHOD
1. Heat oil in a small saucepan over medium heat. Add mustard and cumin seeds and fry until fragrant and popping. Add in other spices and curry leaves and fry for 30 seconds. Set aside.
2. Add all the remaining ingredients to the pressure cooker, then add fried spices and season to taste with salt. Mix well.
3. Close pressure cooker and place over high heat. When pressure is reached, turn heat to low and cook for 20 mins. Remove from heat and wait for pressure to decrease.
4. Open the pressure cooker and add the additional 1/4 cup of cilantro. Gently mix to blend everything together (the split peas will break apart, as will the onions and squash, and the mixture will thicken). Serve over rice.

Monday, December 27, 2010

Take Two: Devil's Food Layer Cake with Peppermint Frosting

Matt is Jewish and as recently as last year asked, "Christmas is always the third Thursday of December, right?" With questions like these, I feel a special obligation to share my Christmas traditions with him while at the same time, with our jobs keeping us from traveling home for the holidays, a certain freedom to drop the ones I never liked in the first placelike everyone disbanding into separate rooms moments after the presents were opened and the (perhaps somewhat related) complete absence of champagne or mulled cider or holiday cocktails of any kind.

And so, with some traditions stricken from the record, I realized that we had space to create some new ones of our very own. For example, last year, with my brother visiting from North Carolina, we thought it might be fun for each person to contribute one dish to Christmas dinner. And so, Christmas dinner became a small, three-dish potluck, or as Matt referred to it, "a weird hodge podge of foods." Needless to say, it didn't stick. So, this year, we decided to go back to something we tried out two years ago and have been thinking about ever since.

Bon Appetit's version:

our 2008 version:

our 2010 version:
Truth is, I've been thinking about remaking a lot of the early appetempts. Some of them are just plain jenkyOrange Polenta Cake, Mushroom Turnover, just to name a few. I'd like to think that for those early posts, the blog and I were still finding our voice and aesthetic. But there was one attempt that cast a large shadow over the others. It was the very first one, the first fail, the impossible cake that birthed Bon Appetempt. If I was going to move forward, I knew I'd have to deal with the past, and that meant retrying my hand at the Devil's Food Layer Cake with Peppermint Frosting.

Though the above slice looks a little anemic and isn't standing upright as we hoped (Wasn't gonna happen.), the cake as a whole survived. Even after we sliced it. (See below.)
Over the past two years, I had really built up the challenge that was this mega-cake. But on Christmas Eve, as I finally rolled up my sleeves and began the two-day process, I kept thinking of the advice Anne Lamott's father gave to her brother in her book, Bird by Bird. The title comes from an anecdote Lamott tells about her ten-year-old brother who had had three months to put together a massive book report on birds, but had only just begun working on it the day before it was due. He was frantic and stressed. And her dad's advice? "Just take it bird by bird."

After all, I was reminded, I had bird-by-birded this thing two years ago when I knew nothing about making cakes. And two years later, the behemoth came together quite nicely—the only real failing arriving when trying to plate the perfect slice for the photo. (It should be noted that the cake is enormous. It weighs about 15 lbs and is roughly the size of a microwave oven.)

Time will tell, but I have a feeling this tradition will stick. It's a major crowd-pleaser and putting it together is the sort of undertaking one looks forward to exactly once a year.

p.s. My Christmas iPad from Matt came in handy.
Happy Holidays! See you in the new year!

Recipe via Bon Appetit:

ingredients:
cake
2 2/3 cups all purpose flour
1 tablespoon baking powder
1 teaspoon baking soda
1 teaspoon salt
2 1/4 cups sugar
1 cup (2 sticks) unsalted butter, room temperature
3 large eggs
1 large egg yolk
1 1/4 cups unsweetened cocoa powder, sifted
2 cups ice water

Dark chocolate ganache
1 1/3 cups heavy whipping cream
2 tablespoons light corn syrup
14 ounces bittersweet chocolate, chopped

white chocolate cream

12 ounces high-quality white chocolate (such as Lindt or Perugina), finely chopped
3 cups chilled heavy whipping cream, divided
1 1/2 teaspoons pure peppermint extract

peppermint frosting
2 1/4 cups sugar
1/2 cup water
3 large egg whites
1 tablespoon light corn syrup
1/2 teaspoon pure peppermint extract
Bittersweet chocolate curls

Preparation

Cake

Position rack in center of oven; preheat to 350°F. Butter two 9-inch-diameter cake pans with 2-inch-high sides. Dust pans with flour; tap out excess. Whisk first 4 ingredients in medium bowl to blend. Using electric mixer, beat sugar and butter in large bowl until well blended. Beat in eggs 1 at a time, beating well after each addition. Beat in yolk. Add cocoa and beat until well blended. Add flour mixture in 3 additions alternately with ice water in 2 additions, beginning and ending with flour mixture and beating until just blended and smooth after each addition. Divide batter between prepared pans; smooth tops.

Bake cakes until tester inserted into center comes out clean, about 40 minutes. Cool cakes in pans on racks 15 minutes. Invert cakes onto racks and cool completely. DO AHEAD Can be made 1 day ahead. Wrap in foil; store at room temperature.

Dark chocolate ganache
Bring cream and corn syrup to simmer in medium saucepan. Remove from heat; add chocolate and whisk until melted and smooth. Transfer to small bowl. Chill until firm enough to spread, about 1 hour. DO AHEAD Can be made 1 day ahead. Before using, let stand at room temperature until soft enough to spread, about 30 minutes.
White chocolate cream
Place white chocolate in large heatproof bowl. Bring 1 cup cream to simmer in saucepan. Pour hot cream over white chocolate. Let stand 1 minute; whisk until smooth. Whisk in extract. Cover; chill until mixture thickens and is cold, at least 4 hours. DO AHEAD Can be made 1 day ahead. Chill.

Add 2 cups chilled cream to white chocolate cream and beat until smooth and peaks form. DO AHEAD Can be made 3 hours ahead. Cover and chill. Rewhisk to thicken, if necessary, before using.

Using long serrated knife, cut each cake horizontally in half. Place 1 cake layer on platter, cut side up. Spread 1/3 of dark chocolate ganache over cake. Spoon 2 cups white chocolate cream in dollops over cake; spread evenly to edges. Top with second cake layer, cut side down; spread 1/3 of ganache over, then 2 cups white chocolate cream. Repeat with third cake layer, cut side up, remaining ganache, and remaining cream. Cover with fourth cake layer, cut side down. Chill while preparing frosting.
Peppermint frosting
Combine sugar, 1/2 cup water, egg whites, and corn syrup in large bowl of heavy-duty stand mixer. Whisk by hand to blend well. Set bowl with mixture over saucepan of gently simmering water; whisk constantly with hand whisk until mixture resembles marshmallow creme and ribbons form when whisk is lifted, 8 to 9 minutes. Whisk in peppermint extract. Remove bowl from over water and attach bowl to heavy-duty stand mixer fitted with whisk attachment. Beat on high speed until mixture is barely warm to touch and very thick, 7 to 8 minutes.

Using offset spatula and working quickly, spread frosting over top and sides of cake. Sprinkle chocolate curls over top and sides. DO AHEAD Can be made 1 day ahead. Cover with cake dome; chill.

Sunday, December 26, 2010

Eggless Lemon Poppy Seed Muffins Recipe

Its strange how this lemon poppy seed muffins got into my head. Strange because I don't like citrus-y or lemon-y desserts. I am more of a chocolate person, or if not, I pick a Creme Brulee or a custard from the choices. Also strange because poppy seeds are not available in Singapore and I haven't seen the black ones in India either (let me know if you know where to find them in India).

lemon poppy seed muffin

I did manage to pick up two packets of black poppy seeds from Sydney and then the muffins started to haunt me until I baked them recently. I am still not a fan of lemon-y desserts or sweets but these were definitely tasty.

I realised I didn't have eggs when I reached the stage in the recipe where I was supposed to add eggs! So I just used yogurt as a substitute and hoped for the best. The muffins turned out super soft and yum, so here's an unintentional eggless adaptation of the classic lemom poppy seeds muffin recipe.

Eggless Lemon Poppy Seed Muffins
Adapted from: Baking from my Home to Yours by Dorie Greenspan
Makes: 6

Ingredients:
1/3 cup regular white sugar
zest and juice of 1/2 a lemon (use lesser if using Indian lime)
1 cup all-purpose flour
1 tsp baking powder
A pinch of baking soda
A pinch of salt
1/2 cup buttermilk or sour cream (I used sour cream)
2 heaping tbsp of yogurt (or use one egg)
1/2 tsp vanilla extract
1/4 cup (4 tbsp) butter
2 tbsp poppy seeds

For Glaze:
1/2 cup powdered sugar mixed with 2 tbsp of lemon juice

How I Made It:

1. Preheat oven to 375F / 190C. Mould or grease a muffin tin and set aside.

2. In a bowl, rub the white sugar with the lemon zest until the sugar is lightly colored and scented with lemon. In another bowl, whisk in the flour, baking powder, baking soda and salt. In a third, whisk together the yogurt (or eggs), buttermilk (or sour cream) vanilla extract, melted butter, the lemon infused sugar, and lemon juice.

lemon poppy seed muffin

3. Add the wet ingredients to the whisked flour mixture and fold together (the specks you see in this pic are not the poppy seeds - which are added at a later stage - its the vanilla powder I used instead of extract)

lemon poppy seed muffin

4. When almost thoroughly mixed, add the poppy seeds. Divide batter between muffin cups.

lemon poppy seed muffin

5. Bake for 30-35 minutes or until the tops are golden and a skewer inserted in the center of the muffin comes out clean.

lemon poppy seed muffin

6. Let cool in the pan for 5 minutes then transfer to a wire rack to cool completely before glazing. I didn't add lemon juice to the glazing, just a few drops of milk, since I didn't want an overpowering flavour of lemon in my muffins.

lemon poppy seed muffin

Note: my muffins turned out a tad under-baked. The baking time mentioned in the book was 15-20 mins and they passed the skewer test at that time but the top didn't turn a golden brown. I have adjusted baking time in the recipe mentioned here but look out for a golden top and you should be fine.

Thursday, December 23, 2010

Holiday Roundup 2010

So my dream of creating all sorts of holiday recipes this year was destroyed by a manuscript, a book proposal, and far too much grading. Still, I did come up with a few ideas, and there are plenty more in the Vegan Dad archives to make your holiday a gastronomic success:

It is a tradition of ours to start Christmas day with a lovely Swedish Tea Ring. You could also do Lemon Currant Rolls, or even this Chocolate Cinnamon Babka.

We usually don't eat lunch on Christmas Day, but spend the afternoon nibbling on finger foods and cookies, like these Russian Tea Balls. Those of you who have Peter Reinhart's Bread Baker's Apprentice can follow my vegan notes to make your own Stollen or Pannettone.

For dinner, you could have Veggie Mini Pies (but add some cranberries into the mix), Mini Pot Pies, Stuffed Tofu, or Festive Phyllo Traingles. You could also go old school with a Stuffed Seitan Roast, or something more simple like Cranberry-Glazed Tofu (with a side of Scalloped Potatoes and Butternut Squash), or a Holiday Stew.

All the best to you this holiday season, and happy cooking!

Wednesday, December 22, 2010

How to Choose an SLR Camera

Actually, this post should rightly be titled how I chose my SLR. I have been getting tons of questions from you guys about my new camera - a Nikon D90 - the type of lens I got, price, where I bought it and most importantly, how I came to the decision.


It was easy, really.

Step 1- Canon vs Nikon

When I started blogging, I bought a very very basic Nikon point and shoot (P&S) camera - the Nikon L10. It was 5 megapixels and had a 3x optical zoom (although I hear these numbers actually mean nothing), it still gave me good pictures. So my mind went and made itself up thinking "Nikon rocks!".

Then I became a Canon girl. It wasn't a conscious decision but I wanted a high-end P&S that will see me through until I saved up for an SLR. I decided on the Canon SX10 IS. I instantly felt the difference between that and the basic model. The pictures suddenly started looking better and it was great.

But.

I wanted an SLR and I wanted a Nikon one. Somehow it was etched in my mind that Nikon is better than Canon so I was stuck on that decision. That's the first decision you will need to make. I honestly don't think one is a better brand than the other, for most of the Nikon models out there, there's usually a Canon counterpart.

Step 2 - Price

Decide on your budget. You will most likely go over it by a little but have a rough range that you wish to spend on your SLR. This will directly influence the specs of your camera, especially the lens. My budget was about 1800 SGD / ~1400 USD.

Step 3 - Lens

There are a few ways to go about this. You can decide to invest in a cheap body and better lens. Or, you can go for a decent body and decent lens (both mid-range). Going for an expensive body and basic lens is not a good idea when you are starting out, I don't need to tell you that.

Most SLRs come with a kit lens. The D90 which I got comes with an 18-105mm Nikkor lens. Its important to understand what the numbers 18-105 mean. It basically stands for the zoom capacity of the lens.

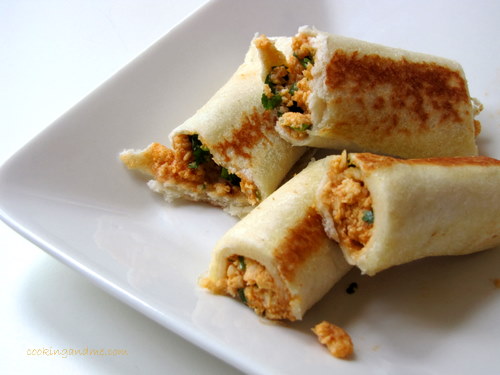
Another whole different topic is prime lens. They are fixed lens, so you can't zoom with them. However, they are considered superior in terms of clarity. They are also lighter, cheaper, and easier to carry around.  Depending on what your primary subject(s) will be (family, kids, food, beach, portraits, etc), you need to pick out the right lens. Along with the D90 kit, I picked up a Nikkor 50mm 1.8 lens, especially for low light and food photography. This lens has a large DoF and so creates a wonderfully sharp subject with a blurred background, the ideal situation for food photos and portraits. You can see the first few pics taken with this lens in my Garlic Rolls Recipe page.

I researched a lot before deciding on what to buy. A few things I did (a lot) are:

- write to fellow food bloggers and friends who had a Nikon SLR, particularly a D90. Sig helped a lot with my questions and sent me Amazon links to make it super clear what exactly she was talking about.

- search for particular lens names and camera models on Flickr. You can see example shots taken with the lens you are interested in. This is immensely useful since it gives you an idea of what the lens is capable of. Of course, post-editing and expertise come into the picture too, but its still a useful thing to do. I pored a lot over the Nikkor 50mm night shots search results.

- research online of course. Some useful sites that explain concepts are DP Review and Ken Rockwell. You can also go through Flickr Forums. One conversation I found very useful is whether the 50mm lens does good landscape shots too. The lens are not ideal for landscape so its better not to buy that as the only one with your camera body.

- go to shops, hold the camera, try some test shots, see how it feels in your hands.

This post is getting too long so if there's any other info you'd like, you can leave a comment on the Facebook page or email me.

And btw, an SLR is totally totally TOTALLY worth the investment. Whatever people say, its just not possible to get the same quality with a P&S. If you are still undecided, I would say, Go.For.It ;)

Disclaimer: I am not an expert in this subject, just wanted to share my experiences during the hunt for the perfect SLR. I am super happy with the D90 so far. Also, I only considered Canon and Nikon as possibilities, doesn't mean you shouldn't look at Sony or Olympus or whatever. I just wasn't interested, that's all.

Sunday, December 19, 2010

Every Cookie is a Sugar Cookie

To quote Gary Gulman, "Every cookie is a sugar cookie. A cookie without sugar is a cracker." With that in mind, have you heard of Canal House Cooking? If not, allow me to explain: It's a self-published series of seasonal recipe collections from Christopher Hirsheimer, one of the founders of Saveur magazine, and Melissa Hamilton, a former food editor at Saveur. People have been talking about it. So, I ordered Volume no. 5, "The Good Life," and was completely won over, which, in light of a recent email I got from a friend, is kind of funny to me. The email read:

Amelia,

Was Bon Appetempt a satire of food blogs that kind of collapsed into becoming a non- or only semi-satirical food blog? I am a curious person and would be interested to know.

Best,
Brandon

I wrote back: Brandon, please see Nora Ephron Potato Pancake attempt.

To be fair, it's a good question. Sometimes I am flipping potato pancakes to the easy jams of Eminem while other times I'm lamenting the loss of Gourmet magazine (It was an institution! Too beautiful to fail!) And well, this post probably falls under the latter category because Canal House Cooking is kind of like Gourmet magazine on drugsif Gourmet were the raw egg, Canal House Cooking would be a pimentĂłn fried egg that has been cooked and basted in Spanish-paprika-laden olive oil. (That is an actual recipe in Volume No. 5 by the way.)

"The Good Life" contains: an essay by Gabrielle Hamilton, whose praises I've already sung in the Vegetarian Chili post; a super informative piece about grower champagnes, which I had no idea was even a thing and which includes an adorably helpful diagram explaining how to read the label of a champagne bottle; and, if I'm comparing this small volume to Gourmet, then you know Canal House Cooking has some of the most beautiful photographs and inspiring recipes ever seen. Well, they do. And their sugar cookies are no exception.

Canal House's versions:

our versions:
They were easily the most delicious, buttery, subtle-y sweet sugar cookies I've ever had. They almost tasted like shortbreaddid I mention they were buttery? So very buttery that I wonder if this is the reason I had so much trouble with the dough. I know that I picked difficult cookie cutter shapes, but transferring the cut shapes to the baking sheet proved tricky. The recipe has you roll the dough in between two sheets of parchment and then chill for at least four hours before pulling one sheet out at a time to cut the shapes. I chilled them overnight, but the second the dough warmed up, all of my carefully cut cookies began to want to lose their shape. On my second sheet, I hurried as fast as I could and this helped a bit, but still, this dough really needs to be cold, and intricate, whale and anchor-shaped cookie cutters (albeit cute as hell) don't really help the process. A thin, metal spatula would have come in handy too.
So, Brandon, to answer your question, Bon Appetempt is not a satire... unless it's a satire of itself. Probably more accurately, I think it's a place to compile what inspires me—sometimes that's a lava-spewing cake and sometimes it's a beautiful sugar cookie that I simply can't help but try to recreate.

In short: Happy Holidays, people! Email me if you'd like the recipe (bonappetempt@gmail.com) or purchase "The Good Life" here. (One of the rare times I can't post it myself.)

M&M Brown Butter Samoa Blondies Recipe

I have posted a recipe for butterscotch blondies before. They are super simple and usually a welcome change from chocolate brownies.

The M&M used in the recipe can be substituted with milk chocolate chips, white chocolate chips, chopped walnuts, or anything else that catches your fancy.

Brown Butter Blondies Recipe

M&M Brown Butter Blondies Recipe
Adapted from The Recipe Girl
Makes 12 large squares

Ingredients:
1/2 cup + 2 tbsp butter (total of 10 tbsp)
1 cup packed brown sugar
2 tbsp regular white sugar
1 egg
2 tsp vanilla extract
¼ tsp salt
1 ¼ cups all-purpose flour
1/2 cup desiccated coconut (fresh won't work)
3/4 cup M&Ms + few more to lay on top

How I Made It:

1. Preheat oven to 350F/180C. Grease a cake pan or brownie pan.

2. Heat butter in a small saucepan over medium heat until it browns and begins to smell nutty (watch it closely so it doesn’t burn - takes about 5-7 mins). Let the butter cool for a few minutes, until just barely warm.

3. In a large mixing bowl, combine the browned butter and sugars. With a wooden spoon, stir in egg, vanilla and salt. Stir in flour, coconut and M&Ms until batter is blended.

4. Pour the batter into the prepared pan and smooth the top with a rubber spatula. Sprinkle a few additional M&Ms on top. Bake 25 to 30 minutes. Let the blondies cool before turning them out onto a cutting board and slicing into squares (chilling them will make that process even easier).

Brown Butter Blondies Recipe

The brown butter gives the blondies a lovely flavour. The coconut gives a nice crunch too. I lowered the quantity of coconut a lot in my version, it really is enough without being overpowering.

Saturday, December 18, 2010

Scalloped Potatoes and Butternut Squash with Roasted Chestnuts

I experimented with two dishes tonight for Christmas. The first (a cranberry tofu with a cranberry and orange chutney) was a disaster, but the second was pretty much what I wanted. Not the prettiest looking dish, but the flavour was amazing. The creamy sauce is made even more creamy with the butternut squash, complemented by the sage. The potatoes are soft but not mushy and the chestnuts add some texture and flavour.

INGREDIENTS
- 1/4 cup margarine
- 1 large onion, diced
- 2 cloves garlic, minced
- scant 1/4 cup flour
- 3.5 cups plain soy milk
- 1 tbsp rubbed sage
- 1 tsp salt (or to taste)
- 1/4 tsp pepper
- 1.5 lbs potatoes, peeled
- 1.5 lbs butternut squash, peeled
- 12 roasted chestnuts, chopped

METHOD
Preheat oven to 350 degrees. Grease a 2.8 litre (3 quart) Corningware dish
1. Melt margarine in a saucepan over medium heat. Cook onions and garlic for 10 min, until translucent.
2. Add in flour and mix well. Slowly whisk in soy milk, add sage, and season to taste with salt and pepper. Bring to bubbling, stirring constantly. Remove from heat.
3. Slice potatoes and squash in a food processor so they are very thin. Put a thin layer of sauce in the bottom of the prepared pan. Top with a layer of potatoes and a layer of squash (if potatoes or squash are wet after slicing, bad them on a towel before putting them in the dish). Sprinkle some chopped chestnuts over top. Repeat until all potatoes and squash are gone, and top with the last of the sauce (you may have some left over). Press down on the layers occasionally, and refrain from adding too much sauce.
4. Cover dish and bake for 1 hr and 15 mins. Uncover and bake for 30 mins, until top is golden brown. Remove from oven and let sit for at least 20 mins before serving (the layers will set).

Friday, December 17, 2010

Happy 10th Birthday, Son #1!

I am slowly wrapping my head around the fact that in a few days I will have been a dad for a full decade. At the very least, I can say that we have eaten some pretty good cake over the last ten years. As you may know, I bake a special cake for each kid's birthday--whatever they choose. This year, Son #1 initially wanted a plain white cake with a 10 on it (going minimalist in his older years, I guess) but eventually settled on this car cake which I made for his party today (although his birthday is actually Sunday). I decided that a triple batch of Isa's chocolate cupcake recipe would fill the pan, and at first everything seemed to be going fine. But after 40 minutes of baking the centre was still goopy. After 55 mins it looked OK with a BBQ skewer coming out clean (or so I thought). But, alas! After trimming the bottom (after letting the cake cool for 10 mins), I discovered the cake was most certainly not done. I left the cut portion off, topped the cake with foil, and put it back in the oven on convection at 325 degrees. Another 10 mins and everything seemed OK. The centre was still a bit fudgy and the edges were well done, but it was passable. It looked even better after decorating, despite the fact that because I had to trim more off the bottom (it got pretty crusty with the re-bake) the car looked like it was sinking in a lake (the blue edge I put on did not help). The kids downed it without comment. So, Happy Birthday, kiddo!

Thursday, December 16, 2010

Geeking Out with 3-D Reindeer & Sleigh Cookies

their version:

our version:
Best thing about the directions by far: They tell you how to transport the cookies once assembled.
I think it's fair to say that we are getting into the holiday spirit. Just a little? (Those are boughs of holly in the vases there.)

It's nice to know we aren't alone. Other people/places I love who are also feeling the holiday spirit:

For where to purchase your very own 3-D cookie cutters, check out previous post's gift guide!