Friday, October 31, 2008

Happy Halloween!

We are getting ready for Halloween around here, so just a quick post to wish everyone a sage and happy Halloween. Supper will be Creamy Mac and Cheeze (a fast and easy go-to meal on nights like this). Instead of the fancy jack-o-lanterns I did last year, I had the boys design their own. Son #1 came up with the angry design, while Son #2 did the smiley face--I think it reflects their personalities perfectly (ha ha). I will be taking the kids around tonight dressed as a chef--appropriate, I think.

Thursday, October 30, 2008

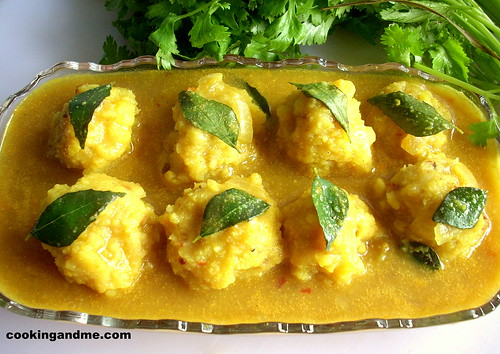
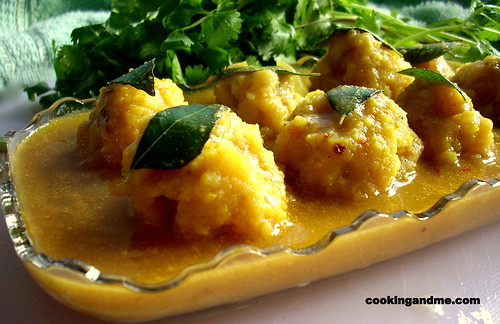
Paruppu Urundai Kuzhambu

Paruppu Urundai Kuzhambu literraly means dal balls in a gravy. As with most tam Brahm recipes, this one has the most common ingredients like toor dal, tamarind, hing and of course sambar powder! 


I have mentioned before how new I was/still am to an extend to Tamil Brahmin cooking. My parents-in-law are here for a visit and that means amma takes care of all the cooking and dinner is ready by the time I get back from office. Bliss. But, I told her first off that I wanted to watch her making Paruppu Urundai Kuzhambu. The dish features dal balls in a tangy tamarind sauce. Though it looks a bit like kofta curry, the recipe couldn't be further from it. Amma had given me the recipe long back and I tried it once but the dal balls (urundai) dissolved in the sauce and it ended up like sambar in the end. It does take some practise to get it right and what better way to learn than by watching!


What We Used:

Toor Dal – 1 cup, soaked in water for atleast 1 hour
Onion- 1 small, minced
Hing - 1/4 tsp
Dried red chillies - 3 to 4
Salt – 1 tsp

Tamarind water - 2 cups (or 2 tbsp tamarind paste dissolved in 2 cups water)
Grated coconut (fresh or frozen) - 1/4 cup, ground to a paste in little water
Sambar powder- 1 heaped tbsp
Turmeric powder - 1/4 tsp
Hing - a pinch
Oil - 1 tbsp
Mustard – 1/2 tsp
Curry leaves – a few
Salt - to taste
How We Made It:

1. Take a heavy-bottomed pan that's preferably evenly shaped at the bottom (so that the dal balls cook evenly). Pour in the tamarind water and add turmeric and salt. Bring to a boil.

2. Then add the hing, sambar powder and ground coconut and let it boil on low flame.

3. Meanwhile, rinse the soaked toor dal completely and grind it with red chillies, hing and salt, without adding any water.

4. Mix in the minced onions to the above dal paste and make small lemon-sized balls with it.

5. Add the dal balls one by one, slowly, into the boiling sauce. Do not mix around too much or else the balls will crumble. If you are trying this for the first time, add one or two balls at a time and then keep adding more.

6. Now its time to be patient and wait for the dal balls to cook. They will almost double in size as they boil in the sauce and the sauce will thicken as well.

7. Once the dal balls are cooked (will take about 15-20 mins), temper mustard seeds in some oil, add curry leaves and transfer to the boiling kuzhambu.

8. Remove from fire and serve hot.

We made this kuzhambu last weekend and though I didn't have a flat bottomed pan which brings out the best results, the kadai worked pretty okay too. We had to keep stirring the balls gently so that it cooks evenly. If you are making this for the first time, you can also try steaming the balls before dropping in the sauce. This will prevent break-age. I will let you know how it comes out when I try it on my own next :D

-------------------------------------------------------------------

There is something else that I kept forgetting to mention in my previous posts so doing so now. Better late than never. Mansi of Fun and Food had hosted a Healthy Recipes Contest and I won! She sent me this amazing book and I want to thank her for hosting and everyone who voted.

But wait! What's the recipe that won? Click here to find out!

Chick'n in a Marsala and Rosemary Sauce

Here in my corner of the Great White North vegan convenience foods, other than Yves, are hard to come by. Stuff like Morningstar Farms and Boca are nowhere to be found. Sometimes it would be great to reach into the freezer and make a quick and easy meal. So, I was excited to see these PC faux chicken breasts in the freezer section. There are actually really good. I would not want to eat them everyday, but it was great to have some ready-made faux meat on hand. The so-called chicken is made with Gardein, which I hope isn't some super-evil, Dupont-controlled, test tube, unnatural, over manufactured product because I would like to keep buying these. The extra bonus is that they are $12.99 for 8 pieces--cheaper than the actual chicken breasts PC sells (for once).

INGREDIENTS
- 2 tbsp olive oil
- 1 tbsp margarine
- 1 onion, halved and sliced
- 2 cloves garlic, minced
- 4 cups cubed chick'n seitan
- 1 28 oz can diced tomatoes, with juices
- 3/4 cup marsala wine
- 1 tbsp ground rosemary
- 3 cups thinly sliced cremini mushrooms
- 1/4 cup tomato paste
- salt and pepper to taste
- pasta

METHOD
1. Heat oil and margarine in a large saucepan over medium heat. Saute onions and garlic for 5-7 mins, until soft and translucent. Add seitan and cook for 2 mins.
2. Add tomatoes, wine, and rosemary to the pan and mix well. Bring to bubbling and simmer for 5 mins, until sauce reduces a bit. Add mushrooms and cook for 5 mins, or until cooked through. Add tomato paste and season to taste with salt and pepper. Serve over pasta.

Wednesday, October 29, 2008

Cookbook and Bakery Update

I am busy baking bread tonight so just a wee update on the cookbook (and on the bakery, as some requested). I am approaching 100 pages for the cookbook, and plan to have the whole thing ready for download by late November/early December (Christmas shopping, anyone?). As mentioned before, the cookbook is just recipes from the blog for those of you who would like a paper copy to keep in the kitchen instead of the laptop. Since my recipe list keeps growing daily, this book will feature recipes from September 2007 to June 2008. My plan is to do another book next year.

As for the bakery, business is trotting along. I am having fun and find it relaxing to make bread after a day of work. Since September I have baked 97 loaves of bread and cinnamon rolls for a customer list of ten (I only bake 2x a week). I think I could take on a few more customers. Some nights are busy with me baking 10 loaves; others are slow with only 2 loaves in the oven. I certainly would not rely on a small home-based bakery to ensure my financial security, but I enjoy it and make enough money to make it all worth while. And, I am spreading organic vegan bakery love around the neighbourhood.

Tuesday, October 28, 2008

Maple and Apple Cider Caramel Corn

Planning to have a Halloween party? Need some vegan treats to serve? Enter caramel corn with a hint of maple and apple cider. Prepare to have your friends praise your treat making abilities. (Son #1 helped me stage tonight's photo)

INGREDIENTS
- generous 1/4 cup popping corn
- 2/3 cup packed brown sugar
- 1/4 cup light corn syrup
- 2 tbsp Earth Balance margarine
- 2 tbsp maple syrup
- 2 tbsp apple cider
- 1/4 tsp baking soda
- 1/2 tsp sea salt

METHOD
Line a baking sheet with parchment paper. Preheat oven to 300 degrees.
1. Pop popcorn and place in a large bowl.
2. Place sugar, corn syrup, margarine, maple syrup, and cider in a saucepan. Heat over medium heat, stirring until the margarine melts and the sugar is dissolved. Increase heat to med-hi and bring to bubbling. Without stirring, bring mixture to 118 degrees Celsius, increasing heat as needed. Keep a careful eye on it (or nose, rather) making sure it does not burn.
3. Remove mixture from heat and stir in baking soda and salt (it will foam like crazy). Pour over corn and mix well.
4. Transfer and spread over prepared baking sheet. Bake for 8-10 mins, mixing/turning after 4 mins to further spread caramel coating. Bake until coating looks glossy. Again, make sure it does not burn.
5. Remove from oven and let cool. Break into chunks and serve.

Chunks of caramel corn are great for a party because guests can get a handful without having to fiddle with individual pieces of popcorn. If you want individual pieces, place caramel corn back into the mixing bowl and keep tossing the caramel corn until the coating cools.

Monday, October 27, 2008

Fresh Whole Wheat Pasta

As promised I experimented with making a whole wheat pasta tonight. Let me just say from the outset that this is not a 100% whole wheat pasta, so some people might be disappointed. I'm pretty sure that a pasta made from all whole wheat flour would turn out pretty badly. My first attempt was to replace the white flour in this recipe with all purpose whole wheat flour. That was a failure. My flour is pretty coarse and so the dough never came together and kept breaking apart with all the bran and wheat germ. That batch went into the garbage. My next attempt was to add wheat germ and bran to the regular recipe--this worked out much better. The dough was more finicky that the regular version, but still cooked up great and had a good texture and taste.

INGREDIENTS
Makes 1 lb of pasta
- 1 cup semolina flour
- 1 cup all purpose flour
- 2 tbsp vital wheat gluten
- 2 tbsp wheat germ
- 2 tbsp wheat bran
- 1/2 tsp salt (optional)
- 1/2 cup tepid water, plus 1-2 tbsp more

METHOD
1. Whisk together flours, germ, bran and salt (if using) in a bowl. Make a well in the center. Put water in the well and slowly incorporate the wet into the dry, making a rough dough, adding more water if needed.
2. Turn out dough onto a lightly floured surface and knead into a smooth dough (5 mins). The dough should not break apart or crack, so wet your hands if the dough seems too dry. On the other hand, try not to make it too moist. The dough should be smooth and fairly tough.
3. Roll into a log and wrap in a slightly damp towel. Set aside for 20 mins to let the dough relax. Roll and cut as per usual.

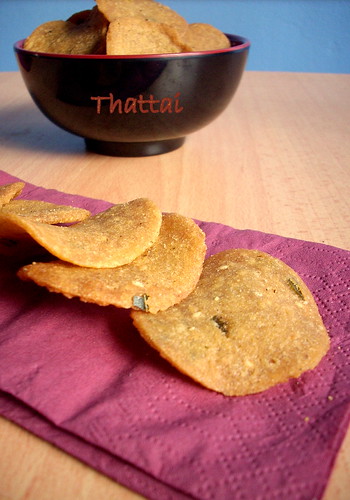
Thattai - A Savory Snack For Deepavali

I wanted to share a Diwali savory snack with you very quickly. So no yada-yada this time. Just a quickie thattai recipe that came out real well, even for a newbie like me.


What I Used:
Rice flour - 4 cups
Urad dal - 1/2 cup, ground to fine powder
Chana dal - 2 tbsp (I didn't use them since didn't have any)
Butter - 1/3 cup
Red chilli powder - 1 tsp
Sesame seeds (ellu) - 2 tbsp
Curry leaves - a few, each cut into two
Salt - to taste
Water - about 1. 5 cups
Oil - for deep frying
How I Made It:

1. Mix all the ingredients and make a thick dough adding very little water at a time.

2. Divide and shape into marble-sized balls. Normally, the store bought ones are bigger but I made them small so that I can use less oil while frying.

3. Dampen fingers and gently the flatten the dough on a plastic sheet (I cut up the plastic bag in which I got the urad dal), to get a uniform disc of about 0.5cm thickness.

4. Prick the discs lightly with a fork (to prevent puffing up) and deep fry till golden brown.

Tastes awesome with some hot tea on Diwali, while chatting around the family coffee table with family :)
This can be stored in an air tight container for upto a week.

This goes to JFI - Festival Treats this month hosted by Srivalli.

Sunday, October 26, 2008

Fresh Vegan Pasta

I am considering offering fresh pasta at the bakery next month--not really a baked good, I know, but I think it will have some appeal. I have blogged about fresh pasta a few times before, and was particularly happy with the pumpkin pasta recipe. However, I have found that eggless pasta has a tendency to get mushy, or even a bit pasty (especially when you go back for a second helping). Eggs provide protein which helps bind everything together and, when cooked, give pasta its texture (at least, I think that is was happens). Running on this theory I decided to add more protein to my pasta with vital wheat gluten and see what happened. The results were exactly what I was looking for--a durable pasta that had a nice "bounce" when bitten without being too tough. I made some this weekend for some visiting guests (who make their own egg-based pasta) and they gave it their seal of approval. Next up: trying to make a whole wheat pasta.

INGREDIENTS
Makes 1 lb of pasta
- 1 cup semolina flour
- 1 cup all purpose flour
- 1 tbsp vital wheat gluten
- 1/2 tsp salt (optional)
- 1/2 cup tepid water (or more)

METHOD
1. Whisk together flours and salt (if using) in a bowl. Make a well in the center. Put water in the well and slowly incorporate the wet into the dry, making a rough dough, adding more water if needed.
2. Turn out dough onto a lightly floured surface and knead into a smooth dough (5 mins). The dough should not break apart or crack, so wet your hands if the dough seems too dry. On the other hand, try not to make it too moist. The dough should be smooth and fairly tough.
3. Roll into a log and wrap in a slightly damp towel. Set aside for 20 mins to let the dough relax. Roll and cut as per usual.

NOTES ON FRESH PASTA
1. On Making: If the dough is too tacky when rolling, dip it in some flour. If your dough is too wet it will stick together when being cut.
2. On Storing: Fresh pasta can be kept in the fridge for a few days, or in the freezer. However, you need to dry the pasta out a bit first or it will clump together. You can hang your pasta on drying racks, but I find it easier to sprinkle the pasta with flour and let dry spread out on floured linen towels. Rotate/flip the pasta every 10 mins, adding more flour, if needed. I let it dry for about 40 mins, until it is no longer tacky to the touch. Store in a plastic bag to keep from completely drying out.
4. On Cooking: Fresh pasta cooks in a flash. For spaghetti, I find it is done as soon as the water comes back to a boil. Drain and briefly rinse with a some cold water from the tap.

Saturday, October 25, 2008

Earth Balance Peanut Butter: A Review

I mentioned a few days ago that Earth Balance sent me some of their new peanut butter to check out. So check it out I did. I personally am a big fan of peanut butter and find myself taking a classic PB&J sandwich to work several times a week. I usually buy Kraft peanut butter, probably because my mom bought the all natural stuff when I was a kid (deriding Kraft as peanut butter icing) and I am still in some stage of teenage rebellion. So, what is the big deal with Earth Balance peanut butter? Obviously it's no great coup to make a vegan peanut butter so I will admit that news of the new product was a little less exciting than when I discovered Earth Balance margarine. The big deal, it seems, is with the fat. Kraft uses hydrogenated oil, which I thought created trans fat, though the jar I have here states that it has 0g of trans fat per serving (in Canada, they have to report 0.1g or more). Earth Balance does not hydrogenate oil but rather uses expeller-pressed oil. Specifically, they use palm fruit oil (not palm kernel oil). The literature they gave me states that palm fruit oil is "quite healthy" (I am sure some of my readers will want to comment on that) because it is about 45% saturated and lower in lauric and mysritic acid than palm kernel oil. What this translates into is a no-stir peanut butter that is stable at room temperature without the aid of hydrogenation.

OK, enough talk about fats, what about the taste? Earth Balance uses agave as a sweetener which makes the peanut butter less bland than all natural but less sweet than Kraft. The taste is more salty than sweet (55mg of sodium per 1 tbsp) and has a very nice roasted flavour.

The peanut butter will retail in the U.S. at prices ranging from $3.99 to $4.49 for a 16oz jar at places like Whole Foods, Trader Joe's, Safeway, and Wegman's, but are not yet available in Canada (son of a . . . !). I certainly hope I can buy more in the near future. You can find out more here.

Friday, October 24, 2008

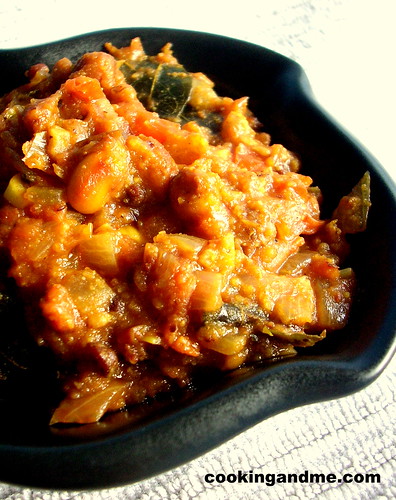
Authentic Tomato Rice / Thakkali Sadam

I have already posted my easy peasy tomato rice recipe here but this one is more authentic and has some grinding and roasting to do before you can enjoy it. And let me also tell you that its totally worth the effort. Of course, if you are too pressed for time or are too tired to be doing anything than some bare minimum chopping and stirring then the first recipe is the one for you.

The paste

This is my aunt's special recipe and she has been using it for ages to impress her guests (and my uncle of course).

Tomato Rice

What I Used (Serves 2):

Rice - 2 cups
Tomatoes - 3 ripe medium-sized ones. If in India, do not use the 'Bangalore tomatoes' but the other firmer, tangier variety.
Onion - 1 medium, very finely chopped
Salt - to taste

Dry-roast and grind:

Coriander seeds (malli) - 1.5 tbsp
Chana dal - 2 tbsp
Red chillies - 5 or 6
Fenugreek seeds (methi/uluva) - 1/2 tsp

For tempering:

Mustard seeds: 1/2 tsp
Urad dal - 1 tsp
Chana dal - 1 tsp
Green chillies - 3, chopped fine
Peanuts - 1/2 cup (I use slightly more since I like their crunch in the rice)
Asafoetida/hing - a pinch
Turmeric powder - 1/4 tsp
Curry leaves - a few
Sesame oil (nallennai) - 2 tbsp
How I Made It:

1. Dry roast and grind the list of ingredients under that head and leave aside to cool. Make sure that you don't burn the fenugreek while roasting. To avoid this, add it once the other ingredients are almost roasted.

2. Cook the rice. Make sure that its not overcooked or too mushy. I used ponni rice but basmati brings out a nice flavour and unique taste to the dish.

3. Heat the oil and temper mustard seeds and urad dal. Add the chana dal, green chillies, peanuts and chopped onions and saute for about 2 to 3 mins.

4. Then add the turmeric, hing and the curry leaves. Fry for another minute or two.

5. Add the ground powder (masala) and fry for another 3 to 4 minutes.

6. Now add the chopped tomatoes and mix well. Keep the fire on low and cook till the raw smell leaves the mixture. This should take about 10 to 12 mins. Add salt. The oil will begin to separate. Make sure that the mixture is a thick paste and not watery (in short, don't add water).

7. Once done, mix in the rice, stir well until blended well and serve hot with raita, achaar and papad.
This rice dish goes to Srivalli's Rice Mela.

Thursday, October 23, 2008

Roasted Pumpkin and Walnut Manicotti

I almost didn't post a picture tonight because it looks so bad. I can assure you, though, that these taste great. The filling would also taste good in ravioli, I think. As I expected, Son #1 wasn't overly crazy about the filling, Son #2 liked it OK, but Son #3 gobbled down two servings.

INGREDIENTS
Makes 8 manicotti
- 1 lb chopped butternut squash
- 1 lb chopped pumpkin
- olive oil
- salt
- 1 cup walnuts
- 1 head of garlic
- 1 tbsp sage
- salt and pepper to taste
- 8 manicotti shells
- double recipe of Easy Sage Alfredo made with 1/2 the flour

METHOD
Preheat oven to 400 degrees
1. Toss squash and pumpkin in a bit of olive oil and salt. Roast in the oven on a cookie sheet lined with parchment paper for 20 to 30 mins (depends on how small you chop the squash), turning every 1o mins. Roast garlic head at the same time, for about 15 mins, until soft. Allow squash to cool.
2. Roast walnuts on a cookie sheet for 6 mins, turning after 3 mins. Allow to cool. Reduce oven heat to 350 degrees.
3. Mash squash, pumpkin, and half the head of garlic with a fork (save the other half for the Alfredo sauce). Pulse walnuts in a food processor until they resemble coarse bread crumbs. Mix into the squash mixture along with the sage. Season to taste with salt and pepper.
4. Cook manicotti shells for 4 mins in boiling water. Drain, and stuff with pumpkin filling. Place in a large baking dish and cover with Alfredo sauce. Cover dish and bake for 45 mins. Remove cover and bake for 10 mins.

Wednesday, October 22, 2008

Protein Power Muffins

Does your mom worry that you aren't getting enough protein? Are you looking for a great way to start your day? Do you need to rebuild muscle after a work out? One way to do that is these muffins. These are a variation on my pumpkin muffins, but packed with protein. The have soy, quinoa, and hemp, all of which are complete proteins (i.e. they contain all essential amino acids), as well as bran, flour, and walnuts (which provide essential fatty acids along with flax seed). Here's how the protein breaks down: wheat bran: 8g; oat bran: 4g; quinoa: 9g; flour: 19g; walnuts: 9g; flax seed: 3g; hemp seed: 44g; soy milk: 10g; chocolate chips: 8g. TOTAL: 114g, or about 9.5g per muffin. This is pretty good considering most adults need about 45 to 55g of protein per day. Eat two for breakfast and you've already had over 1/3 of your protein for the day.

INGREDIENTS
- 1 1/2 cups all purpose flour
- 2 tsp baking powder
- 1/2 tsp baking soda
- 1/2 cup sugar
- 2 tsp cinnamon
- 1/2 tsp salt
- 3/4 cups wheat bran
- 1/4 cup oat bran
- 3 tbsp ground flax
- scant 1 1/3 cups soy milk
- 1/3 cup canola oil
- 1 tsp vanilla
- 1 cup cooked quinoa
- 1/2 cup chopped walnuts
- 1/2 cup vegan chocolate chips
- 1/2 cup hemp seeds

METHOD
Preheat oven to 400 degrees. Lightly grease a muffin tin.
1. Whisk together flour, baking powder and soda, sugar, cinnamon, and salt in a large bowl. Mix in bran and flax.
2. Whisk soy milk, canola and vanilla in another bowl. Mix in quinoa. Add to dry ingredients and mix together with a wooden spoon until just mixed. Fold in walnuts, chocolate chips, and hemp seeds.
3. Divide batter into muffin tin (it will fill them right up). Bake for 20-22 mins.

Easy Vathal Kuzhambu

This tangy South Indian specialty gets its name from Vathal which is vegetables sun dried and then added to the gravy for flavour. The common vathal is made with sundakka (Turkey Berry), vendakka (Okra) or manathakkali (interestingly known as black nightshade in english). You can also add vegetables like brinjal or drumsticks for a different flavour.

I had been using the MTR ready mix since I came to Singapore but decided to make the authentic version. I wasn't very confident since this is a very authentic recipe and may not come out well during the first try. I searched online and came across this relatively simple version that didn't require any grinding or roasting and decided to give it a shot.

It came out much better than I expected so this one is definitely a keeper.

What I Used:

Shallots -12, halved or whole if not too big
Vathal/Drumsticks/Aubergine - 1/2 cup (you can add pretty much any of these in the kozhambu for a unique flavour)
Tamarind paste - 2 tbsp (or half cup tamarind water made by squeezing a lemon sized tamarind ball in luke warm water)
Fenugreek/venthayam/uluva - 1/4 tsp
Sesame oil - 3 tbsp
Peppercorn - 1tsp
Sambar powder - 2 tsp
Salt - to taste
For tempering:
Mustard seeds - 1/4 tsp
Urad dal - 1/2 tsp
Curry leaves - a few

For thickening:
Either 1 tbsp urad dal roasted and powdered OR 1 tbsp rice flour mixed with some water.
How I Made It:

1. Heat the oil in a heavy-bottomed pan temper mustard seeds, urad dal and curry leaves.
2. Then add the shallots and any vegetable or vathal you are using and fry for about 2 minutes.
3. Add the sambar powder and peppercorn and fry for another 30 seconds.
4. Add the tamarind water and water and allow to boil on low flame for 8-10 minutes.
5. Add the thickening ingredients of choice and let boil for another 3-4 minutes.
Serve hot with steamed white rice and ghee drizzled on top.

Tuesday, October 21, 2008

Savoury Pumpkin Biscuit (Topping)

In true Canadian fashion, I am going to whine about the weather. It snowed today! Man, did that make for a frosty bike ride into work! So, I was in the mood for some warm comfort food tonight. I made a version of my vegetable stew with biscuit topping, adding in some purple potatoes, roasted chestnuts, and butternut squash. Just look at those wonderful colours! For the topping, I added pumpkin and apple cider to the biscuit recipe for a delicous fall flavour.
INGREDIENTS
- 2 cups flour
- 1 tbsp baking powder
- 1 tsp brown sugar
- 1/4 tsp baking soda
- 1/4 tsp salt
- 1/4 cup nutritional yeast
- 1 tsp rubbed sage
- 1 tsp marjoram
- 1/3 cup non-hydrogenated vegetable shortening
- 1/2 cup pureed pumpkin
- 1/2 tsp apple cider vinegar
- 1/2 cup apple cider

METHOD
1. Whisk flour, baking powder, sugar, baking soda, and salt together in a bowl. Stir in nutritional yeast and spices. Mix in shortening with your fingers until it resembles coarse bread crumbs.
2. Whisk pumpkin, vinegar, and cider together. Add to dry ingredients and mix with a fork, then gently knead into a dough.
3. Roll out on a lightly floured surface. Either cut and bake as biscuits, or use as a topping for the stew.

Monday, October 20, 2008

Chili Dogs

Sometimes I crave the weirdest things . . . like chili dogs. It's not like I ever ate chili dogs before I was a vegan, but for some reason they have been in my head all day. I looked up a recipe for Skyline chili (I never ate there either when I lived in Ohio) and assembled these paragons of culinary achievement. I had every intention of topping these babies with grated Tofutti cheese, but we were out. Oh well. Next time.

INGREDIENTS
Makes enough chili for 12 chili dogs
- 1 tbsp oil
- 1 onion, diced
- 2 cloves garlic, minced
- 1/2 small can tomato paste
- 1 1/2 cups water
- 3/4 cup TVP
- 1/2 tsp allspice
- 1/2 tsp cumin
- 1 tbsp chili powder (or more to taste)
- 2 tsp cocoa powder
- 1 tbsp white vinegar
- 1/4 tsp ground cloves
- 1 tsp vegan Worcestershire sauce
- 2 tbsp ketchup
- 1 tsp cinnamon
- 1 tsp salt (or to taste)

METHOD
1. Heat oil in a saucepan over medium heat. Saute onions and garlic for 7-10 mins, until soft and translucent. Add tomato paste and water and mix well. Bring to bubbling and add TVP and remaining ingredients. Reduce heat and let simmer for about 20 mins, until TVP is soft. Add a few splashes of water if chili gets too dry.
2. Serve over veggie dogs topped with the condiments of your choice.

Also, Earth Balance sent me 2 jars of their new peanut butter! I will write a review real soon. Stay posted!

Sunday, October 19, 2008

Applesauce

Sorry to say that this is another one of those recipe-less posts that really is a recipe (sort of). If you have not made your own applesauce you are missing out on a real treat. Now, I like liquid invert sugar and high fructose corn syrup from store brands as much as the next guy, but with homemade you have absolute control over your sauce. Now is the time to make it, of course, with apples ripe and ready at the local orchard. Get an apple that will cook down easily (I like MacIntosh and HoneyCrisp). If you are not sure what is a good apple, ask someone at the orchard. A great way to get cheap apples is to but a bushel of windfalls (i.e. the apples that have fallen off the trees). They may not be pretty, but it does not matter when making applesauce. Once you have your apples, it's time to get cooking!

INGREDIENTS
- peeled, cored, and chopped apples
- lemon juice
- splash of water
- sugar
- cinnamon

METHOD
1. Place chopped apples in a large pot over med to med-hi heat. Add a few splashes of lemon juice (will keep apples from browning to much) and some sugar. If apples stick, add a splash of water. As apples begin to cook down, reduce heat, cover and let apples reduce to sauce (about 30-40 mins, depending on how many apples you use). Mash apples throughout the cooking process until you get the consistency you want (I like chunky).
2. Add sugar (brown/white) and cinnamon to taste.

OTHER APPLESAUCES WE HAVE MADE:
Cinnamon Brown Sugar: Go crazy with the cinnamon brown sugar and cinnamon for a rich apple sauce.
Raspberry (or Strawberry) Applesauce: Add fresh or frozen raspberries (or strawberries) with the apples. Sweeten with white sugar.
Pear-Ginger Applesauce: Pears also cook down quite easily. Sweeten with a mix of white and brown sugar. Add ground ginger, cinnamon, and a bit of nutmeg.

Saturday, October 18, 2008

Bibimbap - A Korean One-Dish Meal

Its been over 5 months since we moved to Singapore and since then I have been eating out quite a bit. TH and I have lunch out and while he finds it difficult to find good food outside (he is a vegetarian), its slightly easier for me. I am a very selective non-veg eater and after marriage, have been mostly sticking to vegetarian food. I mostly ask restaurants to customize their dishes by removing any red meat and substituting with vegetables if possible, or sometimes chicken. This is not easy considering South East Asian Cuisine has meat and seafood atleast in a hidden way, in the form of fish sauce or pork lard used for cooking.

Anyway, since I normally experiment on different kinds of cuisines, I thought I will document some of the dishes here. The pics are going to be a bit fuzzy since I don't carry my camera with me everywhere and use my phone mostly.

The other day, I went with 2 of my colleagues to a Korean restaurant called Seoul Kool and I tried the popular one dish Korean meal called Bibimbop (bee-beem-bop). Though normally served with beef, they also served the chicken version.

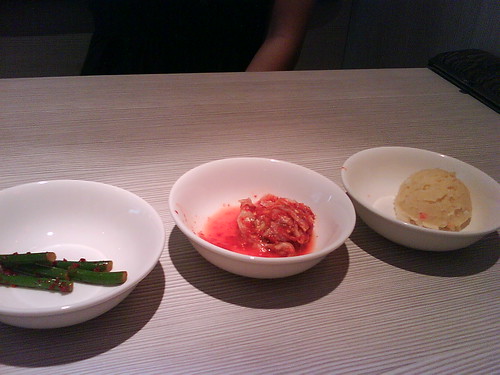
While we waited for our orders, they brought in 6 bowls with different starters. Unfortunately, I was only able to take a  picture of half of them. There were steamed asparagus with chilli flakes, cabbage in some vinegar-chilly paste, mashed potatoes with some sort of seeds and white raisins, red beans in some sweet sauce (which was yummy), julienned carrots with spinach, tiny fish dried and fried (which I didn't try since I don't like dried fish).


The bibimbop came in a metal pot which was on a metal tray and it was *hot*. The dish looked pretty and colorful with all the components arranged in a nice manner. There was shredded chicken, fried seaweed, bean sprouts, cucumber, mushrooms, spinach, carrots, and some more unidentifiable vegetables and chilli noodles, all served on a bed of rice. We were supposed to mix it all well before eating. There is a also a leafy soup that can be added to it, along with some chilli paste. I tasted the soup and didn't like it - the leaves tasted like they were dried before cooking.


Though the serving looked small, once I started eating it, I found it quite filling. Also, they kept refilling the starters too. It was wholesome and flavorful. I loved it!


Cost: S$ 12.90

Seoul Kool
Jong Gat Jip Holdings Pvt Ltd
Icon Village
12 Gopeng Street
Singapore - 078877

Ph: +65 6327 7761

For bibimbap recipes, click here, here and here.


Apple Spice Porridge

Behold my second installment of trying to make breakfast more interesting for the kids. Not really a recipe tonight; more of an idea that you can play around with. And not even a very original idea, really. Sons #2 and #3 gobbled it right down, but Son #1 whined ad nauseum about it until the oatmeal had congealed into a dense mass and the whole thing was cold and kind of nasty. *sigh* Maybe boxed cereal isn't so bad after all . . . .

INGREDIENTS
- oatmeal (I use quick cook/instant on busy mornings)
- cinnamon
- ginger
- nutmeg
- allspice
- cloves
- maple syrup
- grated apple
- raisins

METHOD
1. Cook oatmeal as per directions on package. Spice to taste using some or all of the spices above, then stir in some grated apple and raisins. Tastes great on a cold fall morning.

Friday, October 17, 2008

Hearty Autumn Muffins

Vegan Mom and I have been looking for new things to serve the boys for breakfast to break the monotonous cycle of boxed breakfast cereal. These muffins are one answer. I used the Ginger-Raisin Bran Muffin recipe from VWAV as a starting point and went from there. They are filling, hearty, and filled with two of the wonderful things autumn gives us: pumpkins and apples. Plus, they have enough bran to get the mail moving in the morning . . . if you know what I mean.

INGREDIENTS
Makes 12 large muffins
- 1/2 cup raisins
- 1 cup apple, small dice
- 1 1/2 cups all purpose flour
- 2 tsp baking powder
- 1/2 tsp baking soda
- 1/2 cup sugar
- 2 tsp cinnamon
- 1/2 tsp nutmeg
- 1/4 tsp allspice
- 1/2 tsp salt
- 3/4 cup wheat bran
- 1/4 cup oat bran
- 1 cup pureed pumpkin
- 2/3 cup soy milk
- 1/3 cup canola oil (or applesauce)
- 1 tsp vanilla extract

METHOD
Preheat oven to 400 degrees
1. Soak raisins in warm water. This will keep them plump and from burning in the oven.
2. Whisk together flour, baking powder and soda, sugar, spices, salt, and bran in a bowl. In a separate bowl, whisk together pumpkin, soy milk, oil, and vanilla until well-blended. Add to dry ingredients and mix until just moist (over mixing makes for tough muffins). Fold in raisins and diced apples.
3. Divide batter into muffin tins and bake for 20-22 mins, until a toothpick comes out clean.

Thursday, October 16, 2008

Pumpkin Pasta with Easy Sage Alfredo Sauce

Tonight I made the pumpkin pasta I made last night. It cooked beautifully. As I mentioned in yesterday's post, the pasta only needs to be cooked for 1 min once the water returns to a boil. I wouldn't say the pasta had an overly pumpkiny flavour, but it did have a nice light orange colour. My plan was to make a creamy sage sauce for a nice autumn twist on a pasta dish, but wanted to make sure it did not taste like spaghetti with Thanksgiving gravy. I was worried the kids would not like it but they gobbled it right up. Son #1 even rejected his usual bowl of cereal at bedtime and asked for more pasta. I don't think that has ever happened before.

INGREDIENTS
- 1 lb pumpkin pasta (I made fettuccine)
- 3 cloves garlic, skins on
- 3 tbsp margarine
- 2 generous tbsp flour
- 1 tsp sage
- 1/4 tsp thyme
- pinch of nutmeg
- 1 tsp salt
- 2 cups soy milk
- 1 cup firm silken tofu

INGREDIENTS
1. Cook pasta in rapidly boiling salted water for about 60 seconds, until soft but still firm.
2. While water is heating, make sauce. Dry roast garlic in a pan until soft. Remove from heat, remove skins, and chop.
3. Heat margarine in a saucepan over medium heat. Whisk in flour and bring to bubbling. Add garlic and spices and mix, then whisk in soy milk. Bring to bubbling, whisking regularly.
4. Add tofu and blend with a hand blender. Adjust seasonings to taste. Mix with cooked pasta and serve.

Aloo Paratha

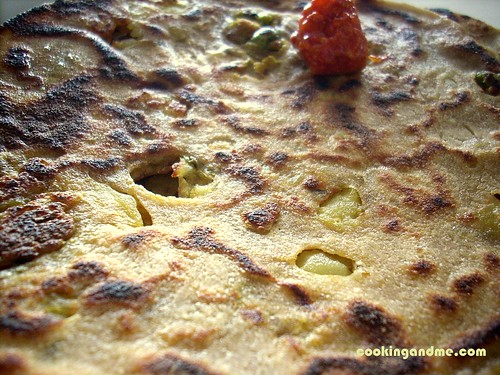
Aloo Paratha really doesn't need an introduction to any Indian cuisine lover. I remember having it in an Indian restaurant in Dublin and though everything else tasted nothing (much) like Indian food, their Aloo Paratha was very near the real one. The best Alu Paratha I have ever tasted was in a well-known dhaba in Gurgaon lovingly called the Convergys Dhaba. Darsh took me there during one of our many visits to Gurgaon and I will never forget the taste of that paratha which was super-thick, soft, oozing in butter with a square butter piece on top that melts around the paratha as you eat. And they serve it with a really nice achaar (pickle). The paratha was hot till I finished eating it, that's how thick it was. Bliss..


As with most street food, its impossible to get that taste at home for me. I chicken out and add very little butter and I guess that's for the best anyway. I like my parathas nicely browned and with avakka pickle while TH also takes curd with his.

What I Used:

For the roti/bread:

Wheat flour/atta - 4 cups and a bit more while rolling
Warm water - 2 cups (a little more or less)
Milk - 4 tbsp
Salt - 1 tsp
Butter - as needed to cook

For the potato/aloo filling:

Potatoes - 2 to 3, cooked and mashed until soft
Green chillies - 2, finely chopped [if you are not used to chillies and don't want your tongue to fall out when you accidentally bite into them, use 1/2 tsp red chilly powder]
Jeera powder/jeerakam - 1/2 tsp
All purpose curry masala/garam masala - 1/2 tsp (optional)
Ginger - 1/2 tsp, finely minced
Fresh coriander leaves - a generous bunch, finely chopped
Turmeric powder - a pinch
Salt - to taste

The filling is quite flexible and you can add pretty much anything you want. Some people add minced onions, garlic, more spices, etc. Customize it to what suits you best. But the basic idea is to keep it a bit mild and simple.

How I Made It:

Dough:

Mix the salt and wheat flour well. Add the milk to it and mix again. Add water little at a time until you get a soft pliable dough. It should make a soft dent when you press your thumb down. Knead well till you get this consistency. Cover and keep aside.

Filling:

1. Add all the ingredients together in a bowl and mix well. The potatoes should be mashed and any hard lumps removed.

The process:

Make lemon-sized balls of the dough and roll into thick discs. Make balls of half the size with the filling and place inside the dough discs. Cover completely with the dough and make into a ball again. Press lightly with the palm of your hand and dust with flour before rolling out into thick flat parathas.

Finish off the dough and the filling in this manner.

The final step:

Heat an iron griddle and cook the parathas with generous dabs of butter on both sides. Sometimes I add some chaat masala to the butter before cooking for a different flavour.

This popular Indian bread goes to Zorra's World Day of Bread Event.

Wednesday, October 15, 2008

Fresh Pumpkin Pasta

I have been meaning to experiment with a pumpkin pasta ever since pumpkins hit the store a few weeks ago. I finally got around to it tonight whilst baking bread. The recipe is super easy, though you need some strong wrists and a pasta roller and cutter. I have not cooked it yet (that will be tomorrow's dinner) but it rolled and cut perfectly. I have every reason to believe it will cook up nicely.

INGREDIENTS
Makes 1 lb of pasta
- 1 cup semolina flour
- 1 cup all purpose flour
- 1/2 tsp sea salt
- 1/2 cup pureed cooked pumpkin
- 1-2 tbsp water

METHOD
1. Mix together flours and salt in a bowl. Make a well in the center. Put pumpkin and 1 tbsp of the water in the center. Slowly incorporate the wet into the dry, making a rough dough, adding more water if needed.
2. Turn out dough onto a lightly floured surface and knead into a smooth dough (5 mins). It's going to take some elbow grease. The dough should not break apart or crack, so wet your hands if the dough seems too dry.
3. Roll into a log and wrap in a damp towel. Set aside for 20 mins to let the dough relax. Roll and cut as per usual.

A Note on Cooking Fresh Pasta:
Fresh homemade pasta does not need to cook very long--1-3 mins, usually, depending on the thickness. Monitor the pasta closely and make sure you don't overcook it, otherwise it will be mushy.

Tuesday, October 14, 2008

On Steaming Seitan in the Oven

We spent the holiday weekend with family at the cottage, and as you know my plan was to make a seitan roast with stuffing. I had to make a few changes, however. First, I went with a more traditional stuffing to be enjoyed by vegans and non-vegans alike. As you can see from the pic above, I baked the extra stuffing in greased loaf pans (covered with foil) for one hour at 350 degrees. I do think the original wild rice stuffing is better for inside the roast, though, since it provides a nice contrast of taste and texture. Secondly, since I forgot my steamer at home, I had to change my method for cooking the roast. I suppose I could have just baked it, but last time I did that I found it got too dry. So, I came up with this contraption (the cottage kitchen is not blessed with a great selection of pots and pans). Although I used aluminum pans, ideally this could be done in a roaster. Anyway, I made the roast as per the recipe and wrapped it in heavy duty foil (I find the heavy duty foil is needed to keep the roast from bursting out), and suspended it over a loaf pan. I then placed the pan in a larger roaster, and filled the bottom of both pans with a few centimetres of boiling water (making sure it did not touch the roast itself). I then put the lid on and baked it for 1 hr. I then removed the roaster from the oven, removed the loaf pan, emptied the water, and baked the roast on its own for 30 mins.
The end result was a bit more "bouncy" than the original version, but I think that may be because I cooked the roast too long. I think the bake-steaming could be reduced to 30-40 mins. I had to seal up the roaster to keep the steam in, and that made it hard to check the roast. In any event, for those of you who don't have a steamer, this method may be of some use. It seems to me you could make sausages this way. As long as you can suspend the seitan above the water, a roaster can be a good steamer.

Monday, October 13, 2008

Come to the Table: A Book Review

Last month a rep from Rodale Books contacted me about reviewing Come to the Table: The Slow Food Way of Living on my blog. I agreed, so here it is.

Although the slow food movement started in 1989, it seems like the idea of locally grown whole foods is gaining more traction today than even before. A 2001 study concluded that the average piece of food travels 1,500 miles before it reaches your plate, a staggering number considering today's fuel prices and the cost to the environment. While this number has been disputed, there is no question that our food supply comes from countries far and wide. A trip to the grocery store will reveal garlic from China, and grapes from Chile. In response, the word locavore has now entered the lexicon.

The Slow Food movement is essentially combination of the organic and local food trends. According to Come to the Table, slow food is about countering industrialized farms by producing food via "ecologically sound and humane methods." The point, then, is to eat real food produced locally and organically.
Come to the Table is a collection of stories edited by Katrina Heron about farms in California that have adopted the slow food mentality and are trying to make a profit in a market economy dominated by factory farms. Combined with beautiful colour photos, these stories make you want to flee the city to get back to nature and in touch with the earth. Of course, the authors make no bones about the fact that it is back breaking work and certainly not a life of fame and fortune. Interspersed between the chapters are tips for living a slow food life, and brief explorations into the issues facing farmers like USDA organic certification. The book ends with over 40 simple recipes, in keeping with slow food philosophy.

Although the slow food movement is rather appealing to vegans (especially those whose veganism is tied to environmental concerns), slow food also embraces meat, egg, and dairy production. This raises several interesting questions that readers may want to discuss in the comments below. Does small-scale, humane, ecologically sound meat production negate the need for veganism? Would you eat eggs that came the kind of farm described in Come to the Table? Do these farms, while more attractive than factory farms, still perpetuate an ideology based on human dominance of animals? Do you oppose animal husbandry? What about the impact on health from saturated fat, regardless of how the meat and eggs are produced? Can the population really be sustained by small farms? The list could go on and on.

In the final analysis, Come to the Table is an interesting read, but I am not sure it is worth the $32.95 (CAN) price tag. While the farm stories are interesting, I would have preferred more practical tips on growing your own food. The information given is scant, and none of it particularly insightful (have your own herb pot, for example). The recipes are solid, but not worth buying the book for. While they do focus quite a bit on vegetables, there are also many meat and dairy-based recipes that are of little use to vegans. Curiously, one of the recipes calls for instant pancake batter, which doesn't strike me as particularly slow food-esque. Whether you buy the book or not, it is certainly worthwhile to tap into local food networks wherever you live. Support your local farmers' market, try to buy organic, grow your own, and try to eat food that remembers where it came from. That is what slow food is all about.

The Indian Recipes Round-Up

This is one event that I almost regretted hosting because of many glitches that happened along the way. I was contacted by an ex-colleague currently with Warner Bros who wanted to promote a movie she was working with. She also promised movie tickets and various give-aways. It seemed like a fun idea and I happily agreed.

But what do we do when people make empty promises and not only let you down but also tens of others who trust you and what you said? I have tried my best to communicate and follow up, but to no avail.

Bottom-line: I promised some gifts for the participants and its very likely that I won't be able to keep that promise. It feels horrible and I sincerely apologize for that. To make things slightly better, I will be randomly picking 2 names from the list and send them a surprise gift with apologies since its the movie merchandise that I had originally promised.

I did, however, manage to send movie tickets to most of the early birds. Again, my apologies to Jayashree for not being able to get her tickets, though she was one of the early birds.

Now, not only because I feel apologies make for a bad blog post, and because there are so many delicious Indian recipes waiting in my inbox ready to pop out, I present to you the lovely array of 28 dishes made and sent by 27 beautiful ladies and one brave gentleman.

Chutneys/Snacks

Swati's Susheela
Supriya's Rice Cutlets
Harini's Vellai Cheedai
Shreya's Onion Pakora
Rachel's Plaintain Fritters
Swati's Hyderabadi Dahi Bhindi Masala
Rupa's Khatta Palak Dal and Teaselgourd Stir-Fry

Non-Vegetarian

Neema's Fish Curry
Arundati's Egg Curry
Pallavi's Hyderabadi Kheema

Dessert

Swapna's Sponge Cake
Isha's Semolina Sheera
Happy Cook's Nankatai
Bharathy's Ghee-Roasted Bananas
Divya's Fat-Free Chocolate Pistachio Roll

Non-Bloggers' Contributions


Sreedevi's Gud, aur Ghee [Wheat katli (sweet)]

Ingredients:
1 cup ghee
2 cups wheat flour
1 cup grated jaggery
1 cup cashew nuts

Procedure:
Heat the ghee in a pan until you get the aroma. Put the wheat flour and stir until golden brown. Now add the grated jaggery and mix well for a minute. Remove from flame and pour the contents on a flat plate. Sprinkle cashew nuts on top. Cut into desired shapes and serve once it cools.

This dish can be make in quick time and is good for health too.

She's Tomato Gojju/Chambaal

Total Cooking time : 15 mins

Serves : 3

You need:
Onion – 1 medium, diced finely
Tomatoes – 4 medium ripe ones ,chopped finely
Bay leaf – 1 small (optional)
Ginger-garlic paste – ½ tsp (optional)
Chilli powder – 1 ½ tsp OR Green chillies -2, lightly slit
Coriander powder – 1 tsp
Turmeric powder – ½ tsp
Jeera powder – ½ tsp
Garam masala powder – ½ tsp
Hing – ¼ tsp
Coriander leaves – for garnishing
Salt according to taste
Mustard seeds and curry leaves – ½ tsp for tempering
Oil – 1 tsp

Method:
-Heat oil in a kadai/heavy bottomed pan. Add mustard seeds. Once they splutter, add onions and curry leaves. This ensures the curry leaves don’t turn black in the hot oil. Saute the onions for few seconds till it turns pink. [Do not let it turn brown].
-Add the bay leaf . Add the ginger-garlic paste and dry spice powders and stir fry for a few seconds in the oil.
-Immediately, follow with the chopped tomatoes and salt. Stir fry for a minute or so on low heat. The salt helps the tomatoes to become give out water. So, no need to add more water.
-Keep stirring till the tomatoes become mushy. Now add about ½ cup of water and cover. Allow it simmer for about 5 minutes. If the tomatoes chunks are still visible add another ½ cup of water and again simmer for 5 minutes. Garnish with chopped coriander leaves.
-Serve hot with roti/dosa/idli. This is such a versatile curry that it can accompany any kind of roti, dosa or even idlis.

I thank everyone for participating so whole-heartedly. Please let me know I you sent in an entry and its missing here.

Sunday, October 12, 2008

Happy Holiday!

Happy Thanksgiving weekend to all my Canadian readers! I am fortunate enough to be surrounded by family and so I will keep this post very brief. Enjoy your time with family and friends, and don't forget about my seitan roast if you are looking for good vegan eats. See you all on Tuesday! In the meantime, enjoy these pics from a recent walk through the woods.

Saturday, October 11, 2008

Cabbage Rolls Again . . .

I just bought the world's biggest cabbage. Look at the size of that puppy! And only 99 cents! I love it when produce is local and in season. Of course, it means I am making a huge pot of cabbage rolls.

Friday, October 10, 2008

Italian Meatballs

I have made and posted various meatballs recipes before (like this one, and this one), but I was reminded just how awesome they were when I made them for tonight's pasta dinner. These babies stick together, have great texture and taste (as long as you're at least partially partial to tempeh), and will hold up when simmered in a sauce.

INGREDIENTS
- 1 pkg tempeh, simmered in water for 10 mins, cooled, and grated
- 1/4 cup instant oatmeal
- 1/4 cup nutritional yeast
- 1/2 cup vital wheat gluten
- 1 onion, grated
- 4 cloves garlic, grated
- 2 tsp ground fennel seed
- 1 tsp sage
- 1 tsp thyme
- 1 tsp oregano
- 1/4 cup finely chopped fresh parsley
- 2 tbsp soy sauce
- 2 tbsp HP sauce/A1 Sauce/BBQ sauce
- 3 tbsp olive oil

METHOD
1. Mix cooled and grated tempeh in a large bowl with oatmeal, nutritional yeast, gluten, onion, garlic, and spices. Add sauces and mush/mix together with your fingers. Add a splash of water if needed.
2. Heat oil in a large frying pan over med-lo heat. Shape tempeh mixture into 36 small balls. Fry in oil for 15 mins, turning regularly, until nicely browned on all sides.
3. Although the meatballs can be used right away, they are even better when simmered in a tomato sauce for an hour or so. Serve over pasta.

Chettinad Aloo / Potatoes with Chettinad Masala

Do not get thrown away by the blahh pic accompanying this recipe. You have to try it to see how awesome it tastes. Before I go any further, this recipe is an original one but from a cousin. She is very new to cooking and yet came up with this amazingly flavourful dish for us. I took the recipe from her (she just calls it throwing a few things together) and have made it twice in 2 weeks.

I think I am beginning to like potatoes almost as much as TH!

What I Used:
Pototoes - 3 big
Ginger garlic paste - 1 tsp
Red chilli powder - 1 tsp or to taste
Cardamom - 1
Cinnamon - 1" piece
Cloves - 2
Star anise - 1 (optional)
Grated / dessicated coconut - 2 tbsp
OR
Khus khus / poppy seeds - 1 tbsp, soaked
Salt - to taste

For tempering
Oil - 1 tbsp
Mustard seeds - 1/2 tsp
Urad dal - 1/2 tsp
How I Made It:

1. Boil and mash the potatoes. Set aside.

2. Grind together the cinnamon, cardamom, anise, cloves and coconut/couscous with no added water. Ok fine, you can add very little water if you absolutely must.

3. Heat oil in a wide pan and temper mustard seeds. Add the urad dal and fry till golden brown.

4. Then add the ground paste along with the ginger garlic paste and the chilli powder and roast for 30 seconds.

5. Finally, add the potatoes and leave on sim (lowest heat) for 10-15 minutes till the masala blends with the curry. Add salt.
Serve hot with steamed rice or roti.

This original recipe goes over to Lore's monthly Original Recipes Event.

Related Posts:

Aloo Gobi
Aloo Tindora Curry
Kerala Potato Stew
Potato Cabbage Gravy

Thursday, October 9, 2008

Potato Apple Ginger Soup

This soup began as a humble potato soup that just seemed far too pedestrian. I had just finished reading Isa's post on the Vegan Iron Chef Apple Ginger challenge, so the way to jazz up the soup was obvious. The result was quite nice--a soup that tastes like autumn. I added the hint of a few spices; you can increase or lower the amounts as you see fit.

INGREDIENTS
Serves 6-8
- 2 tbsp oil
- 1 large onion, diced
- 1 rib celery, chopped
- 2 carrots, chopped
- 1 large sweet potato, peeled and chopped
- 3 lbs potatoes, peeled and chopped
- 4 large cooking apples, peeled, cored, and chopped
- 2-3 tbsp chopped fresh ginger (depends on how much you like ginger)
- water
- plain soy milk
- 1 tsp coriander
- 1/2 tsp cumin
- 1 tsp cinnamon
- 1/2 tsp nutmeg
- salt and pepper to taste

METHOD
1. Heat oil in a large pot over medium heat. Saute onions, celery, and carrots for 5-7 mins, until translucent. Add potatoes and cook for 2 mins. Add apples and ginger and cook an additional 2 mins.
2. Add enough water to the pot to cover the veggies 3/4 of the way (i.e. the tops of the veggies should be poking out of the water). Bring to bubbling, reduce heat, cover, and let simmer for 20 mins, or until potatoes are soft.
3. Blend veggies with a hand mixer, then thin with soy milk until desired consistency is reached. Season to taste and serve.

Wednesday, October 8, 2008

Cheezeburger Macaroni

I almost didn't post a picture tonight because the dish looks so horrid. Hey, you can't win 'em all. The taste and texture, however, is spot on. For some reason I was thinking about Hamburger Helper, and so I decided to make a dish inspired by that weird white hand mascot (a cousin of the Pillsbury Dough Boy, perhaps?). I essentially revised my creamy mac and cheeze and added tempeh burger.

INGREDIENTS
Serves your entire household (and possibly your neighbours, too)
- 3 cups macaroni, cooked
Tempeh Burger
- 2 pkg tempeh
- water
- 2 tbsp oil
- 1/4 cup HP/A1/BBQ sauce
- 2 tbsp soy sauce
- 1 tsp coriander
- 1 tsp onion powder
- 1/2 tsp garlic powder
- splash of water, if needed
Sauce
- 1/2 cup raw cashews
- 1/3 cup water
- 2 cups soy milk
- 2 tbsp olive oil
- 2 heaping tbsp tomato paste
- 1/4 cup ketchup
- 1/2 cup nutritional yeast
- 1 1/2 cups tofu (does not have to be silken)
- 1 tbsp Dijon mustard
- 1/2 tsp tumeric
- 1 tsp paprika
- 1/2 tsp garlic powder
- 1 tsp onion powder
- 2 tbsp miso (something mellow)
- 1 tsp salt

METHOD
1. Cook macaroni, as per directions, until al dente.
2. While macaroni is cooking, make the burger. Simmer tempeh in water for 10 mins to help reduce the tempeh's bitterness. Cool, then break into small chunks or grate.
3. Heat oil in a frying pan over medium heat. Add tempeh and fry for 3-4 mins, until it browns a little. Add sauces and spices and mix well, adding a splash of water if needed to get it all mixed. Remove from heat and set aside.
4. Place all sauce ingredients in a blender and blend until very smooth.
5. Drain macaroni and return to pot over medium heat. Add tempeh and mix well. Add sauce and bring to bubbling. Cook, stirring constantly, until sauce thickens and reduces a bit (about 5 mins). Serve.

Tuesday, October 7, 2008

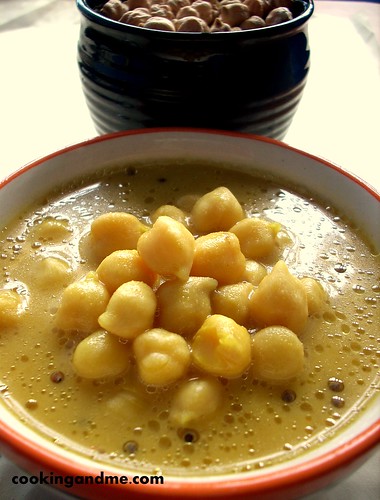
Kadala Kozhambu / Chickpeas in Coconut Milk

Today is a my mom-in-law's b'day and I wanted to do something for her that would be meaningful to both of us. Before I go any further I have to say how lovely she is to me, like my own mom :)

She is an amazing cook too and this is one of the first recipes I learnt from her since TH loves it. Its simple and looks mild but is amazingly flavourful, just like all her dishes are. She is super fast in the kitchen and is normally done cooking for the day by the time I am up (err.. which is around 7 in the morning :D).

So here is to her and her special day. Happy B'day Amma :)

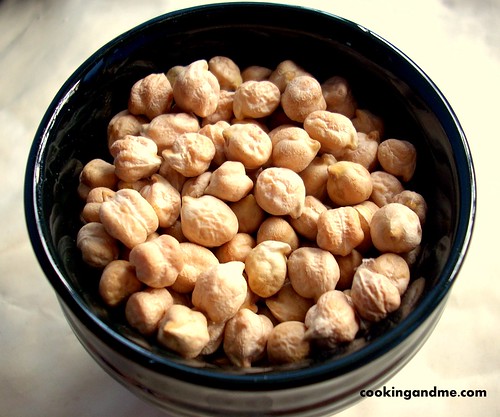
Chickpeas / Kabuli Chana

What I Used (Serves 2-3 people):

Chickpeas/Kabuli Chana - 1/2 cup

Thick coconut milk - 3/4 cup

Tamarind - one marble sized ball (or 2tbsp if you are using paste)

Sambar cum rasam powder - 1 tbsp - I told you its versatile, and has more uses than just in sambar and rasam ;)

- if using your own sambar powder, use 1/2 tsp and 1/2 tsp red chilli powder.

Turmeric powder - a pinch

Hing/Asafoetida/Kayam - 1/2 tsp

Salt - to taste

Oil and mustard seeds - for tempering

How I Made It:

1. Soak the chickpeas overnight in 3 cups water. Pressure cook and keep aside.

2. Use 1/2 cup warm water and blend the tamarind with your hand to extract the juice. If using paste, dilute it in 1/2 cup water.

3. Heat a pan and bring the tamarind water to boil. Add turmeric powder, hing, salt and the sambar powder to this. Sim and let it boil for 10 minutes.

4. Add the cooked chickpeas and boil for another 10 mins.

5. Remove from fire, add coconut milk and mix well. Adjust salt.

6. Heat some oil in a small saucepan and temper some mustard seeds. While hot, pour on the above gravy and mix well. You can even use some curry leaves at this stage.

Kadala Kuzhambu

Serve hot with rice. TH loves it with parippu usili.

This special dish goes to Sra's Event - Legume Love Affair, conceptualized by Susan.

Monday, October 6, 2008

Vegan Mom's Scrambled Tofu

I have made a lot of scrambled tofu in my day but the kids have never been overly crazy about it. It either has too many chunks of veggies, or has too many bits of spices. Enter Vegan Mom's solution: straight up scrambled tofu. It looks an awful lot like the scrambled eggs they sell in hospital cafeterias, but for kids that is a good thing. It is uniform, has no weird chunks of unidentifiable vegetables, and tastes great. The kids asked for it two days in a row, so that's a winner in my book.

INGREDIENTS
- 1 pkg firm tofu
- 2 tbsp oil
- 1 tsp onion powder
- 1 tbsp Dijon mustard
- 1/2 tsp tumeric
- 1/2 tsp salt
- freshly ground white pepper
- 1 tbsp nutritional yeast
- 1 tbsp soy creamer

METHOD
1. Heat oil in a non-stick frying pan over medium heat. Drain water off the tofu and crumble into the pan. Cook for 3-4 mins, until tofu begins releasing its water.
2. Add the rest of the ingredients except the creamer and mix well. Cook for about 10 mins, stirring regularly, lowering the heat if the tofu begins to stick. The idea here is to let the water evaporate and the tofu firm up. You want to keep the heat high enough to facilitate this evaporation.
3. Add creamer and mix well. Allow some of the liquid to evaporate, then remove from heat. Serve.