Sunday, October 31, 2010

Sanjeev Kapoor's Pineapple Upside Down Cake Recipe

Machine-cut pineapples drenched in sugar syrup, how pretty and perfect! I used these babies in a pretty nice pineapple upside down cake recipe. I often end up baking with chocolate whenever I do bake and when I was asked to bring dessert for a potluck a few weeks back, I resolved not to let chocolate anywhere near the dish.

Pineapple Upside Down Cake Recipe

I had just received Sanjeev Kapoor's Cakes and Bakes, so decided to flip through it. I have to admit at this point that the first time I baked this cake, it didn't turn out well. I under-estimated the bake time, and when I turned the cake upside down, it was still squiggly in the middle. That turned into something of a disaster but I salvaged it and called it pudding in a way that would have made my mom proud. 

Pineapple Upside Down Cake Recipe

This recipe is slightly fansy-pansy. It calls for demerara sugar. I bought it just for this purpose, just so that I won't screw up a second time.

Sidenote: Is demarara sugar available in India? If you know if a place, do leave a comment. Thanks!

Pineapple Upside Down Cake
Makes one 9" cake
Adapted from Sanjeev Kapoor's Cakes and Bakes
(Amazon | FlipKart)

Ingredients:
1 cup regular all purpose flour or maida
8 slices canned pineapple, drained
150gm / 3/4 cup butter at room temperature
3/4 cup demerara sugar
1 tsp baking powder
3 eggs, separated
1 tsp vanilla extract
1 cup powdered sugar, sifted
1/2 cup milk (low fat works too)

How I Made It:

1. Preheat the oven to 190C / 275 F

2. Mix 1/4 cup butter with the demerara sugar and spread it at the bottom of a greased 9" cake pan.

Pineapple Upside Down Cake Recipe

3. Arrange a layer of pineapple slices over it, slicing them to adjust and fill the gaps.

Pineapple Upside Down Cake Recipe

4. Sift the flour and baking powder. Keep aside.

5. Beat the egg yolks in a small bowl and add in the rest of the butter (1/2 cup) and the vanilla essence. Combine until smooth.

6. Whisk the egg whites until soft peaks form. Don't overdo this otherwise the egg whites will turn dry.

Pineapple Upside Down Cake Recipe

7. Fold in the sifted sugar, one tablespoon at a time. Then fold in the egg yolk mixture.

Pineapple Upside Down Cake Recipe

8. And finally the flour mixture, 1/4 cup at a time. Be gentle and only mix until the flour disappears into the batter. Don't over-mix.

Pineapple Upside Down Cake Recipe

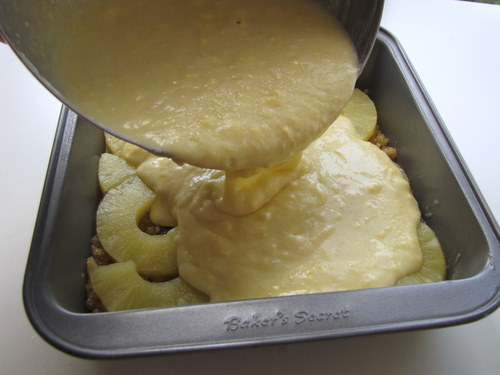
9. Pour the batter over the pineapple slices and bake for about 30-40 mins.
Pineapple Upside Down Cake Recipe

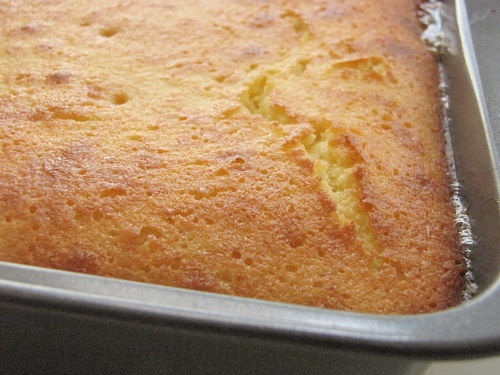
10. Make sure that you test the cake and not go by time because the first time I did that, I ended up under-baking the cake by about 10 mins or so. This one below is done perfectly!

Pineapple Upside Down Cake Recipe

The butter-sugar mixture will caramelize and come up a bit at the sides. Its yum!
Pineapple Upside Down Cake Recipe

Unfortunately, I don't have a great final picture of the finished cake. I had to pack this in foil and take it for a party so no pics of slices.

Pineapple Upside Down Cake Recipe

Its definitely tasty but I am not satisfied with it. I think pineapple, butter, sugar and flour can make something better - so the search is still on. Leave a comment if you have a great pineapple upside down cake recipe on your site!

Happy Halloween! We ate our pumpkin (and used its carcass as a bowl)!

If you haven't met already, allow me to introduce you to my friend, Autumnal Decadence in a Bowl. And, oh. That bowl? It's a pumpkin.

Hugh Fearnley-Whittingstall / The River Cottage Cookbook's version:

our version:
Pumpkin bowls! Who knew? I haven't had this much fun since I made a volCAKEno. All you need to to do is chop off the top, scoop out the innards (reserve seeds for a forthcoming mini post from Matthew), and fill the empty pumpkin bowls with health food.

Are half and half, butter, and Gruyere considered health food? If not, I may have given bad information a moment ago.

Autumnal decadence achieved! Happy Halloween!

Whole Pumpkin Baked with Cream
Recipe (slightly) adapted from The River Cottage Cookbook

1 medium (1 1/2 to 2 pound) pumpkin or several small ones or squashes (1 per person)
Up to 1 pound Gruyere cheese, shredded (depending on the size of your pumpkin)
Up to 4 cups half and half (again depending on the size of your pumpkin)
Freshly grated nutmeg
Salt and Freshly ground black pepper
3 cloves garlic minced
¼ lb stale bread, torn or cut into chunks
1 tablespoon butter

Slice the top off the pumpkin or squashes three-quarters of the way up and retain; this is your lid. Scoop out all the seeds and surrounding fibers from the pumpkin.

Place the scooped-out pumpkin on a baking tray or in an ovenproof dish (which must have sides to catch any leaking cream - an accident that shouldn't, but can, happen).

Put enough grated Gruyere into the empty cavity of the pumpkin to fill about a third of it, then pour in the half and half until the cavity is two-thirds full.

Add the minced garlic, bread, few gratings of nutmeg, a little salt (about 1/2 teaspoon or more per mini pumpkin) and plenty of black pepper (at least 1/4 teaspoon for mini pumpkins). Throw in a bit of butter and replace the lid, so the pumpkin is whole again.

Place in a fairly hot oven (375°F) and cook for 45 minutes-1 1/4 hours, depending on the size of the pumpkin. Test for doneness by removing the lid and poking at the flesh from the inside. It should be nice and tender.

At this point, the skin may be lightly burnt and the whole thing just beginning to sag a bit. Be wary: when the pumpkin is completely soft and cooked through, there is a real danger of collapse.

The larger the pumpkin, the bigger the danger. Don't panic if it happens. It will look a bit deflated but will still taste delicious.

Serve small squashes individually in bowls, with spoons to scoop out the flesh. Serve the larger pumpkin by scooping plenty of flesh and the creamy, cheesy liquid (the Gruyere comes out in lovely long, messy strings) into warmed soup bowls. Either way, serve piping hot.

Herbs Scissors - A Handy Kitchen Tool

I keep a clean pair of scissors in the kitchen for my herbs. Although I have seen herbs scissors in stores, it has never occurred to me to try them since I just used to think "ah they are just another pair of scissors."

Apparently not.


In Priya's words "Recently I bought this pair during my vacation, in a super market after the vendor's demonstration. Usually I never trust these sorts of gadgets but once I bought these I got hooked to them. It works tremendously well for chopping any sort of herbs, sometime garlic cloves and even onions. Its really very handy and now I cant stop chopping herbs with them!"

Thanks for sending these in Priya! Any converts or users out there?

Where? Super Market Vendor
Price: 10 Euros

Tuesday, October 26, 2010

Konkani Tendli Sukke / Tindora Sukke Recipe

This is inspired by what a Konkani friend brought home one day. Although the dish looked a lot like Kerala Thoran, it tasted very different - sour, spicy and coriander-y. Some basic research online brought up so many recipes for it but I followed the one in Red Chillies.

Tindora Sukke Recipe

Tendli Sukke
Serves 2


Ingredients:
1.5 cups tindora / ivy gourd, cut into thin discs
1 tbsp oil
1/4 tsp mustard seeds
A few curry leaves
1/2 tsp grated jaggery / raw sugar

A small piece of tamarind / 1/4 tsp tamarind paste
Salt to taste

Dry Roast one after the other:
1/2 cup grated coconut
2 tsp coriander seeds / or just use 1tsp powder
1 tsp urad dal
3-4 dry red chillies

How I Made It:

1. Grind together the roasted ingredients with the jaggery, tamarind and salt. Do not add water.

2. Heat oil and add mustard seeds. When they pop, add the tindora pieces. Reduce flame and cook until the tindora is soft and lightly browned - about 5-10 mins. You can add a pinch of turmeric to this if you wish.

3. Next, add the ground masala to the tindora and mix well. Throw in the curry leaves and cook until they come together - another 5 mins. Adjust salt.

Serve warm with rice and any non-coconut based curry.

Monday, October 25, 2010

Camera Lens Mugs

This is freaking me out! But in a nice way :)


The Camera Lens Mug at the Photojojo Store!


Buy the The Camera Lens Mug at the Photojojo Store! Its priced at USD 24, much cheaper than actual lenses ;)

Imagine washing your camera lens like this! *Gulp*

Sunday, October 24, 2010

Andhra Peanut Chutney Recipe

A friend, Indy, has been asking for a Peanut Chutney recipe for ages now. I do make it now and then but its mostly my own version, peanuts often added to give it some texture or when I don't have enough coconut to make a plain coconut chutney. 

Peanut Chutney Recipe

 I wanted to give her the Andhra peanut chutney recipe and I wanted to make it first to see it tasted good enough to share. I took inspiration from both Sailu and Indira but preferred to keep my chutney more dry than watery. The consistency its totally up to you but onto the recipe now. 

Andhra Peanut Chutney Recipe
Serves 2

Ingredients:
1 cup raw, unsalted peanuts
5-6 dry red chillies (adjust to taste)
3 flakes of garlic (or 1/2 tsp garlic paste)
3 shallots, sliced (or use 1 small onion)
A marble-sized piece of tamarind (or 3/4 tsp tamarind paste)
1 tsp oil

For tempering:
1 tsp oil
1/4 tsp mustard seeds
1/4 tsp urad dal / split black gram
1/4 tsp channa dal / Bengal gram
1/4 tsp cumin seeds / jeera
A pinch of hing / asafoetida
A few curry leaves (optional)

How I Made It:

1. Roast the peanuts in a dry skillet until brown and the skin starts to peel off - about 10 mins or so. Once cool, you can rub them between your palms and remove the skin but I kept them on. 

2. Heat 1 tsp oil and roast the shallots/onions, red chillies and garlic. Once they are browned, remove and set aside to cool. 

3. Once the peanuts and the shallot mixture cool completely, grind to a smooth paste with the tamarind (fresh or paste) with about 1 tbsp of water. If you want a watery chutney, soak the tamarind in 1/4 cup water (extract juice, discard pulp) and use this for grinding. Add salt. Remove and set aside in a bowl. 

4. Heat oil for tempering. Add all ingredients under the list and when the mustard seeds pop and the dals turn golden brown, remove from fire and dunk into the ground chutney. Mix well. 

Peanut Chutney Recipe

I served this with rice and vatha kozhambu. If you make the watery version, it goes well with dosa and idli too. 

Erupting VolCAKEno!

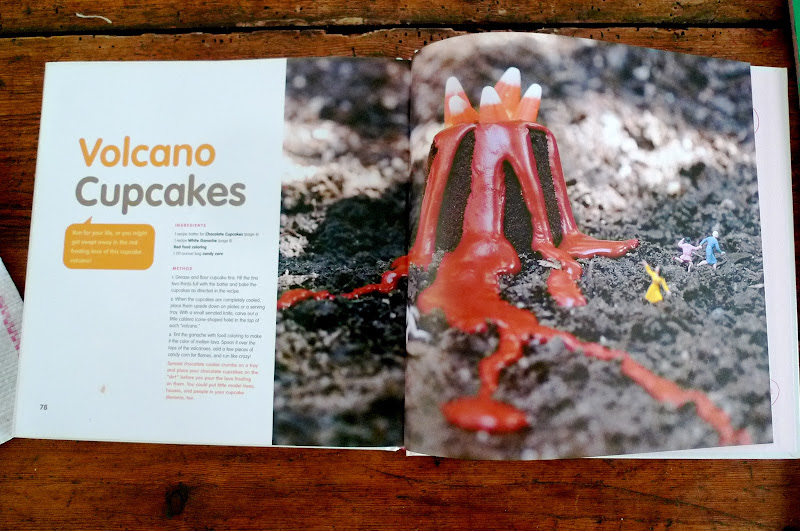
My friend Lauren (from granola project!) wanted to make a birthday cake in the shape of a volcano that actually spewed edible lava for her son Roman's fourth birthday party and asked me if I had any interest in helping her... Uhm, don't ask silly questions.

And so it began. We dove into researching the world of "special effects" cooking. I may have even purchased this. We came up with a plan. I was to make two layers of chocolate cake, a ton of chocolate icing and a bit of white icing (which we would dye red for the spewing lava.) Lauren would make four chocolate cake layers and provide the mise-en-scène. We would meet up the morning of the party, build the volcano cake, and then I would go to work and Lauren would take the cake with her to the party. The plan was rock solid. Nothing could go wrong, right?

(We relied on many different sources for our volCAKEno, so it's impossible to narrow the their version photo to just one.) We used Clare Crespo's Hey There, Cupcake as visual inspiration.
We used the very au courant Special Effects Cookbook for technical and logistical inspiration. And we used Sarah Magid's Organic & Chic for her delicious icing recipes.
from the Special Effects book:
(We also may have used Sir Trader Joe for his cake mix.)

our version:
Lauren's kitchen-project style is so much more relaxed than mine, which equaled more fun, less panic and the freedom to do things like disassemble Roman's easel and paint the flat board part of it to use as a base for the volcano.
 I LOVED it. "You're such a fun Mom!" were my exact words I believe.

We went back and forth on the whole spewing-lava element. The way the Special Effects Cookbook told us to do it involved beating egg whites with sugar until thick, and then adding that to the dry ice moments before the "special effect," but it just seemed a little too fussy/gross/raw egg-whitey. I wanted to fill the little well with Diet Coke and then drop a Mentos in it, the reaction of the two which has almost become its own genre on youtube:

And though very intrigued by this idea, Lauren brought up the point that we didn't want to destroy Roman's birthday cake. Right. Good thinking. In the end, we decided on putting dry ice in the aluminum-foil well, which Lauren would simply douse with a little water for a nice smoking, explosion-less effect. (Did you know Smart and Final sells dry ice? Fact.)

We were nervous about transporting it, but we had pushed four shish kebab skewers into the cake for support and decided to put one of those big blue plastic tubs over it for the car ride. That'll do, right? If it starts to slide a bit, the plastic tub will set it straight. I don't see why not? OK, great. Gottaruntowork!!Goodluck,Lauren!HappyBirthday,Roman!!!Byeee!!

The series of text messages to me looked something like this:
2:32pm: Disaster
2:32pm: Completely fell apart.
2:32pm: Rushing to buy back-up cake now.

However, rumors of dry ice and a volcano cake underneath a plastic tub began to swarm the party. And well, I think these photos speak louder than words at what happened next.
See the smoke? (By the way, thank you to Michael Citrone for all of the amazing party shots.)

The understudy:
Doesn't this perfectly sum up the mind of a stressed parent rushing out to buy a replacement birthday cake moments before the party starts?

Since this all took place two weeks ago, I've had some time to reminisce and some fun comparing the volcakeno to the Titanic, specifically that one line from the movie: "He figures anything big enough to sink the ship they're gonna see in time to turn. The ship's too big with too small a rudder. It doesn't corner worth a damn. Everything he knows is wrong."

None of our research delved into the logistics of driving the cake up to Griffith Park. None of our research mentioned the idea of setting it up in the refrigerator and definitely didn't take into consideration 90+ degrees outside. Should we have thought about these things on our own? Probably. Did we learn a lot for next time? Most definitely. I guess that's why the Special Effects Cookbook left an entire page for notes.
OK, my recipe notes, for real, would be the following:

1. Use 10-inch cake pan or larger for the base and make sure to really trim each additional layer so that you end up with more of a pyramid (and not a tower) by the end.
2. Allow time to set the cake up in the refrigerator before the final icing layer.
3. If transporting cake, consider investing in some of those wooden dowel rods for support.
4. If transporting cake via car, consider not transporting it via car.
5. If your cake layers come out of the oven all dome-like, shave them down so that each layer is nice and flat so as to discourage sliding.
6. If all else fails, distract with Baskin Robbins cake and/or Diet Coke and Mentos demo.

So, Lauren. What's up next?!

Wednesday, October 20, 2010

Hurricane's Grill Darling Harbour, Sydney - Restaurant Review

**Vegetarians may find this post offensive, gross or otherwise a bit over the top so proceed at your own risk and whatever you do, don't look at the second last picture in this post. Thanks**

So, I am in Sydney this week. Although I asked around a fair bit, authentic Australian food is pretty much just steak and burgers and an odd bit of kangaroo meat thrown in here and there. I am not sure if I can try kangaroo meat so me and a 2 colleagues decided to play it safe and try the immensely popular meat and seafood place -  Hurricane's Grill in Darling Harbour, very close to work and our hotel.
IMG_4948

We got bread for the table. A herb roll with oodles of butter thrown in the centre of the slices. It was delicious - easily the best toasted bread I have ever eaten. Damn, TH would have loved this.

IMG_4950

You should know I detest shoving blurry pics to your face but this is the only picture I took of the amazing garlic mushrooms we got as starters. They were mild yet had a peppery kick. There's a whole bed of olive oil and garlic under those babies that practically made them ooze yumminess (and cholesterol maybe but who cares)

IMG_4953

This my friends, is the star of the evening. Grilled Pork Ribs, Hurricane's signature dish. Every single table had a portion of it and my two friends definitely wanted to try it. I had stopped eating pork when I was in my teens and so just ventured to try a small piece of it (only because they oohed and aahed so much). It was definitely awesome, I can tell you that much.

IMG_4956

This was my order. Tiger prawns in garlic butter, served on a bed of rice with a side salad. I ignored the rice, ignored the salad (but of course) and dug right in. Although the exposed head and eyes did make me a bit uncomfortable, it was too delicious for me to care too much.

IMG_4958

The sauces that went with the prawns made it extra delicious. The green stuff is something like pesto but swimming in oil and the gravy in the steel bowl was mind blowing. The red chilli paste was potent and gave the dish a nice kick.

IMG_4962

Finally, the carnage. I did warn you!

IMG_4963

We polished off everything except this last piece of pork rib.

IMG_4965

I kept thinking what a lovely time my bro and sis would've had at this place. Both love pork, and both would have licked their plates and fingers clean. I can never eat good food outside where I live without thinking of family.

Ok so Hurricane's Grill. If you are ever in Sydney and want a good meal, head down there, they definitely won't disappoint.

Website

We got drinks along with the food (we got 2 of that tiger prawns dish, btw) that you see above and the total amount was AUD 141. Considering that outside food in Sydney is not really cheap anywhere, this was just fine for us.

Check our their Bondi beach branch if you are in that area. Darling Harbour is in the CBD area if you don't drop by here, fret not. Bondi beach is the main deal and I hear there are hour-long queues to get in. I would highly recommend booking a table or going at 6:30pm like we did (we still had to wait 15 mins)

A Brief Hiatus

Hey, kids. Vegan Dad here. Just a wee note to tell you that I will be taking a brief hiatus from the blog for the next month. My professional life is extremely busy with three projects on the go right now that need my attention, combined with a full teaching load. I need a few weeks (four, actually) to get everything in order. I will still post links and pics and the like on the Facebook page to keep in contact with you all, but don't expect any new recipes for a while. When I get back I will start gearing up for the holiday season and the New Year with baked goods and savoury dishes aplenty. So, for now, enjoy this pic I snapped at the cottage and I will see you again soon.